Test runs#
Test run represents a planned execution of certain test cases. Test run can be associated with particular attributes, such as milestones and environments, and testing configurations (e.g. browser/platform name and version, etc.) that being combined describe target environment for test case executions.
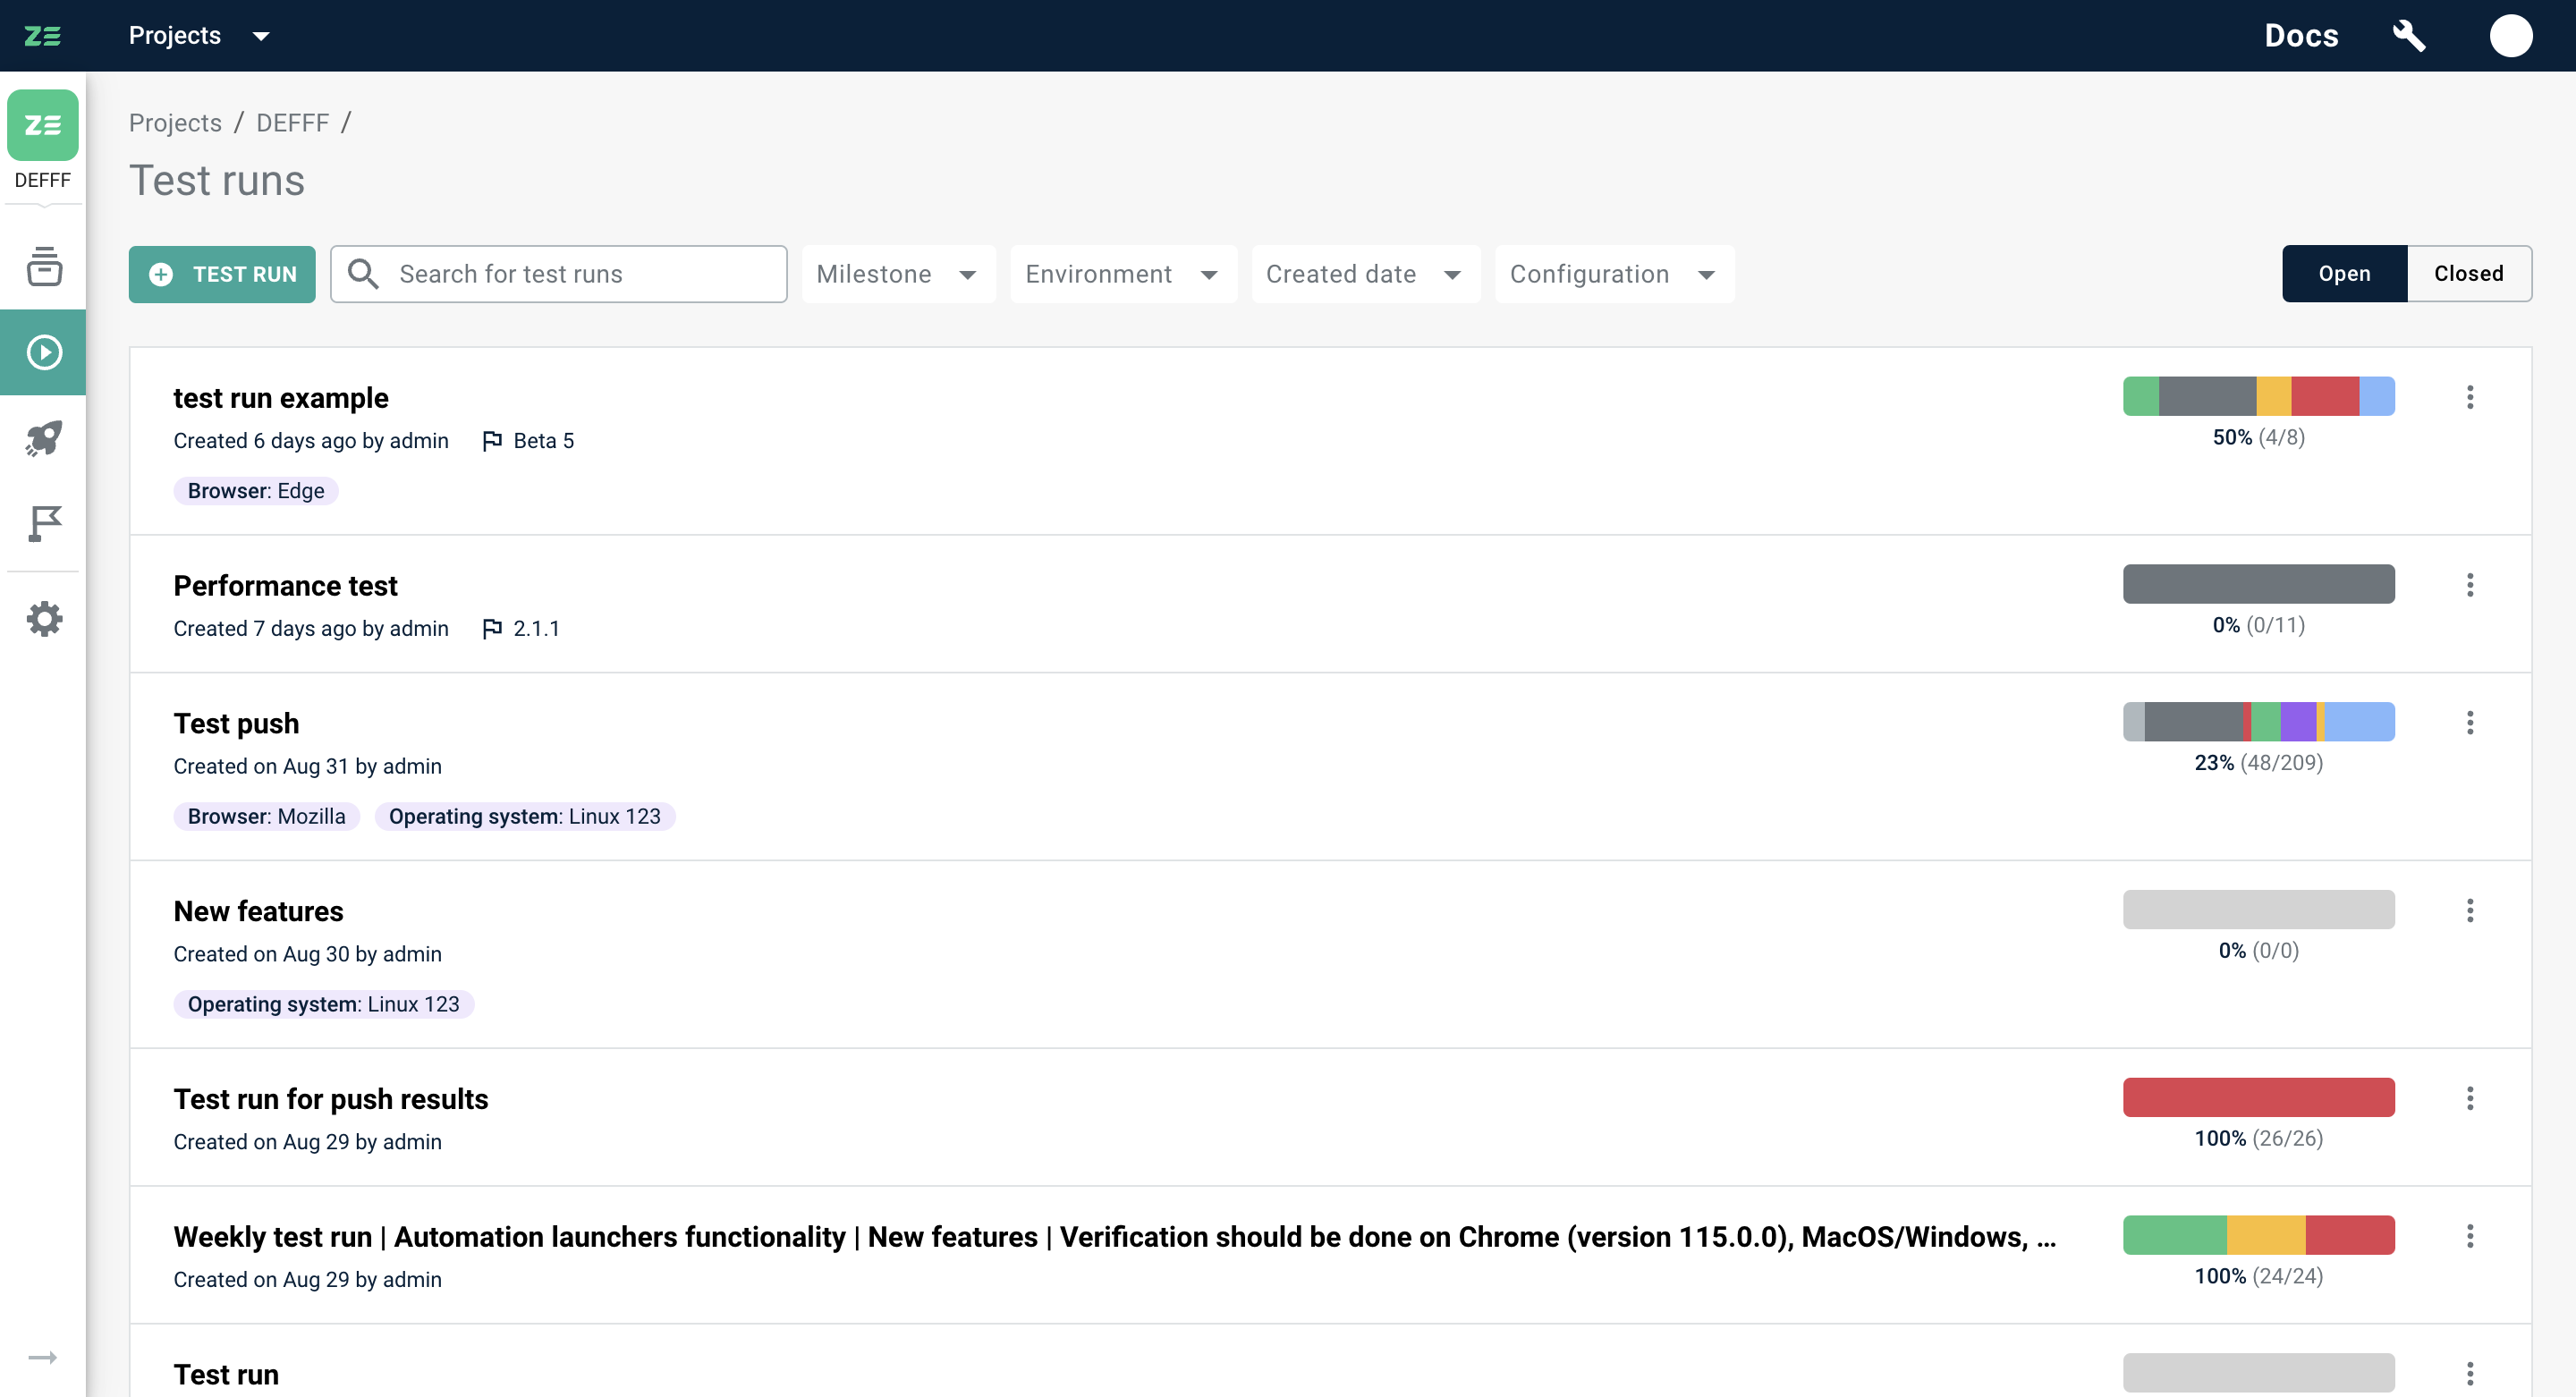
All actions on test runs at Zebrunner can be performed from the Test runs grid. In this section, let’s take a look at the core actions that you can perform there.
Searching and filtering#
Users can search for test runs by entering the query into the corresponding input field on the Test runs grid. You can search using any phrase, word, or symbol from the test run title. Please note that using double quotes is not supported as they are considered special characters.
Note
Search is case-insensitive.
The search query supports two wildcard operators:
?- matches any single character. For example, theste?lquery matches eitherstealorsteelin the title, but notstillorstel. Thest??lquery matchessteal,steelandstill.*- matches zero or more characters, including an empty one. For example, thepr*equery matches all words starting withprand ending withe, such aspre,price,prize,prince,propose.
Below are some of the attributes that can be used for filtering:
- Milestones
- Environment
- Created date
- Configuration
- Open/Closed
How Zebrunner handles searching and filtering under the hood#
Step 1: Zebrunner splits an entered query (if present) by space character into a set of search tokens. The search tokens will be used to search in the test run titles. If you need to search runs by phrase (a few words in specific order), escape the phrase in double-quotes. All the double-quotes in the middle of a resulted token will be omitted.
Step 2: Search tokens (if any) are combined with a logical AND into a single search predicate for the test run title.
Searching and filtering test cases inside test run#
Users can search for test cases by entering the query into the corresponding input field on the Test run page. It's possible to search by phrases from the test case title, individual words or symbols within the test case title, and by the test case key. Please note that using double quotes is not supported as they are considered special characters.
Note
Search is case-insensitive.
The search query supports two wildcard operators:
?- matches any single character. For example, theste?lquery matches eitherstealorsteelin the title, but notstillorstel. Thest??lquery matchessteal,steelandstill.*- matches zero or more characters, including an empty one. For example, thepr*equery matches all words starting withprand ending withe, such aspre,price,prize,prince,propose.
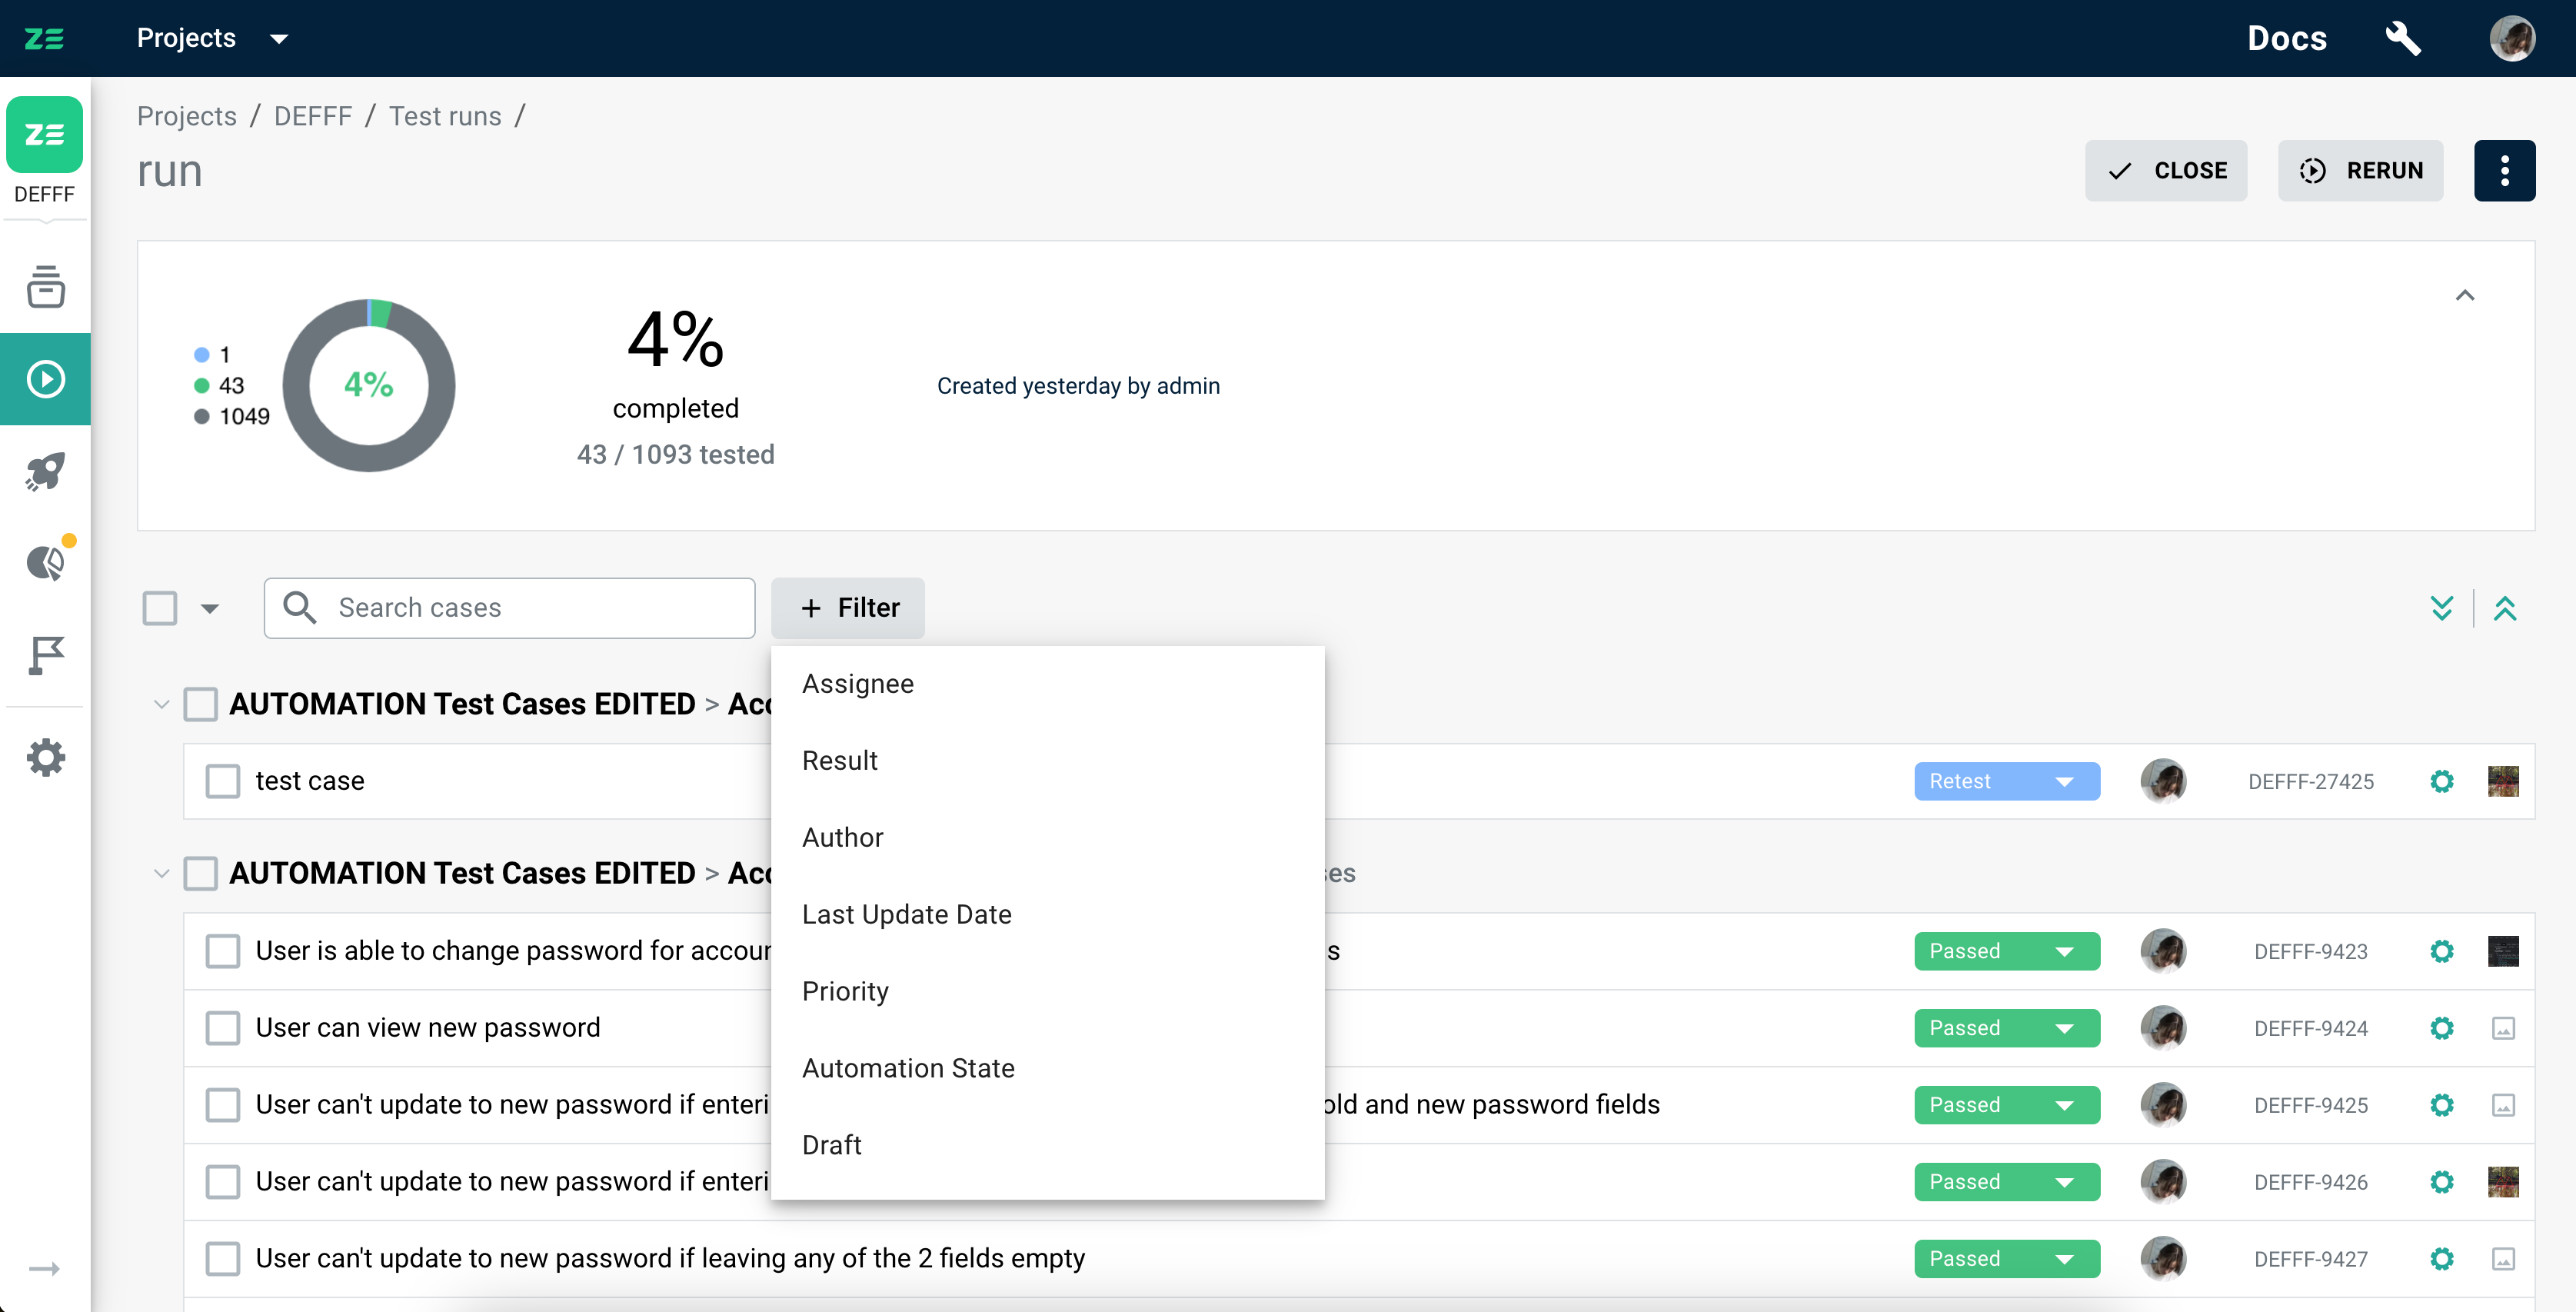
Filtering is supported by assignee and execution result within a test run, by both system and custom test case fields - corresponding controls can be selected by clicking +Add filter button. In addition, a special attribute called “Last update date” allows users to define date ranges for any update made to the test case.
Depending on the filter type, it is possible to apply exact match predicates (combining multiple for the same attribute with a logical OR condition), ranges (in case of dates), substrings (works in the same way as searching but for specific custom field of type String or Text). All the applied filters will be combined with a logical AND.
How Zebrunner handles searching and filtering under the hood
Step 1: Zebrunner splits an entered query (if present) by space character into a set of search tokens. The search tokens will be used to search in the case titles. If you need to search cases by phrase (a few words in specific order), escape the phrase in double-quotes. All the double-quotes in the middle of a resulted token will be omitted.
Step 2: Search tokens (if any) are combined with a logical AND into a single search predicate for the test case title.
Step 3: All search token conforming the test case key format (XXX-123) are translated into a search predicate for the case key. Then they are added to search predicate from Step 2 with a logical OR. In addition, all search token representing integers (e.g. 3174) are considered as part of the case key and are also added to the predicate with a logical OR. At the end of this step we derive the filtering criteria for the search query.
Step 4: All specified filters (if any) are added to the filtering criteria from Step 3 (if any) with a logical AND.
Example 1: Search query is case 431, no filters provided. This will be translated into the following predicate: (title: *case* AND title: *431*) OR key: *-431. As a result, users will receive all test cases containing case and 431 in their title, or the case whose key ends with -431.
Example 2: Search query is API-431 API-572 API-881, no filters provided. This will be translated into the following predicate: (title: *API-431* AND title: *API-572* AND title: *API-881*) OR key: API-431 OR key: API-572 OR key: API-881.
Example 3: Search query is user API-2 572, filter is Priority: Critical. This will be translated into the following predicate: ((title: *user* AND title: *API-2* AND title: *572*) OR key: API-2 OR key: *-572) AND priority: Critical.
Example 4: Search query is "user management", filter is Priority: Critical. This will be translated into the following predicate: title: *user management* AND priority: Critical. As a result, users will receive all critical test cases containing user management in their title.
Creating a test run#
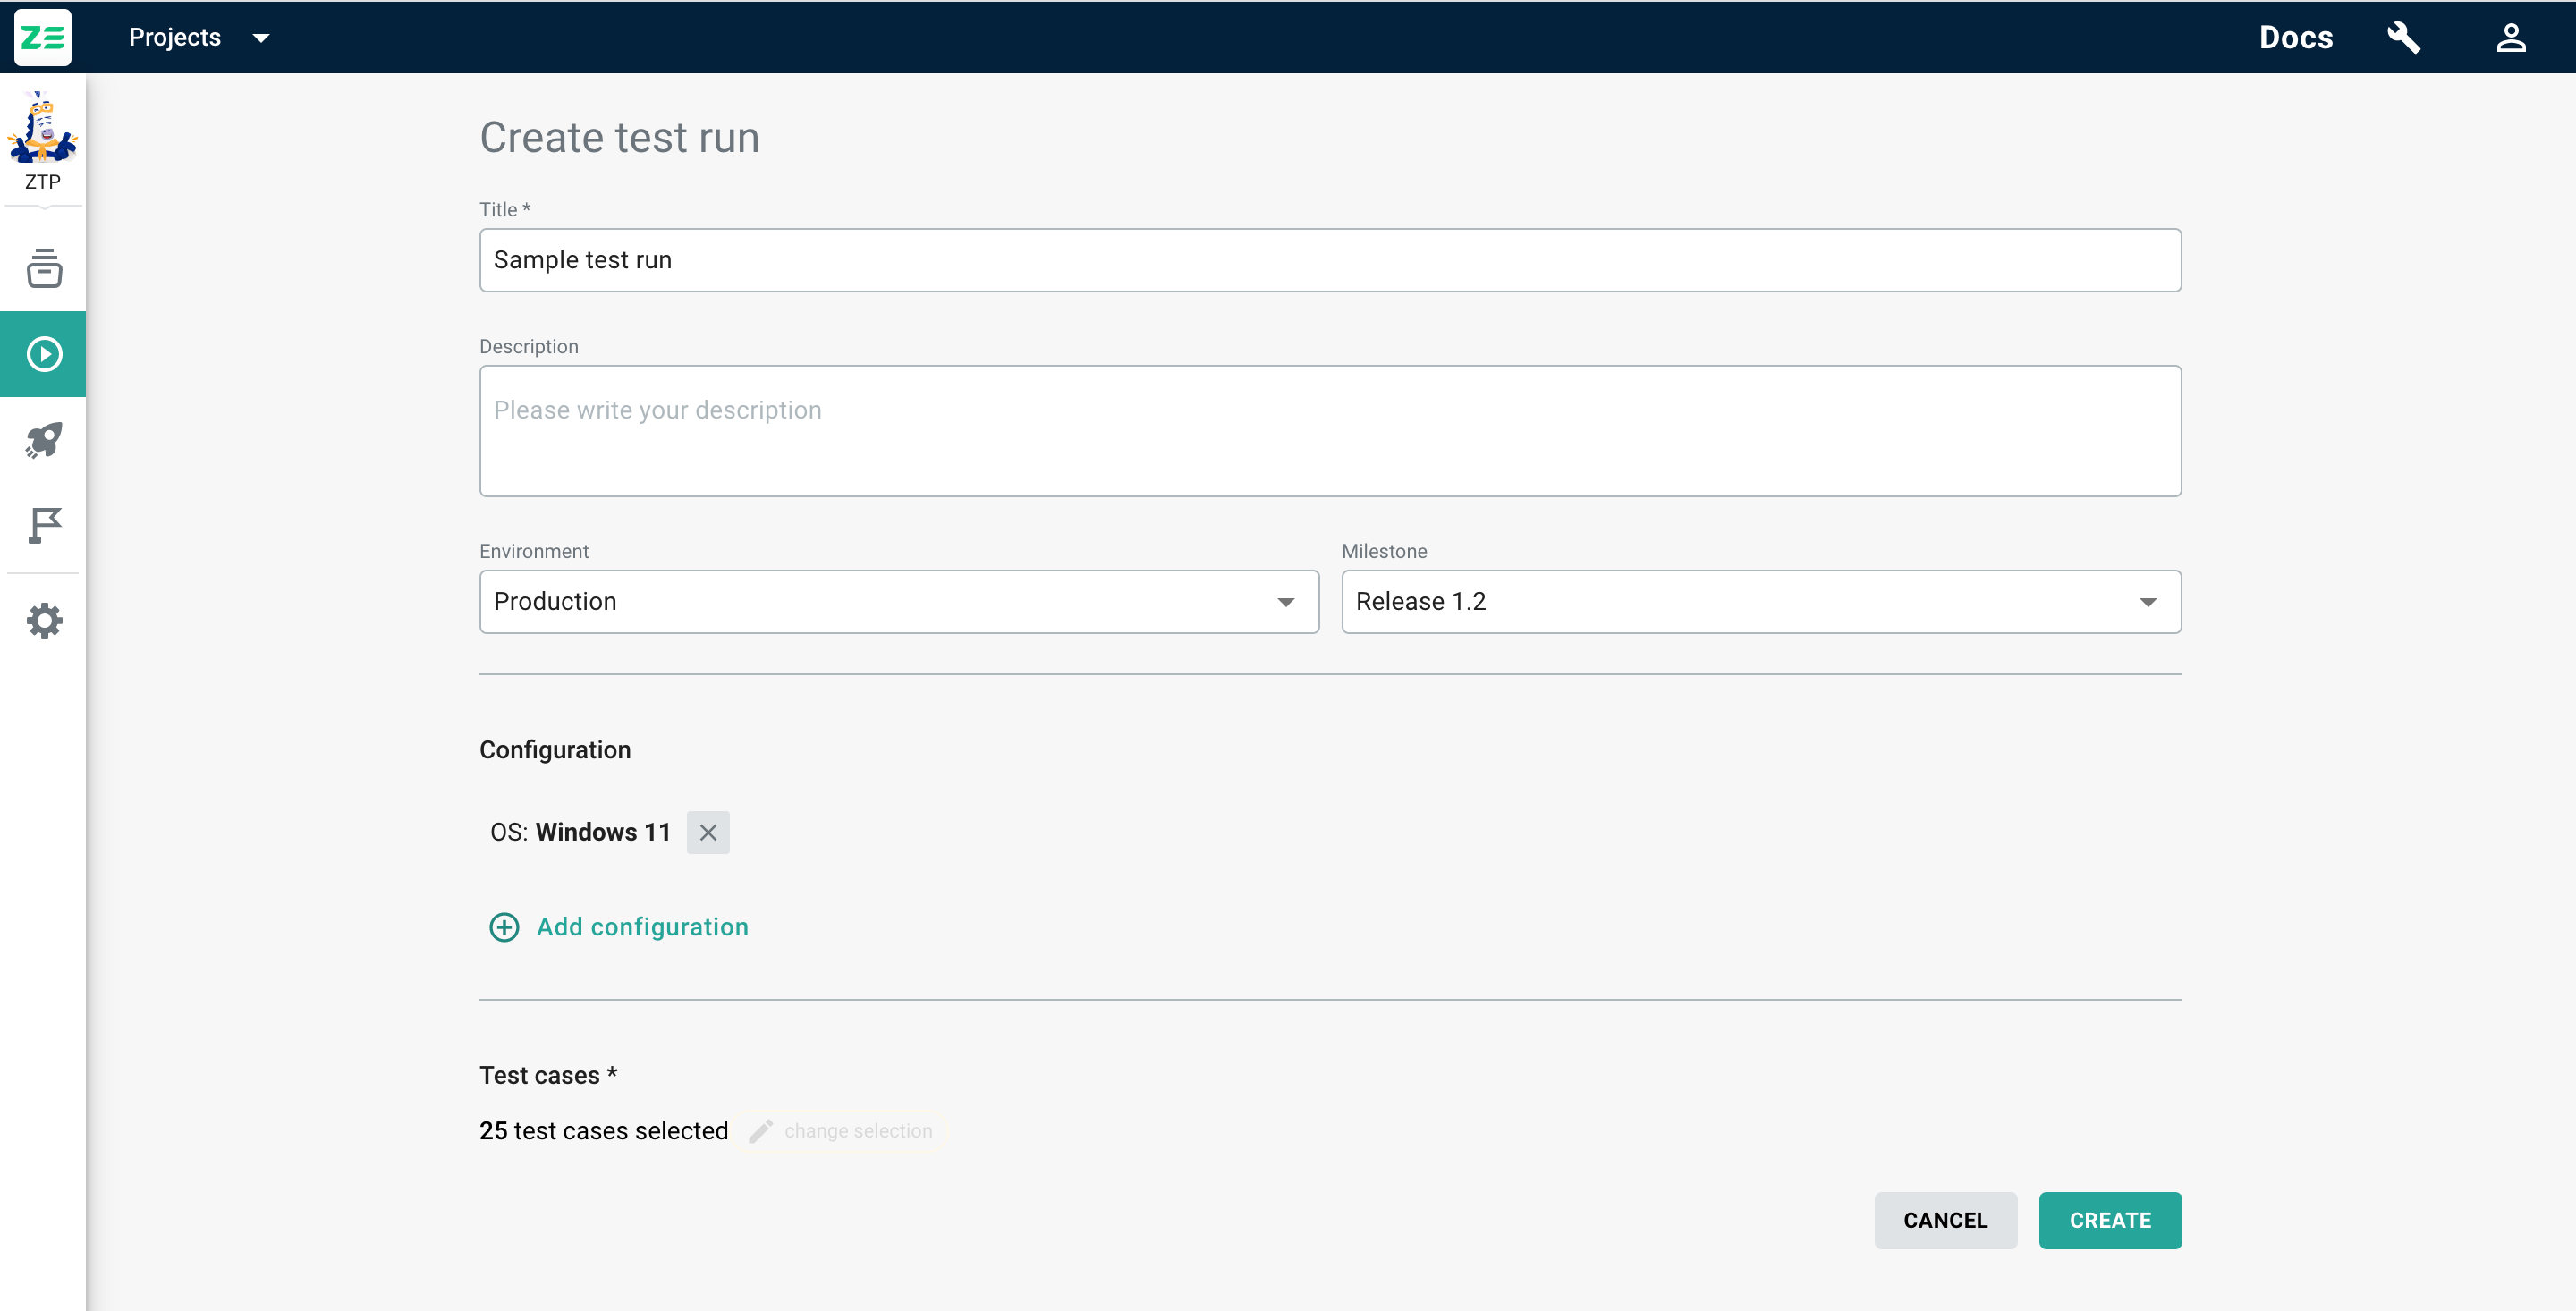
To create a new test run, go to the Test runs grid and perform the following steps:
- Click +Test run
- Enter title and description (if needed)
- (Optional) Specify environment and milestone
- (Optional) Specify testing configuration for the run
- Select test cases
- Click Create
Info
On selection of test cases, you can use all standard searching and filtering capabilities allowing you to narrow down the dataset.
You’ll be redirected to the newly created test run.
Editing test runs#
Info
This action is only available for open test runs and for test runs not included in the test plan.
To edit a test run, go to the test runs grid and perform the following steps:
- Navigate to the test run you’d like to edit
- Click ⋮ at the top-right corner of the page and select Edit
- Apply the necessary changes to the test run
- Click Save
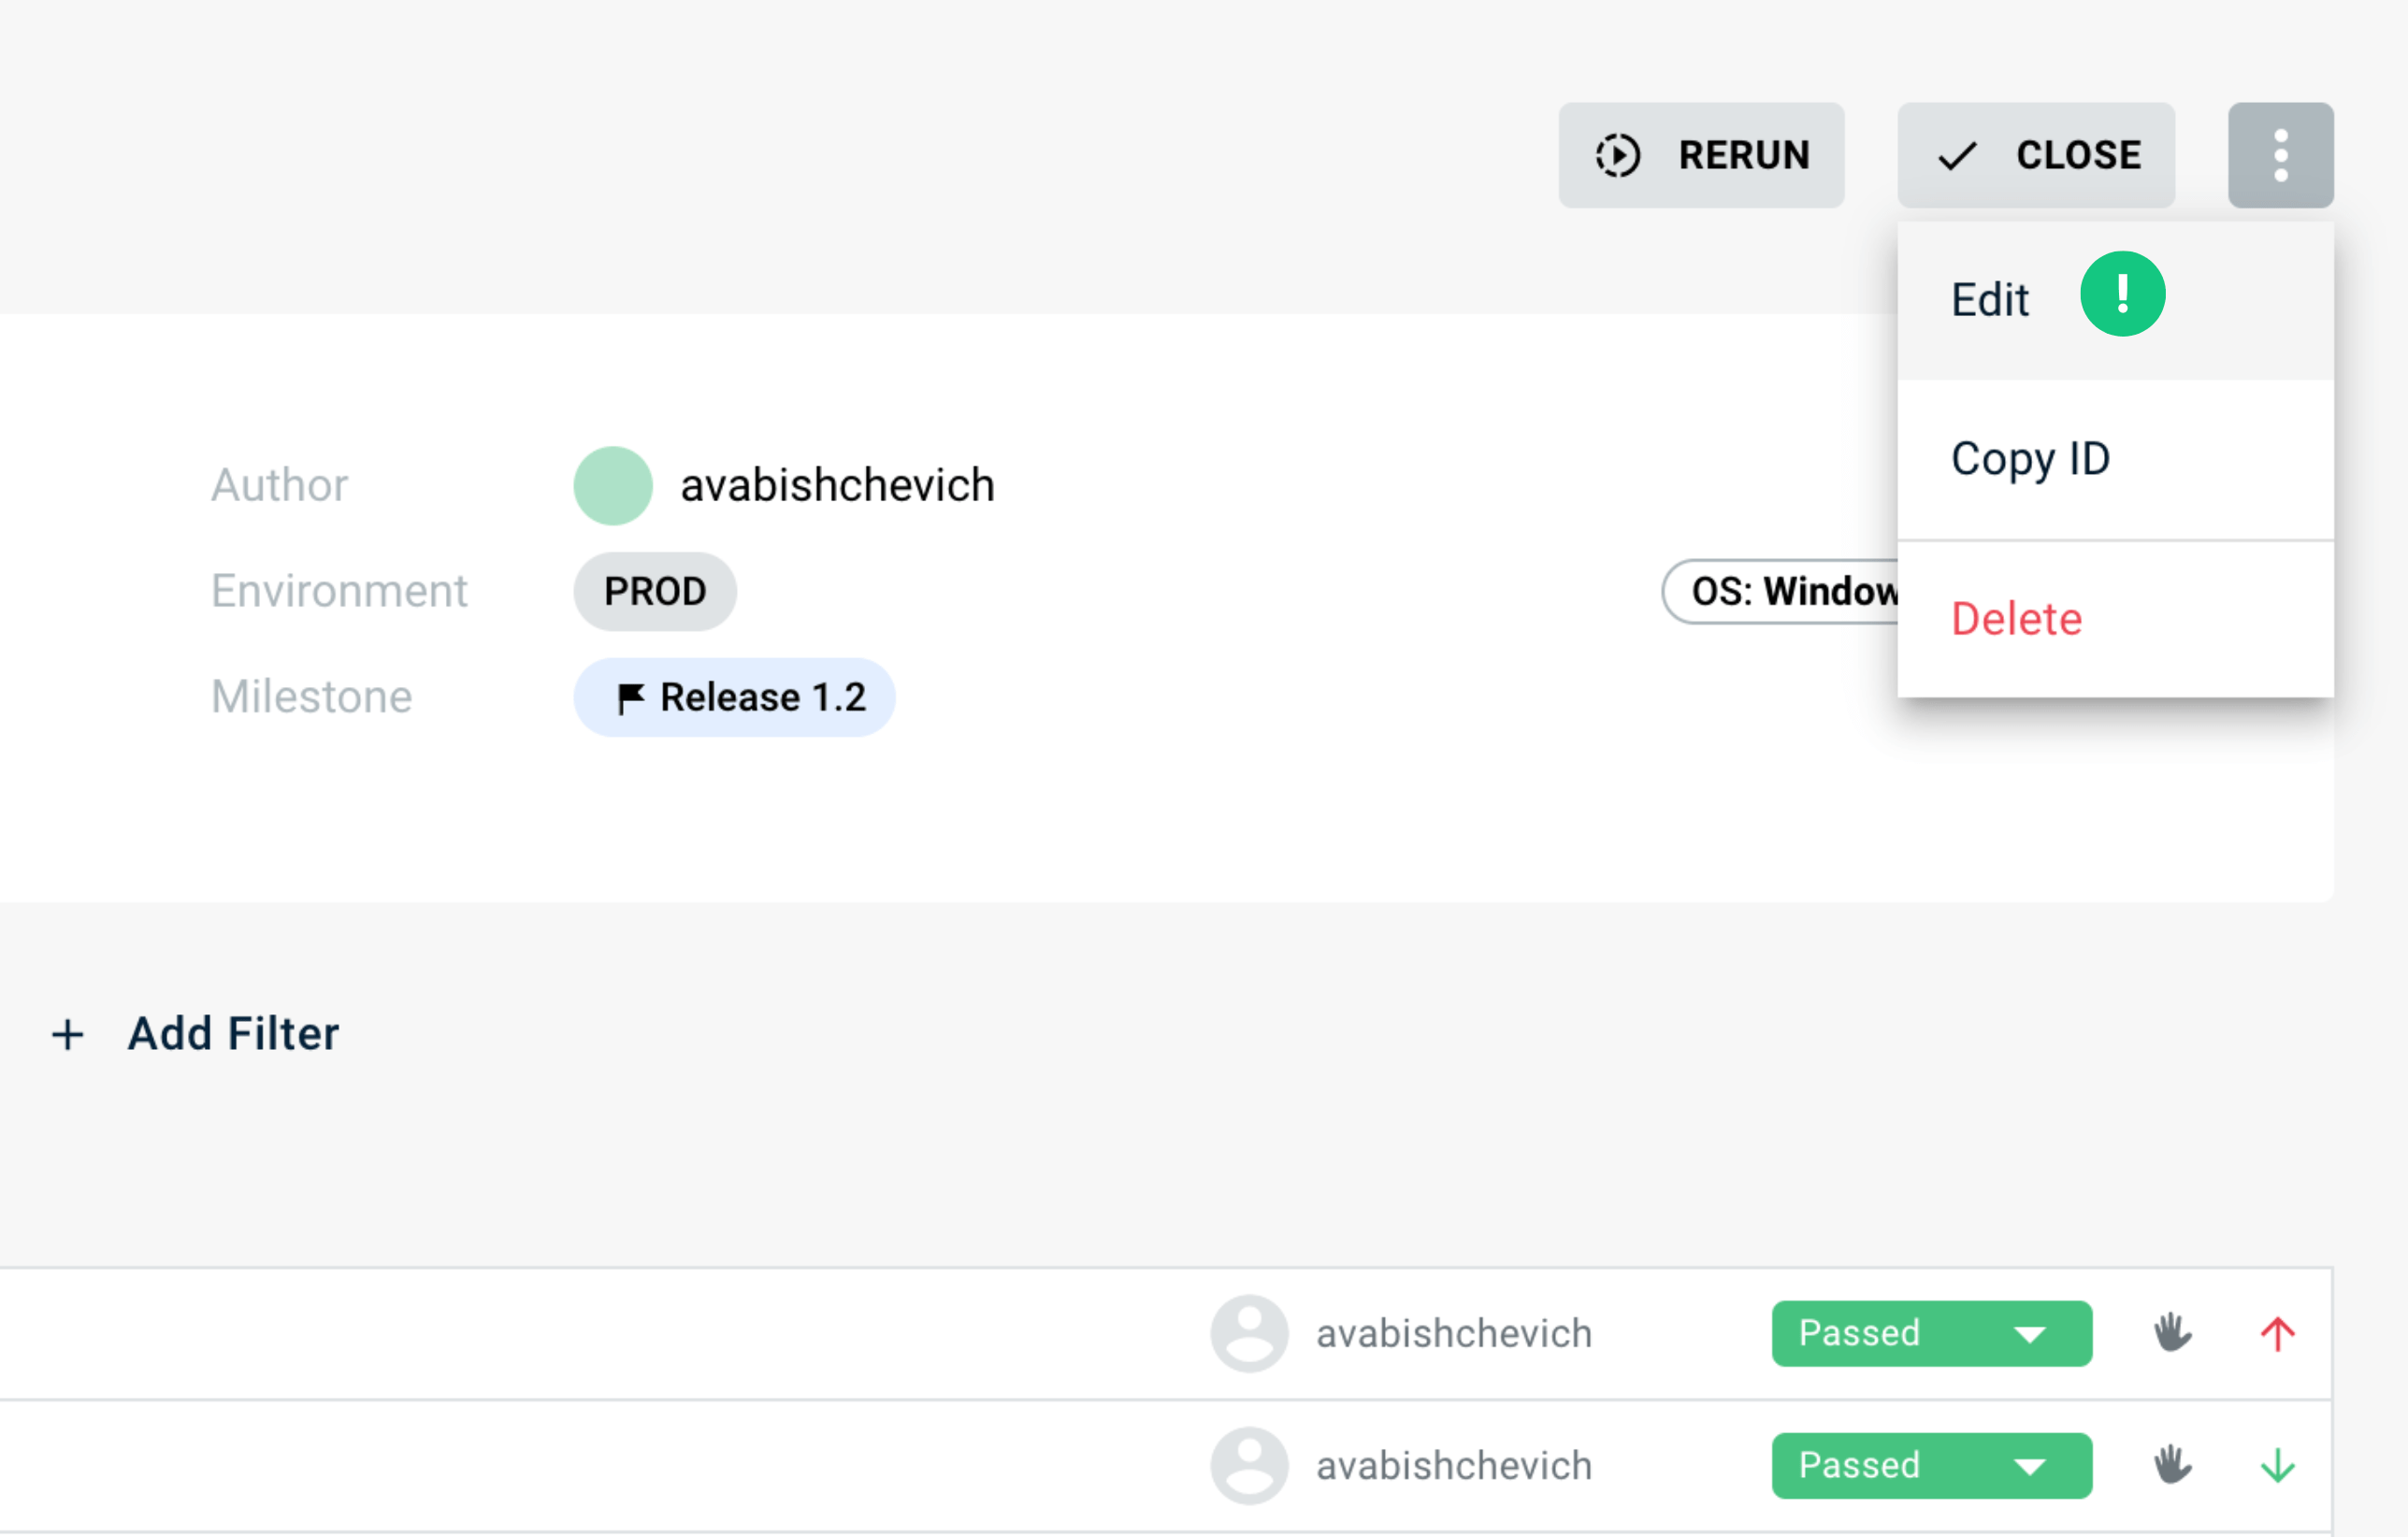
Alternatively, a test run can be edited from the Test runs grid by clicking ⋮ beside the needed test run → Edit.
Assigning test runs to milestone#
Info
This action is only available for open test runs and for test runs not included in the test plan.
To assign a test run to a milestone, follow these steps:
- Navigate to the test run you'd like to assign
- Click ⋮ at the top-right corner of the page and select Assign to Milestone
- Choose the milestone to which you want to assign the test run
- Click Assign
Note
If you want to unassign a test run from a milestone, simply assign the test run to the None milestone.
Alternatively, you can assign a test run from the Test runs grid by clicking ⋮ beside the required test run and selecting Assign to Milestone.
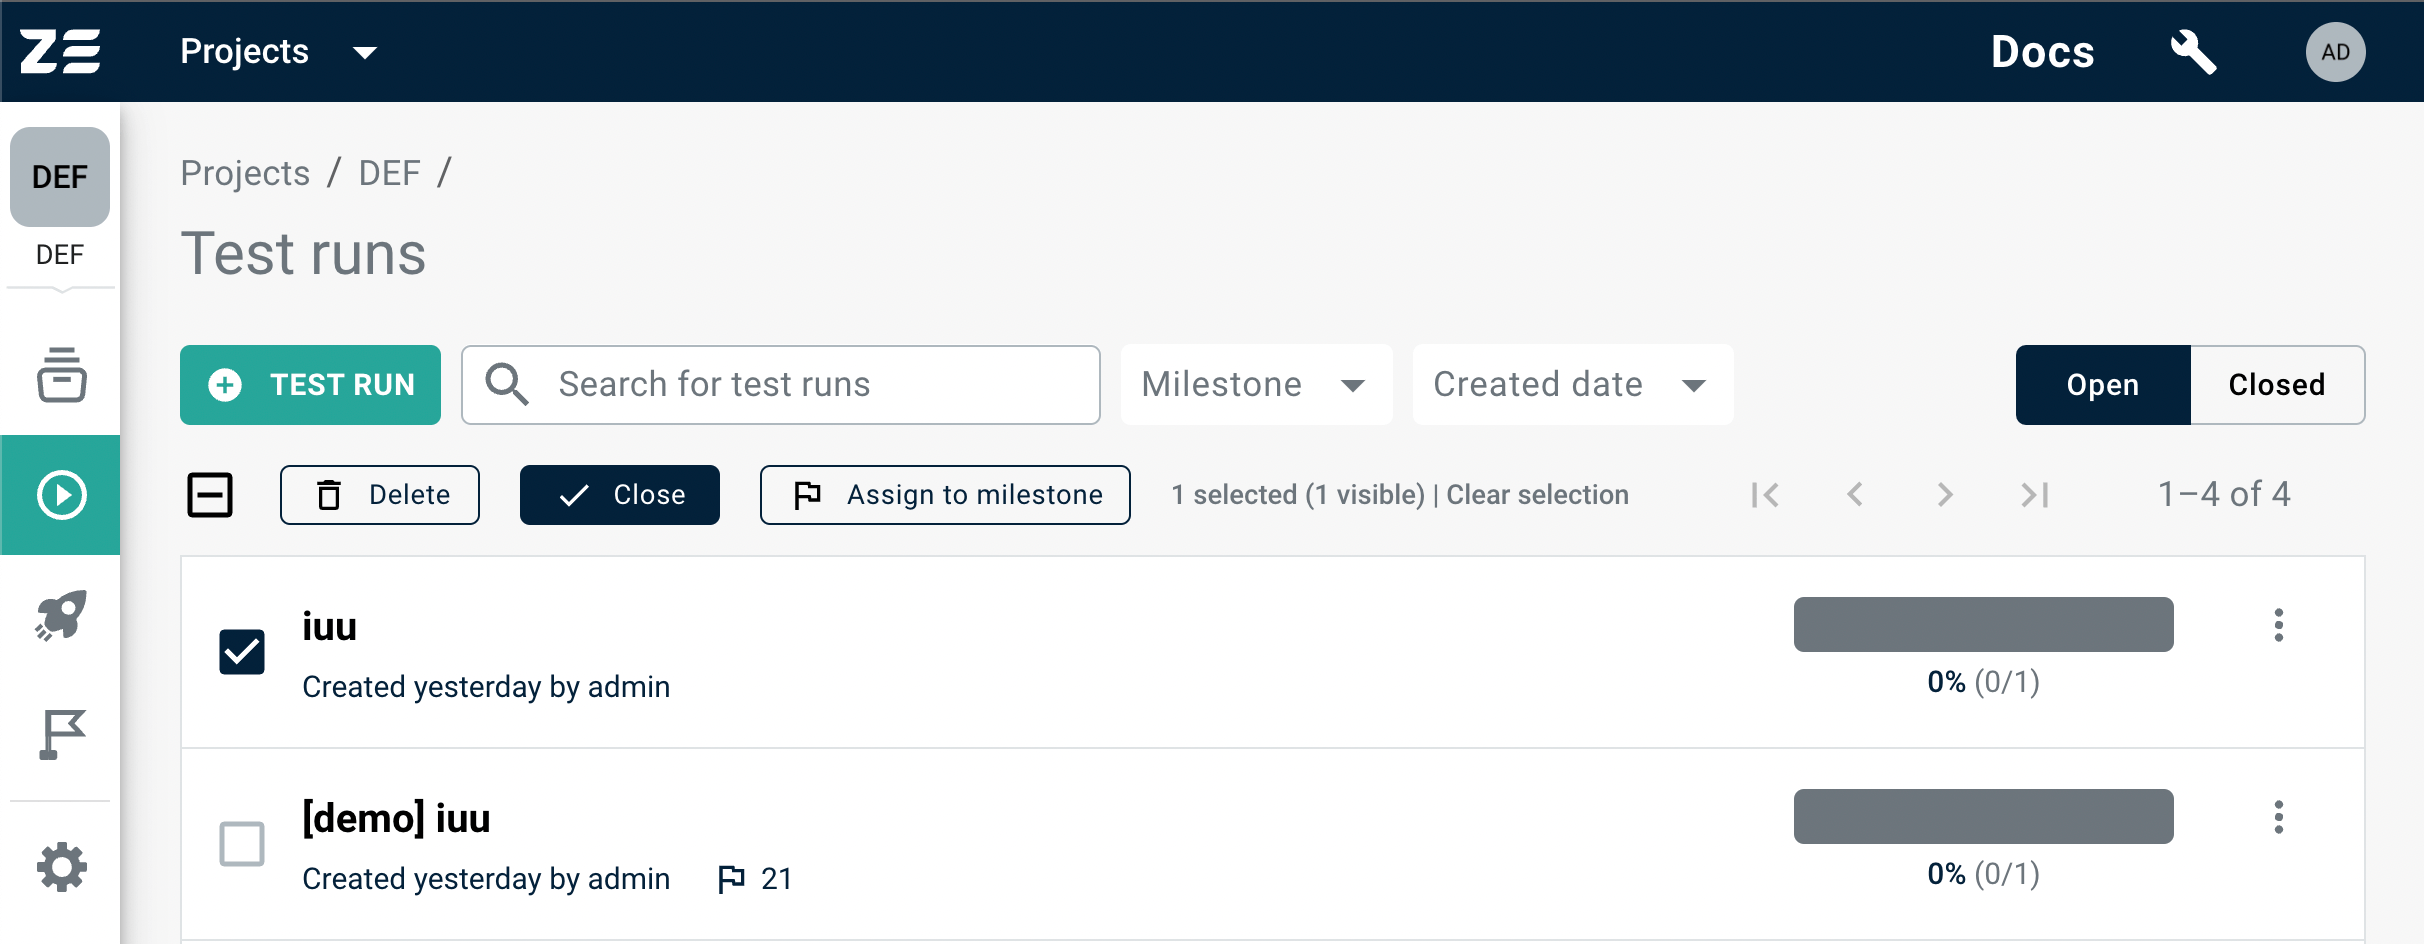
Assigning to milestone in bulk#
If you want to assign test runs to a milestone in bulk, select the test runs using checkboxes. Once you've made your selection, click the Assign to milestone button above the grid and follow the prompts.
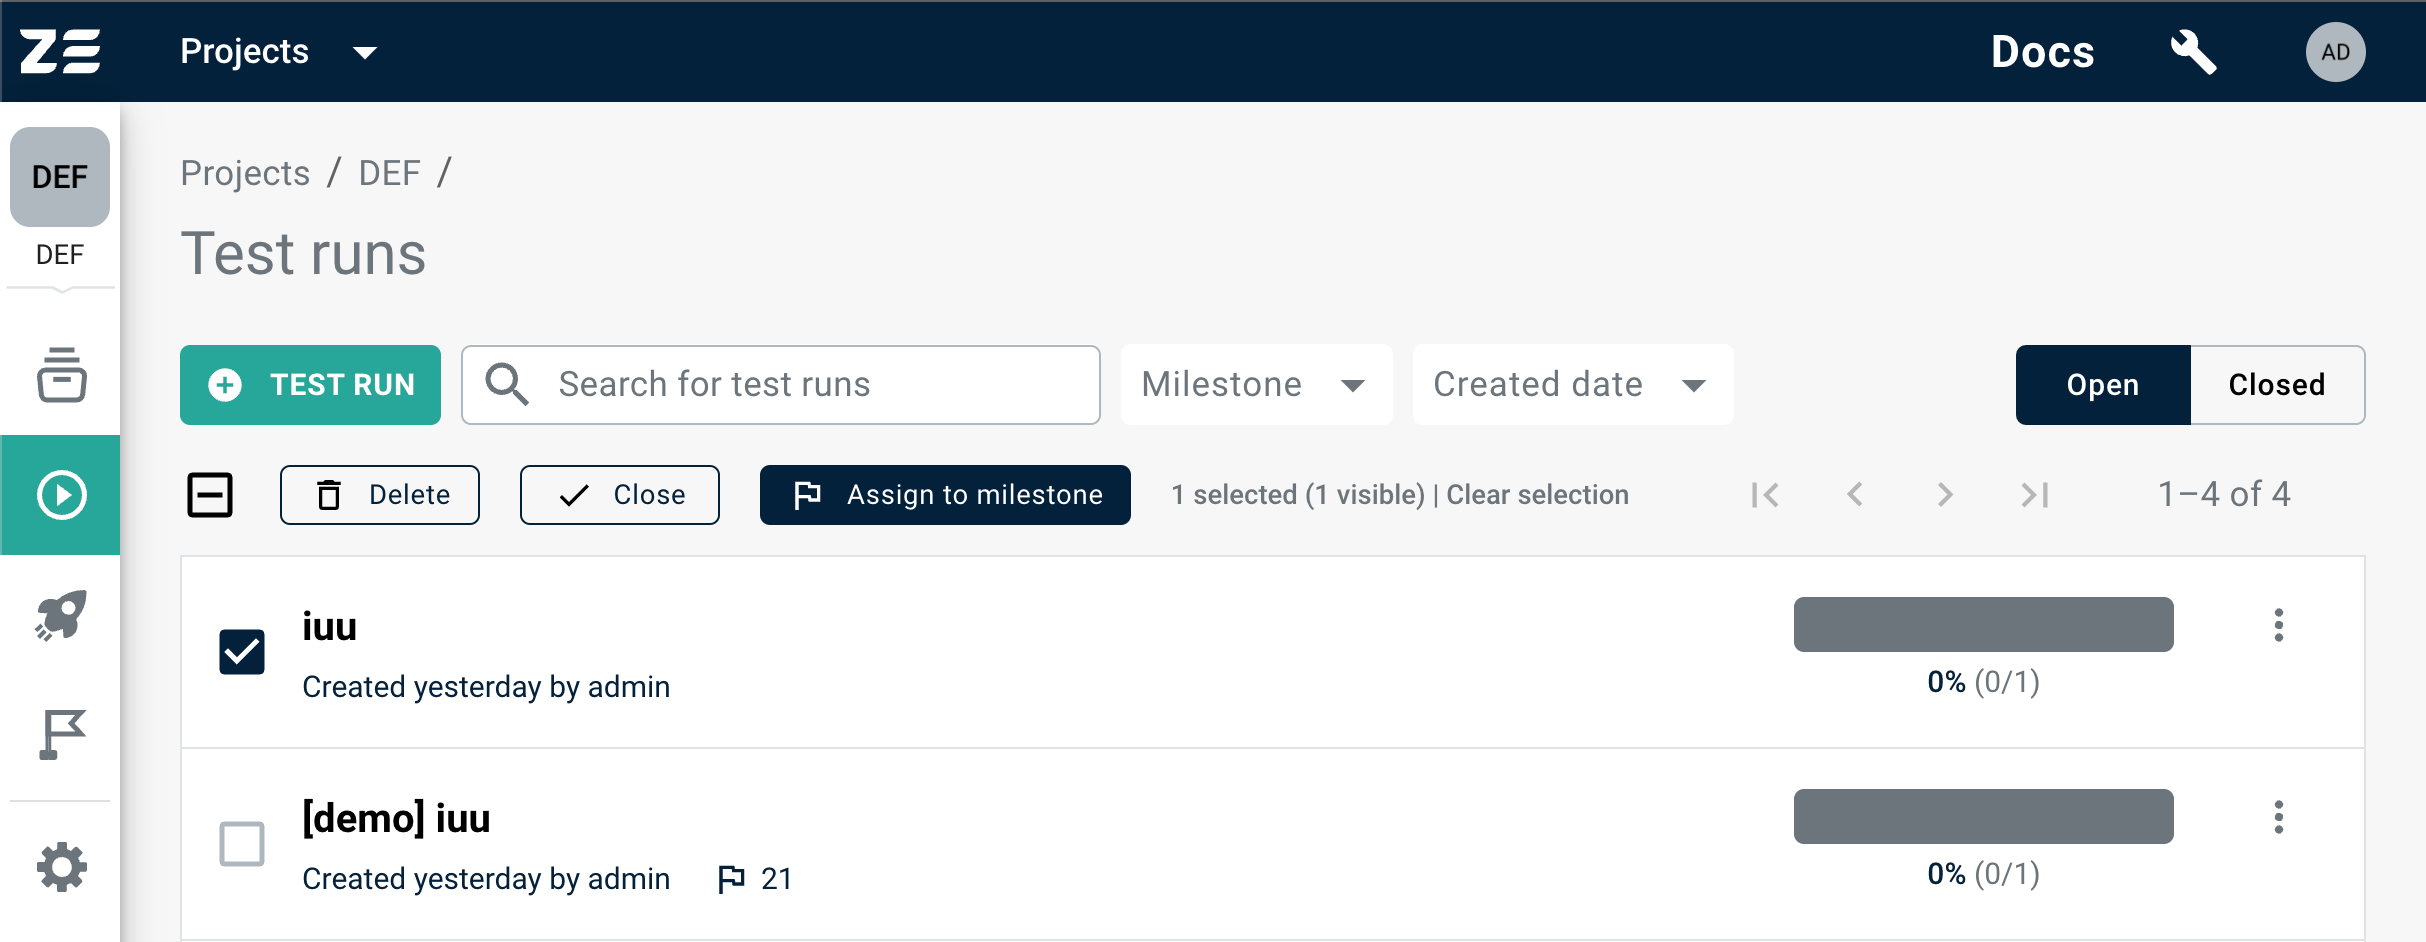
Selecting a range of test runs
Click on the checkbox to the left of the first test run you want to select to initiate the selection. Then, hold down the Shift key and click on the last checkbox to select all test runs in the range between the first and last clicked checkboxes.
Assigning test cases#
Once a test run is created, you may want to distribute the testing efforts between multiple project members.
To assign several test cases to a particular member, go to the Test runs grid and perform the following steps:
- Navigate to the needed test run
- Select the test cases to assign and click the Assign button above the list of cases
- Select project member from the list and click Assign
The test cases in the test run will be updated with the new assignee.
Alternatively, you can add an assignee for every test case individually by clicking the user icon to the right of a test case name (Unassigned by default).
Info
The assignee will be automatically set to a member who submits the result of a test case.
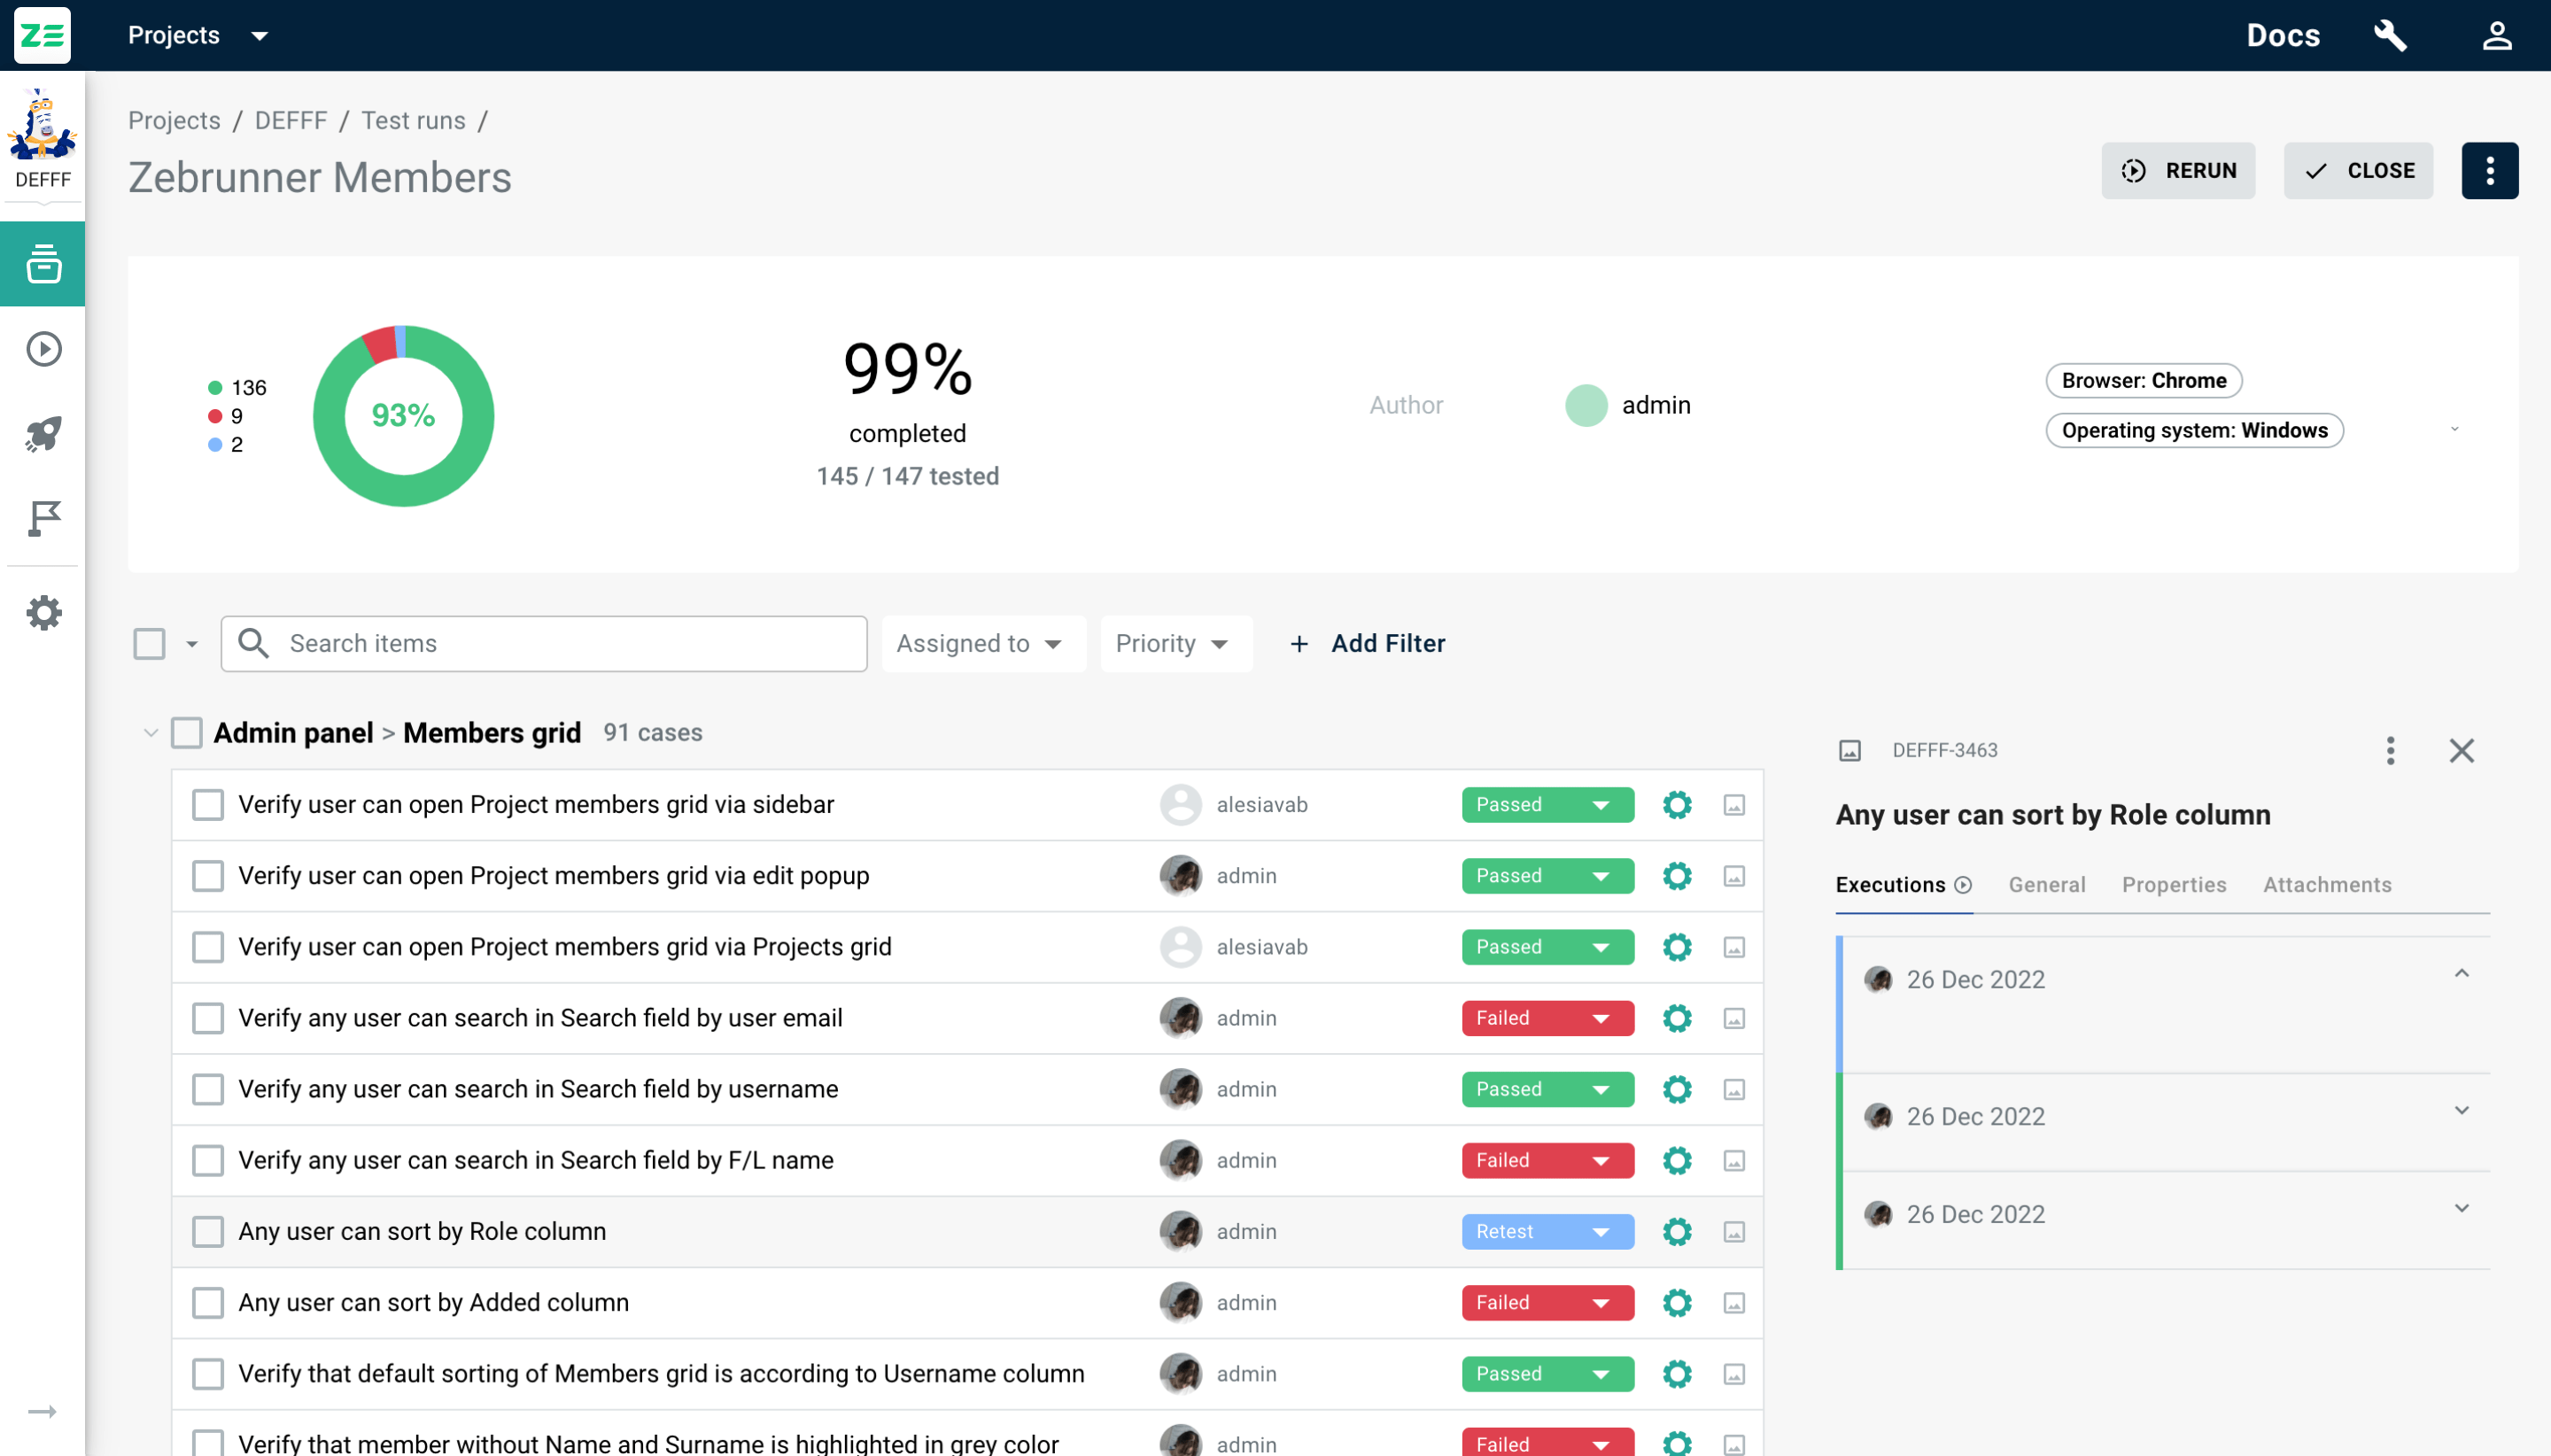
Setting test case execution results#
Zebrunner comes with the following options for test case execution results out of the box:
- Untested
- Passed
- Failed
- Skipped
- Retest
- Blocked
- Invalid
Untested is a default option set to all test cases within a test run. Untested means that there is no result submitted yet. Once you set some result for a case, you can’t revert back to Untested.
To set the result for a test case, go to the test run having it and do the following:
- Click the result dropdown to the right of the test case title (Untested selected by default). Alternatively, you can click the test case title and switch to the modal view, which has the same functionality as the bottom part of the case modal.
- Select the desired result in the dropdown.
-
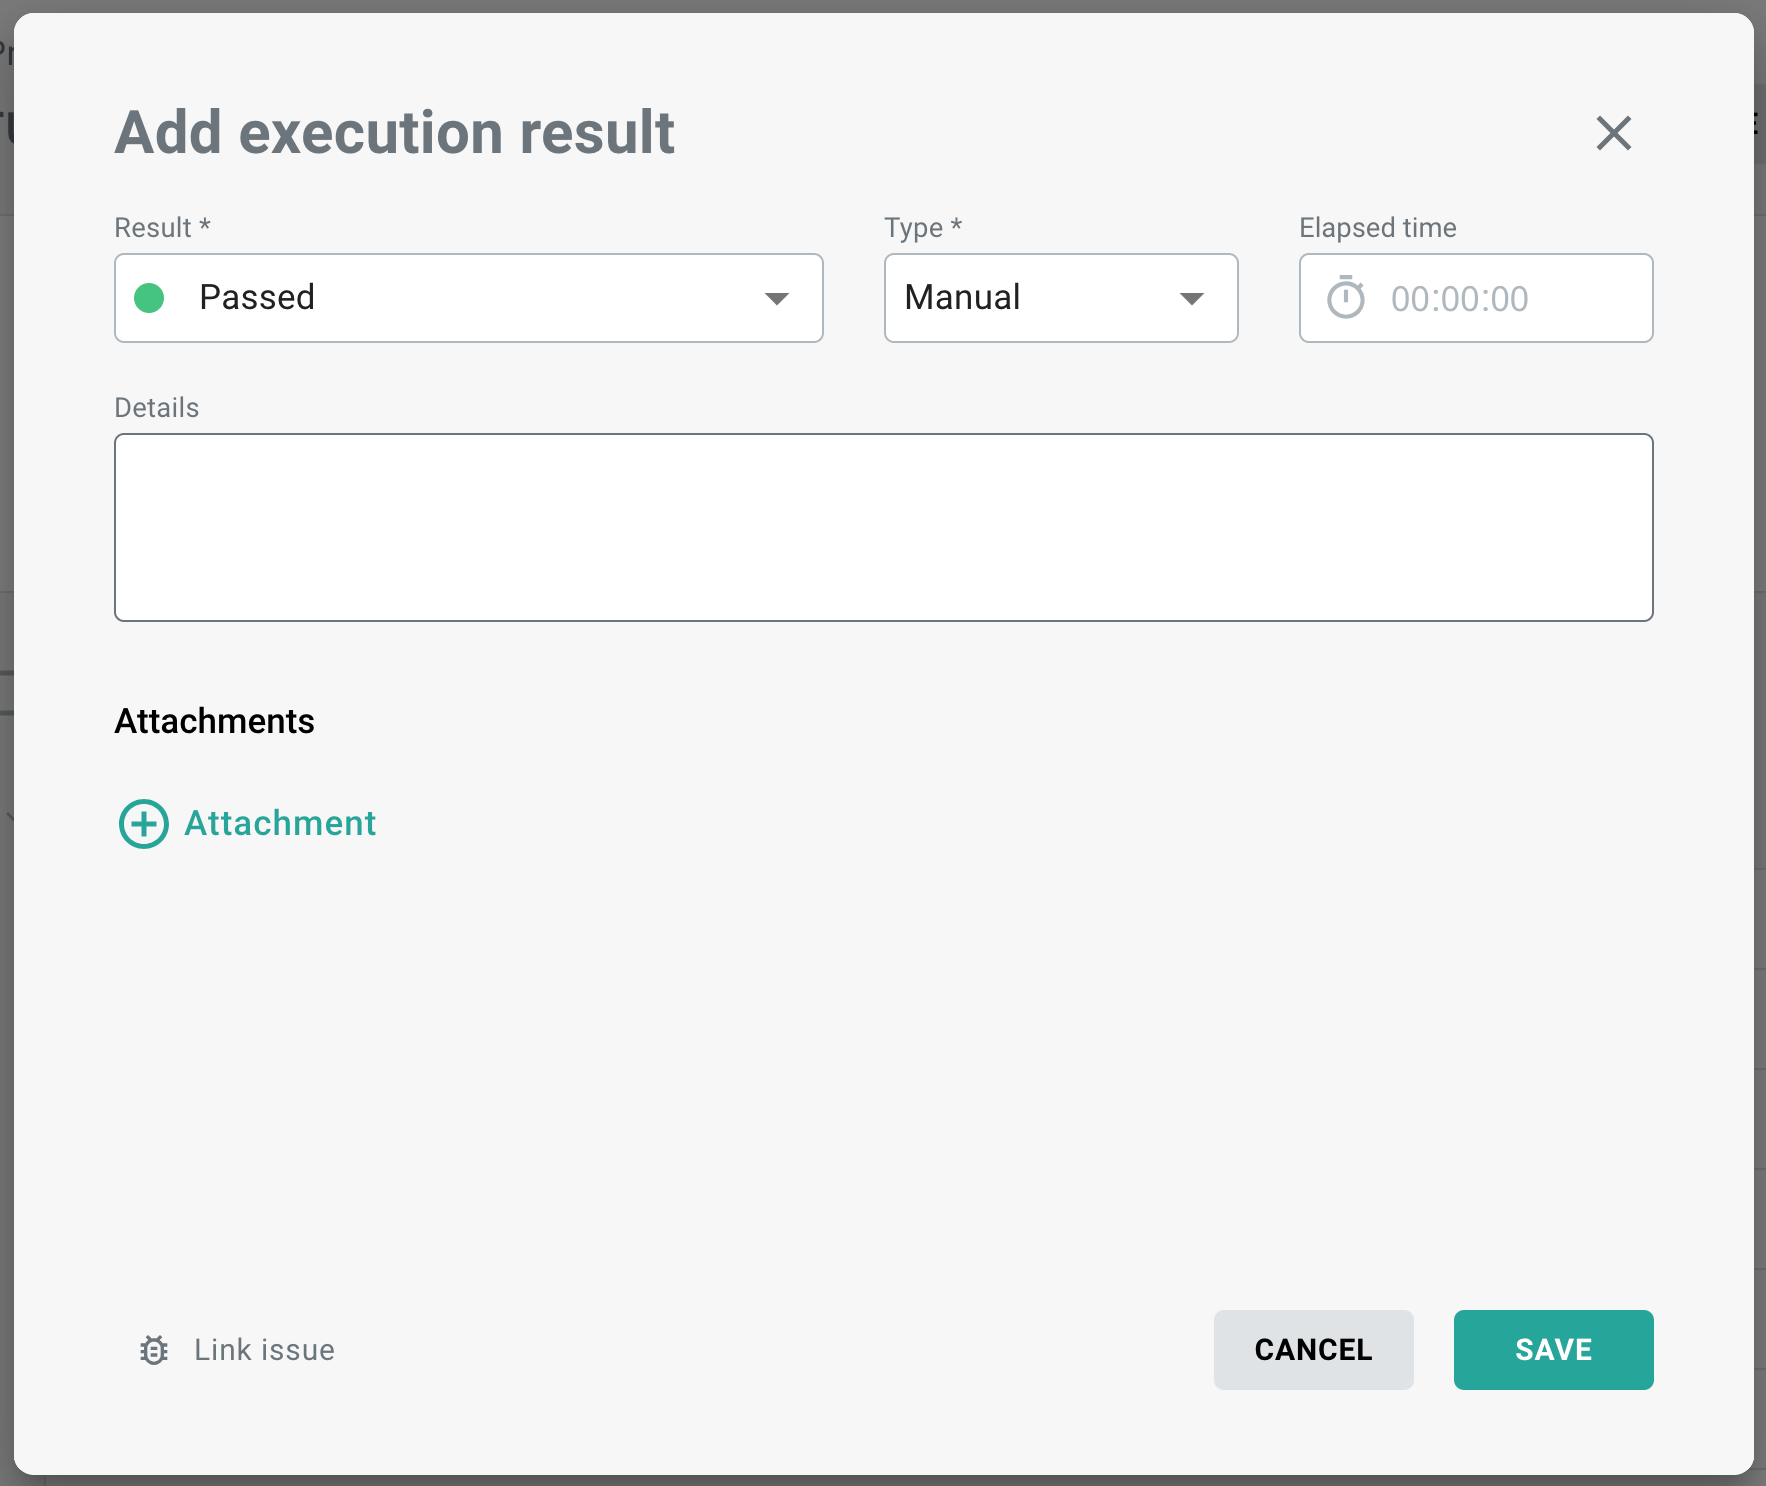
Add details to the result if needed:
- Type - there are two types of execution: "Manual" and "Automated". "Manual" is selected by default
- Elapsed time: the time taken to complete the test case. Elapsed time can be entered manually in the hh:mm:ss format (minimum 00:00:01, maximum 99:59:59). If you leave this field blank (00:00:00), nothing will be added to the execution result. Alternatively, a timer can be used to measure the time needed to complete the test case automatically.
- Details - text information you want to save with execution result (in rich text format)
- Attachments - files you want to add to the execution result (screenshots, video, etc.)
-
(Optional) Link an issue (e.g. from Jira) to this execution (more on Linking issues)
- Click Save
Execution results will be submitted and will appear on the Executions tab (default for test cases within run).
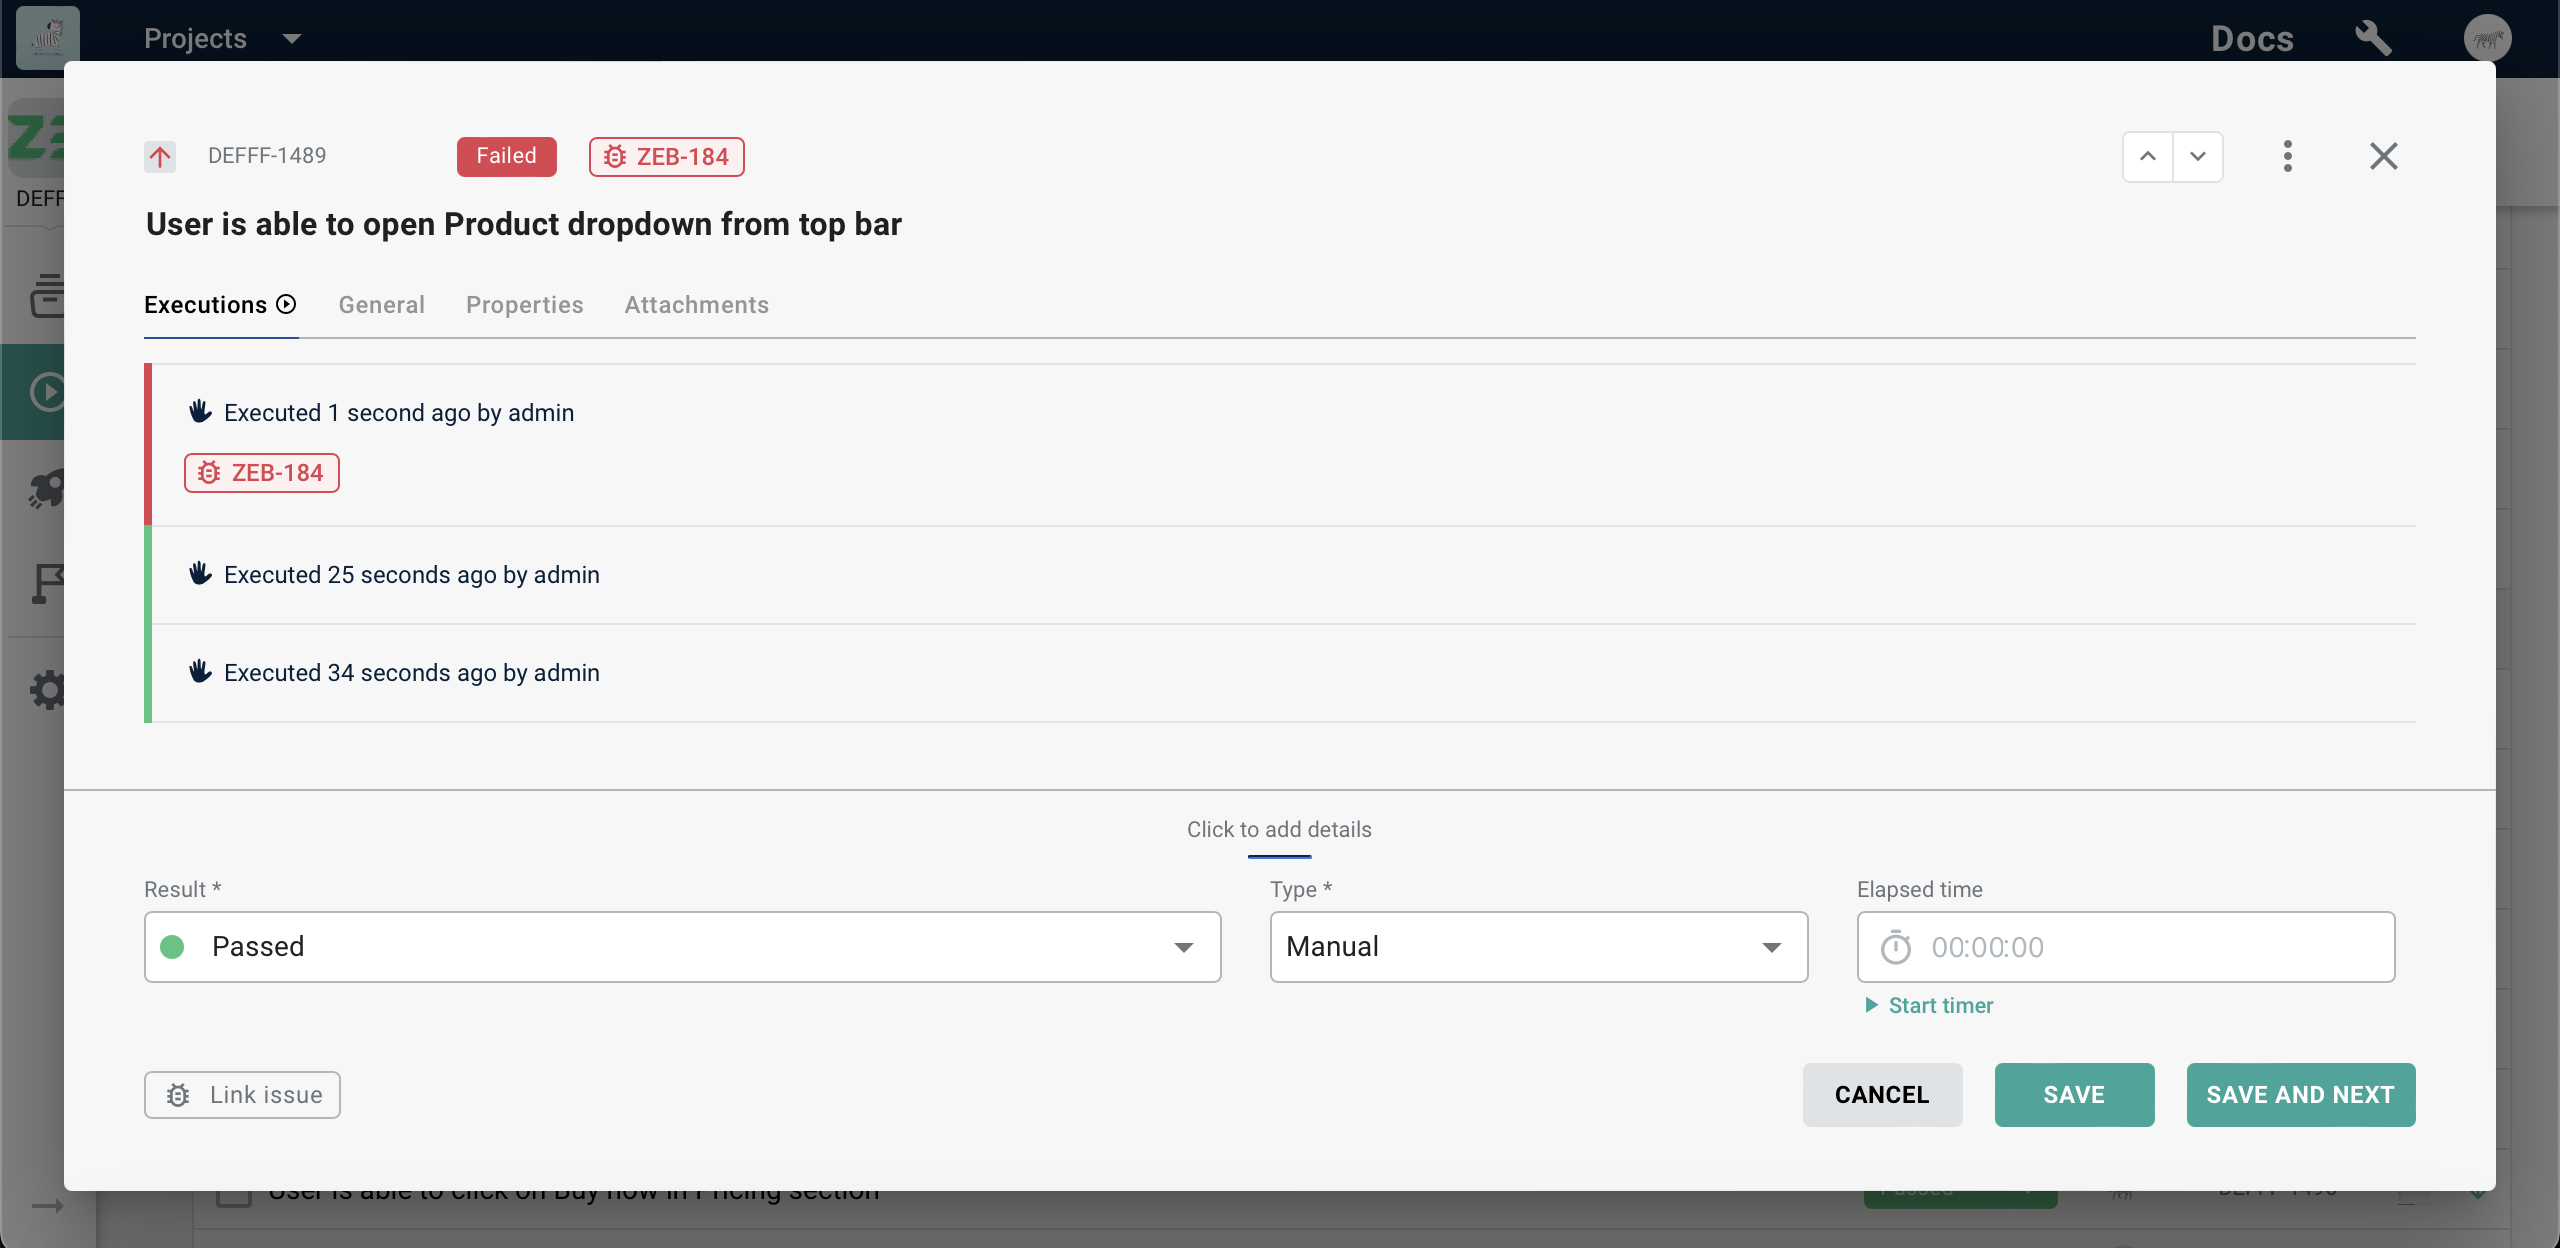
Immutable executions
Please note that all execution results are immutable, meaning that you can’t alter those once submitted. If you update the result, it will appear as the last (top) one on the Executions tab. Test cases grid will always show the result of the latest execution.
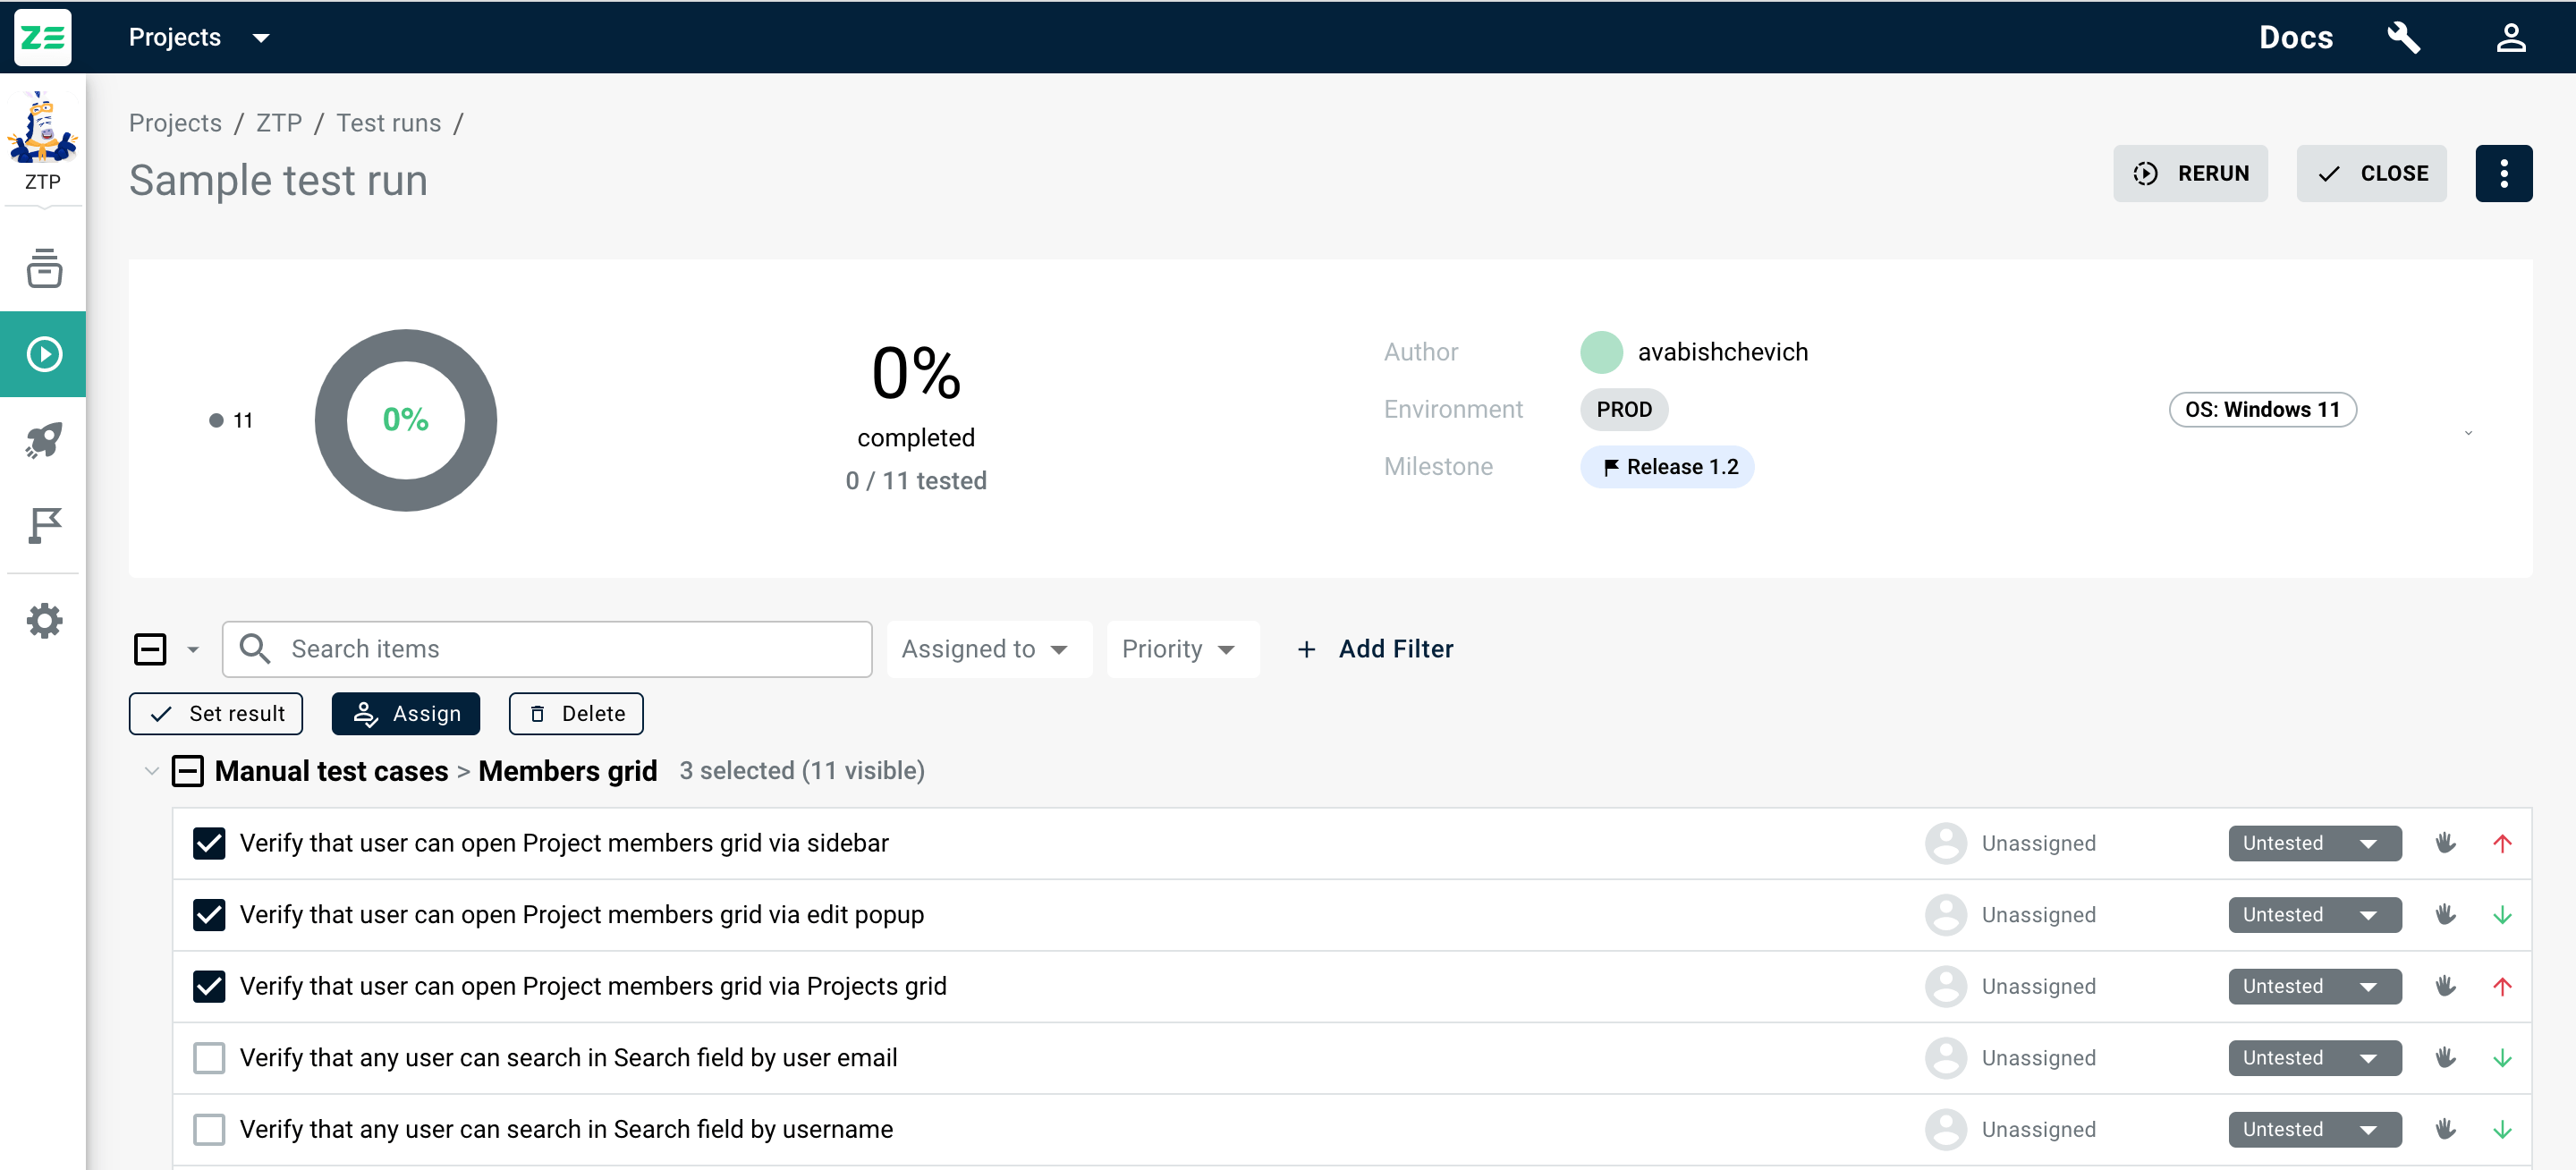
Once you start submitting the results, the summary panel on top of the run view will be updated automatically.
Note
Run completion percentage takes into account test cases having final result submitted (except for Untested, Blocked and Retest).
Alternatively, you can set the result for several test cases at once by selecting them and clicking Set result above the list of test cases. Note that if you submit additional details, issue and/or attachments, they will be copied to every test case execution.
Using timer to measure execution duration#
Zebrunner comes with a built-in timer that can be used once a QA engineer starts executing a test case. The timer can be accessed in the following manners:
- Once the user opens the "Add execution result" modal window.
- Once the user switches to the test case modal view (instead of the sidebar view).
The timer can be used to measure the time taken to complete the test case. It is suggested to start the timer before actually starting the test case execution and stop it once the last step is completed or an issue is detected. To control the timer, users can use the "Start timer" button located under the "Elapsed time" field to enable automatic time measurement. Users can also pause the running timer and reset it with the corresponding buttons or adjust the time manually (you need to stop/pause the timer to do so).
Linking issue to test case execution#
Zebrunner allows you to keep a relation between test case execution results and issues (defects) for the sake of traceability. It is possible to either link existing issues from 3rd party systems or create new ones (currently available for Jira only) directly from Zebrunner UI and link them automatically.
Info
This functionality requires corresponding systems to be configured and enabled in project integrations sections (more on this in the Integrations guide).
Link an existing issue#
To link an issue to a test case execution, go to the test run containing it, and perform the following:
- Open the Set result dialogue
- Click Link issue at the bottom of the dialogue
- Select defect tracking system from the dropdown (if you have multiple configured and enabled)
- Search for the issue you want to link
- Choose the issue from search results and click Link
Issue will be linked to the result and issue label will appear on UI (both in the grid and in the Executions tab). Clicking on the label will take you to the issue page/view in the corresponding system.
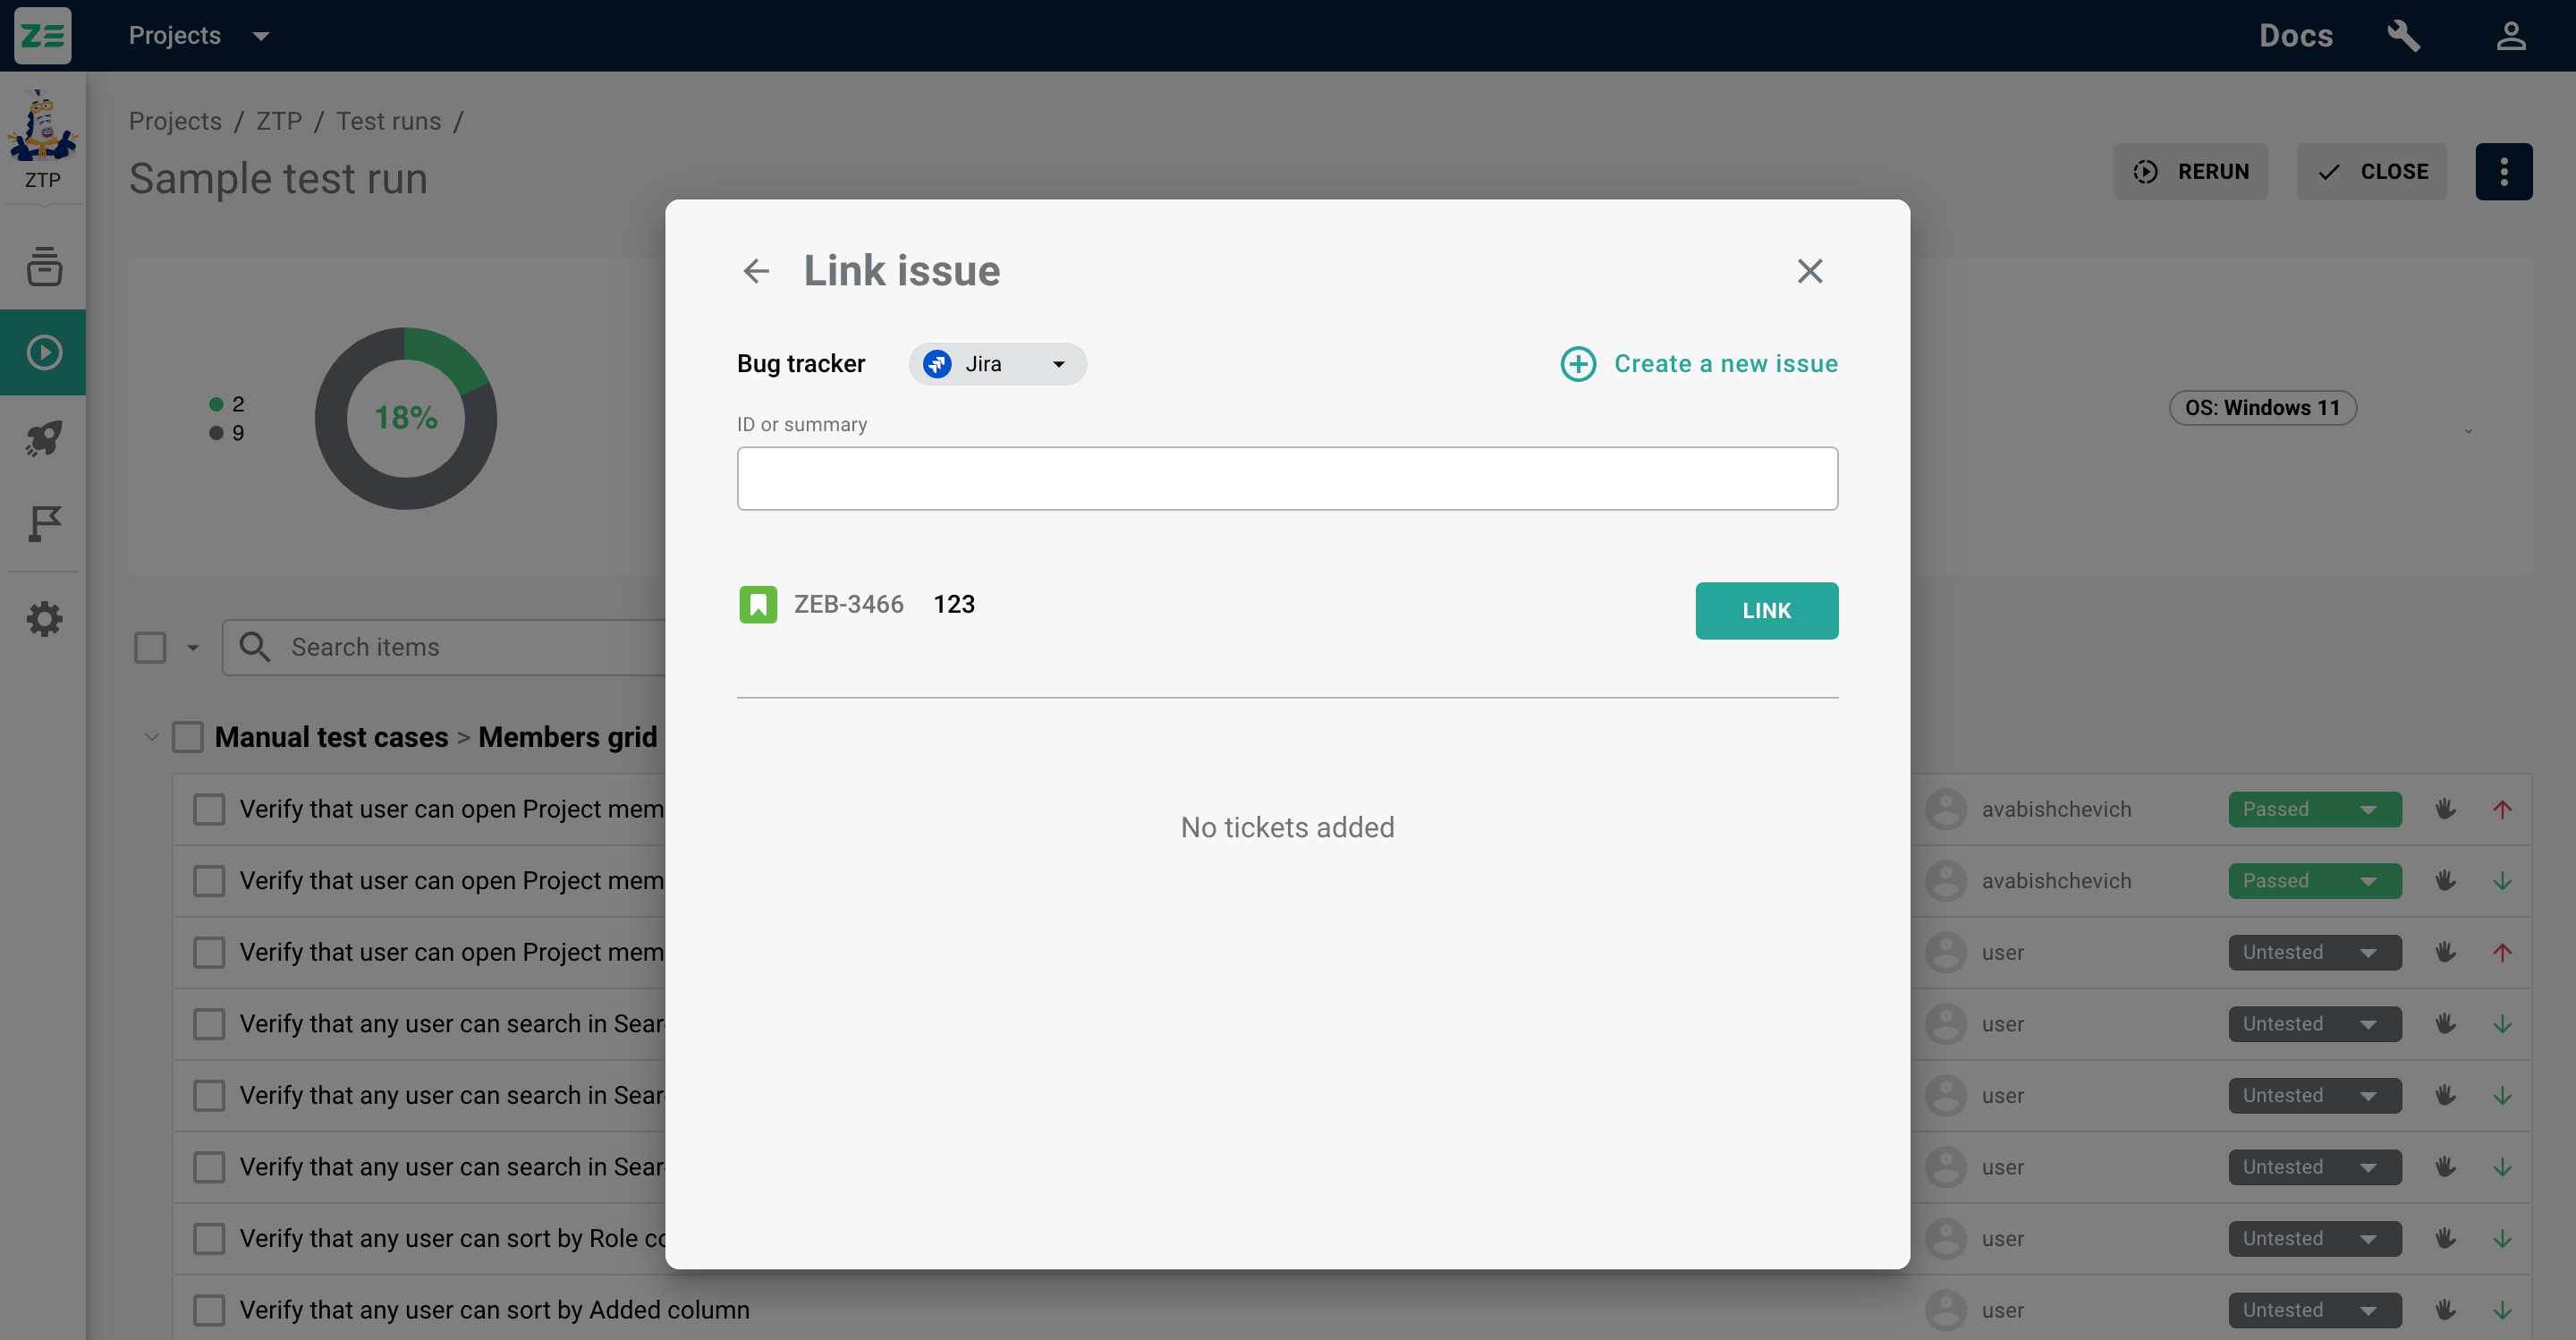
Creating and linking a new issue#
Note
This feature is currently only available for Jira.
To create and link a Jira issue to a test case execution, go to the test run containing it, and perform the following:
- Open Set result dialogue
- Click Link issue at the bottom of the dialogue
- Click Create a new issue
- Select the Jira project and issue type and fill out the required fields
- Click Create and link
Issue will be linked to the result and issue label will appear on UI (both in the grid and in the Executions tab). Clicking on the label will take you to the issue page/view in the corresponding system.

Editing test cases inside test run#
If needed, it is possible to edit the test case directly from the test run. This edit will be propagated to the test repository and synced between other test runs containing the edited test case. To edit a test case in a test run, hover over its title and click on the Edit .

Deleting test cases from test runs#
It is possible to delete test cases from test run (e.g. if they were added by mistake). In order to do that, hover over its title,click on the Delete and confirm your action.
Alternatively, this operation can be done to multiple test cases at once - select the ones you need and use the corresponding bulk action.
Note
Test case deleted from the test run will still be available in the test repository.
Info
This action is not available for test runs included in a test plan.

Closing test runs#
Once all test cases in the run were executed, it may make sense to close it - a closed run cannot be altered and its attributes will stay permanently in the system (e.g. if you deprecate and delete a certain testing configuration, it will still remain tracked for historical runs).
Note
If you delete a test case that is part of a closed run, it will be dropped from that run too together with its executions.
Info
This action is not available for test runs included in a test plan.
Run can be closed by clicking the Close button in the top right corner inside the run or via More actions in the Test runs grid.
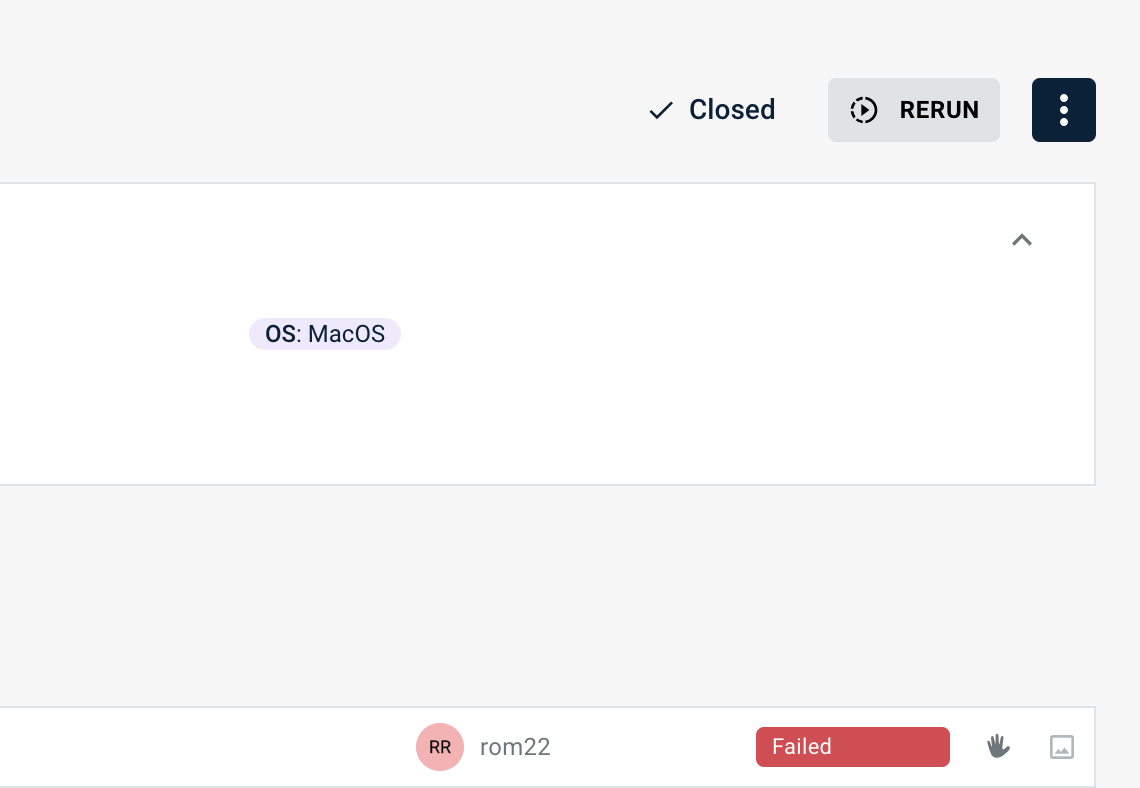
Once a run is closed, a “Closed” mark will be displayed inside it. This run will also appear in the corresponding list which can be accessed by switching to closed runs using control in the top right corner of the Test runs grid.
Since modifications are not allowed, you can only rerun or delete a closed run.
Closing test runs in bulk#
If you want to close one or more test runs, go to the Test runs page and select the test runs you need to close by checking the boxes to the left of the test runs. Once you've made your selection, click the Close button above the grid and confirm the action.
Selecting a range of test runs
Click on the checkbox to the left of the first test run you want to select to initiate the selection. Then, hold down the Shift key and click on the last checkbox to select all test runs in the range between the first and last clicked checkboxes.
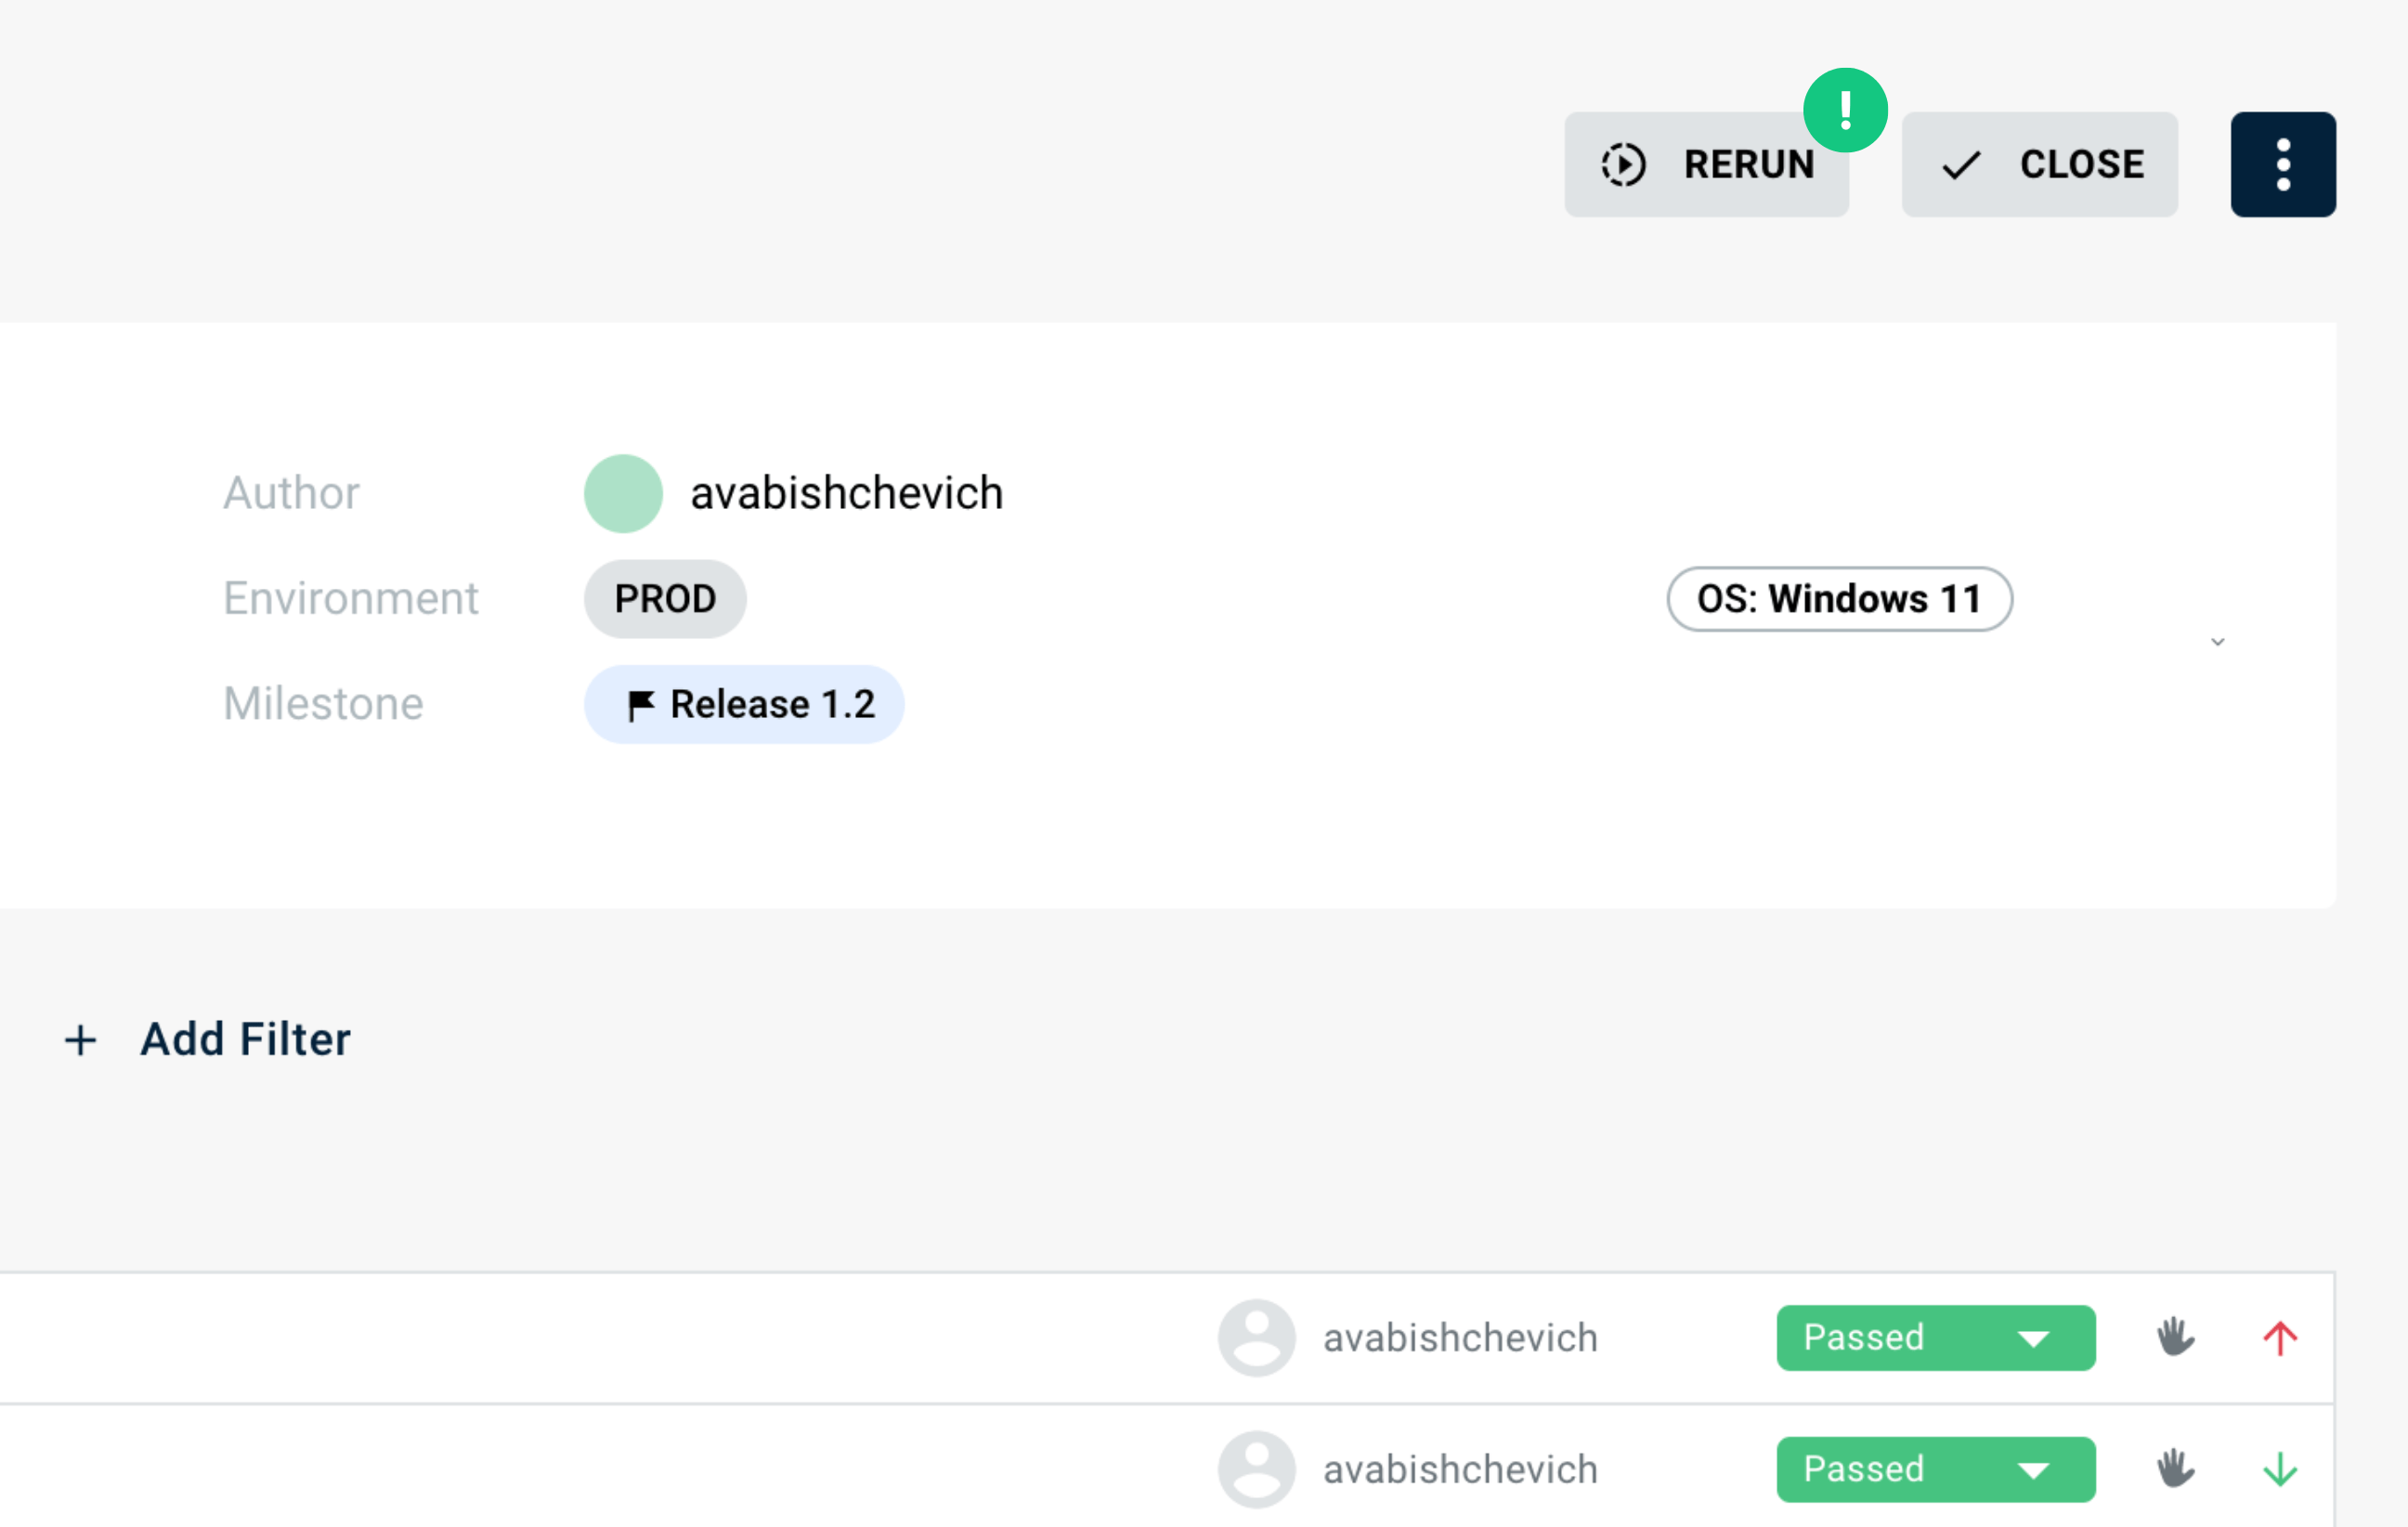
Rerunning a test run#
Rerun can be useful when you want to repeat execution of the same set of cases with the same or similar configurations, or after a fix was applied for the application under test and you want to re-test all or some cases from the run. In a way, a rerun can also be seen as a cloning action, since it creates a brand new run, using the original one as a base.
You can do a rerun by clicking the Rerun button in the top right corner inside the run or via More actions ⋮ in the Test runs grid. From there, you’ll need to do the following:
- Select what test cases you’d like to rerun based on their results
- Optionally, copy assignees for the test cases by checking Copy Assigned To checkbox
- Confirm the action by clicking OK
- You’ll be redirected to the Create test run view where you can apply the necessary changes if needed
- Click Create to continue
You’ll be redirected to the newly created test run.
Info
This action is not available for test runs included in a test plan.
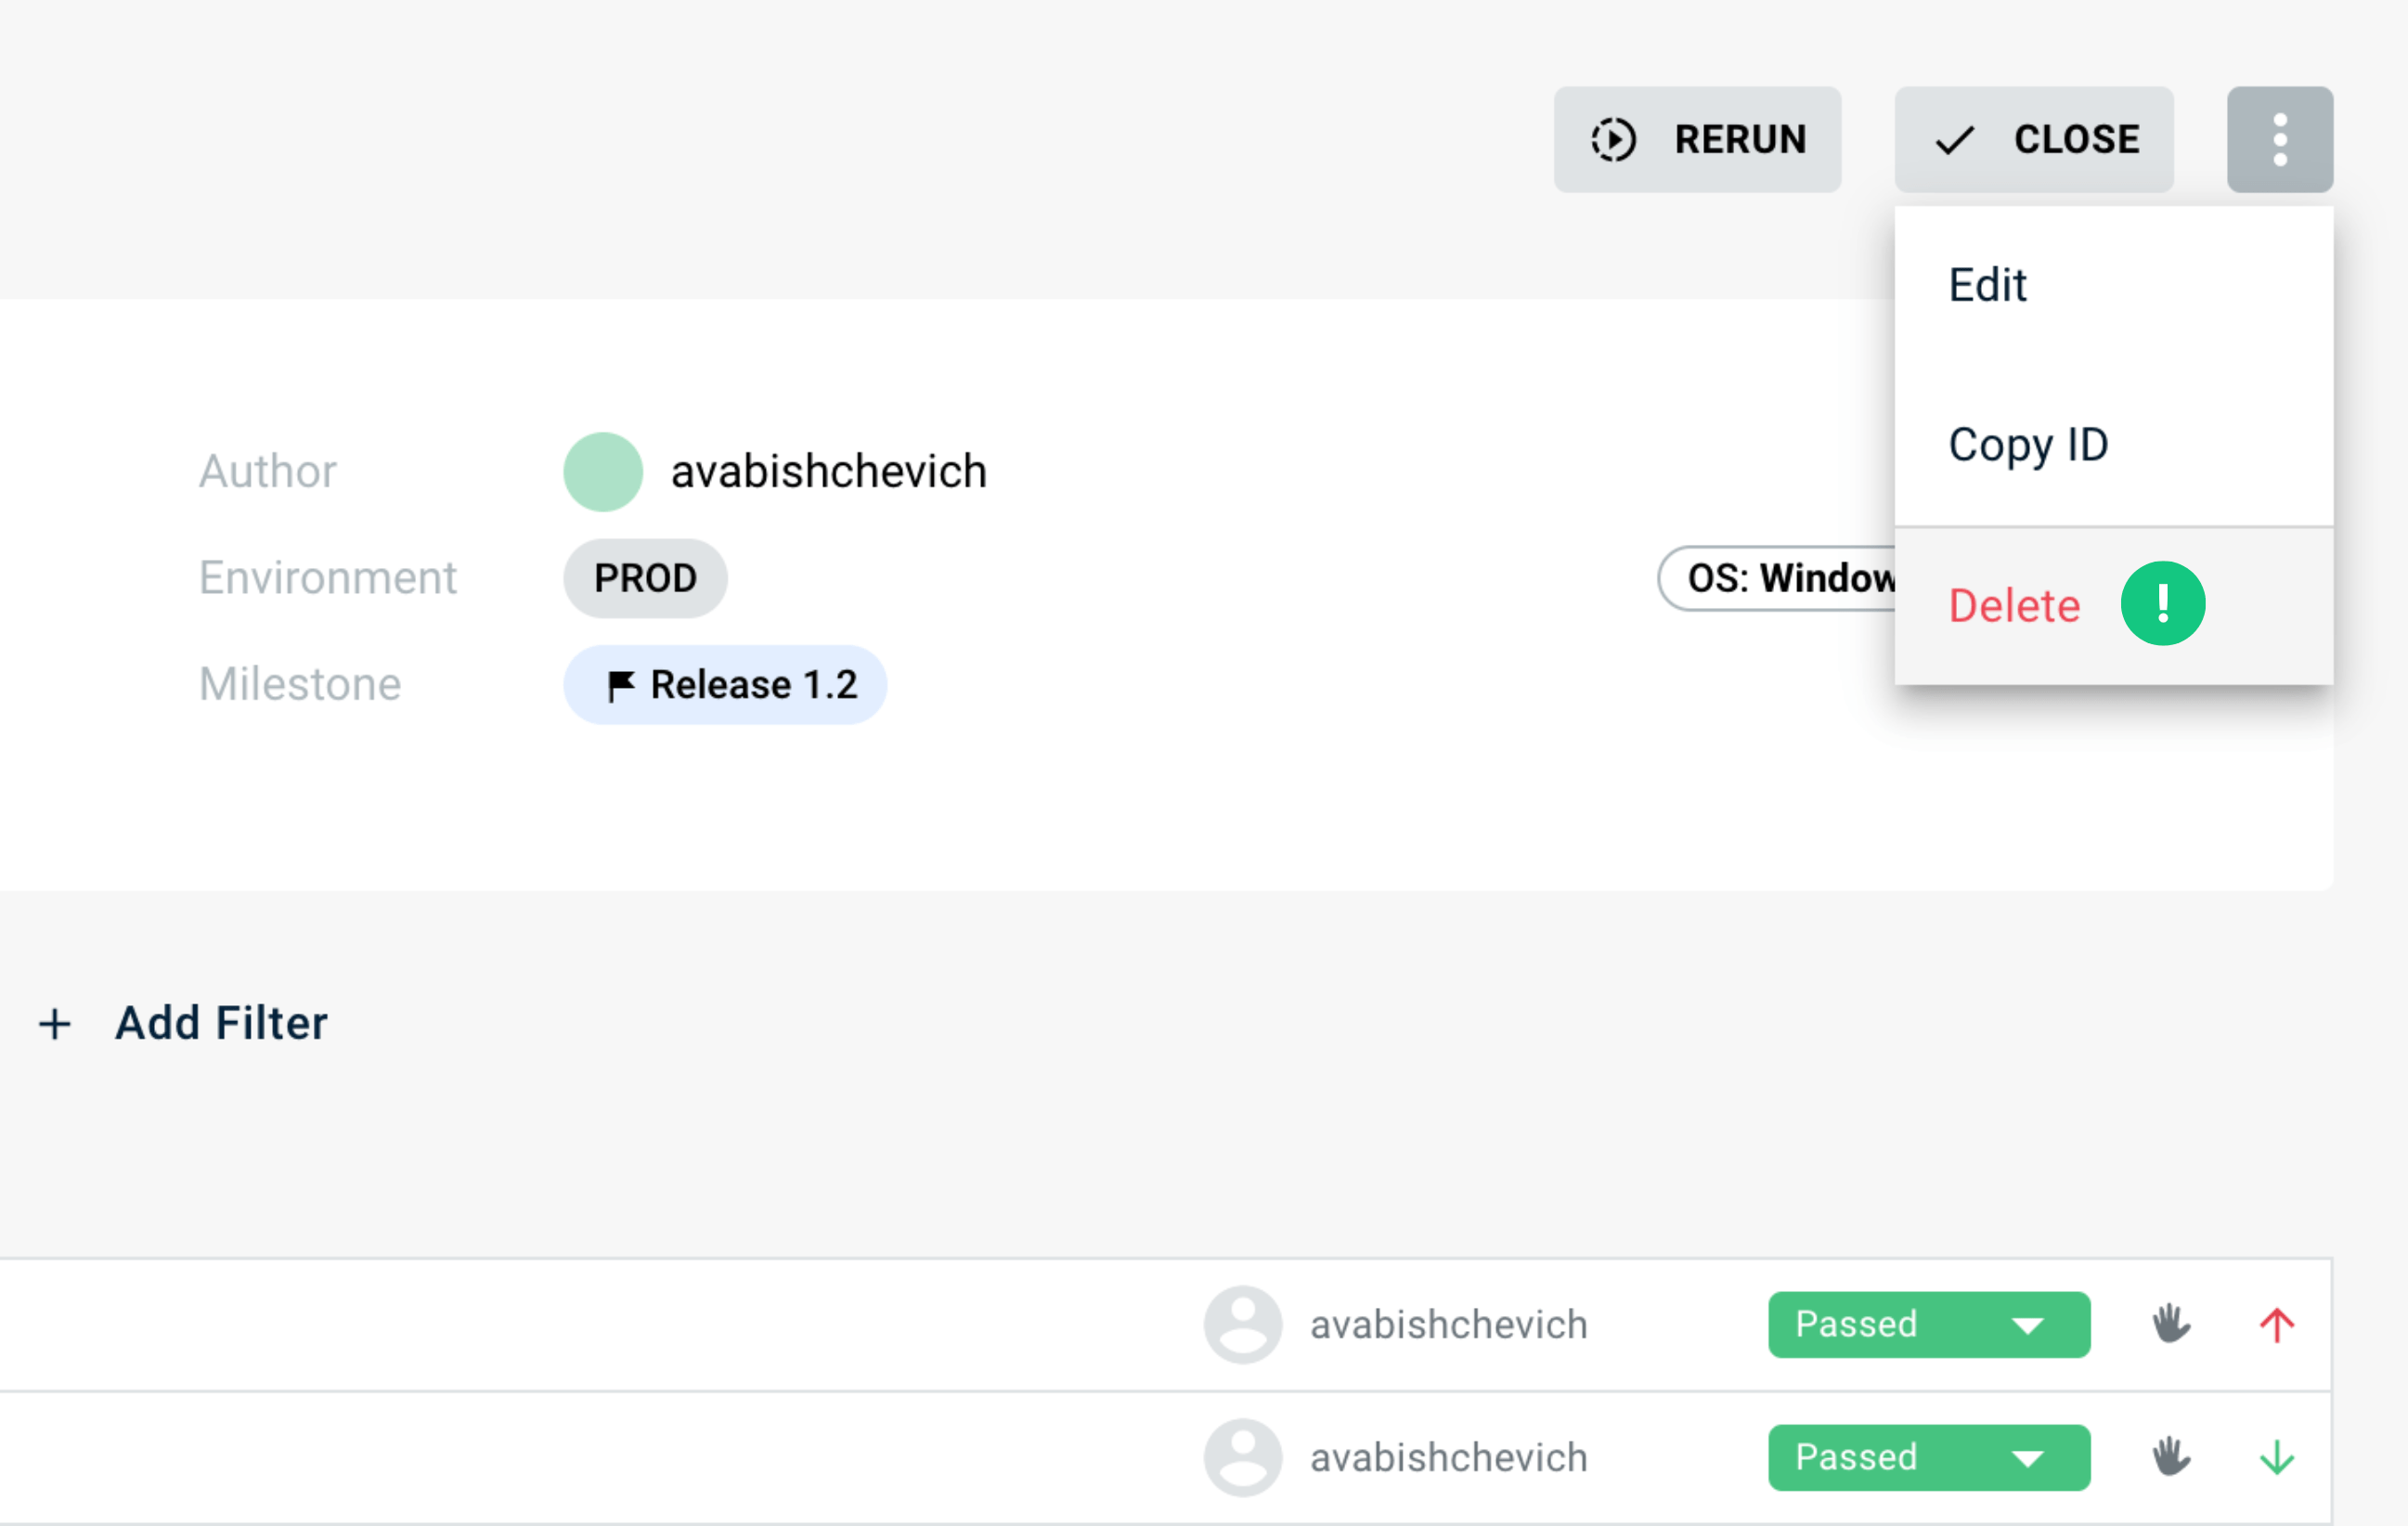
Deleting test runs#
To delete a test run, perform the following steps:
- Navigate to the test run you’d like to delete
- Click More actions ⋮ at the top-right corner of the page
- Click Delete
- Confirm the action by clicking Delete
The test run will be deleted from the system. All the information associated with this test run, including the history of executions, will be deleted as well.
Info
This action is not available for test runs included in a test plan.
Alternatively, a test run can be deleted via More actions ⋮ for a test run in the Test runs grid.
Deleting test runs in bulk#
If you want to delete several test runs in bulk, go to the Test runs page and select the test runs you need to delete by checking the boxes to the left of the test runs. Once you've made your selection, click the Delete button above the grid and confirm the action.

Selecting a range of test runs
Click on the checkbox to the left of the first test run you want to select to initiate the selection. Then, hold down the Shift key and click on the last checkbox to select all test runs in the range between the first and last clicked checkboxes.
Pre-configurations#
While creating test runs, users often need to attach some specific pre-configurations to it that will serve as indications for the test run assignees under what circumstances the executions should be performed.
Let's take a look at the functionality available for this purpose in Zebrunner.
Testing configurations#
Working with testing configurations can simplify the process of performing test runs. Imagine you need to create 2 test runs with an identical set of test cases, but for one of them, test cases should be executed on Chrome browser, for the second one - on Firefox. In this case, you need to create a configuration group “Browser” and add the appropriate browser options.
You can manage test configurations from Settings ( in the sidebar) → Test case fields → Testing configurations.
Info
Only project Administrators/Managers can manage testing configurations. Users with the role of Engineers can access this page in a read-only mode.
Let’s take a look at how to work with testing configurations based on the example above.
- Navigate to the Settings → Testing configurations page.
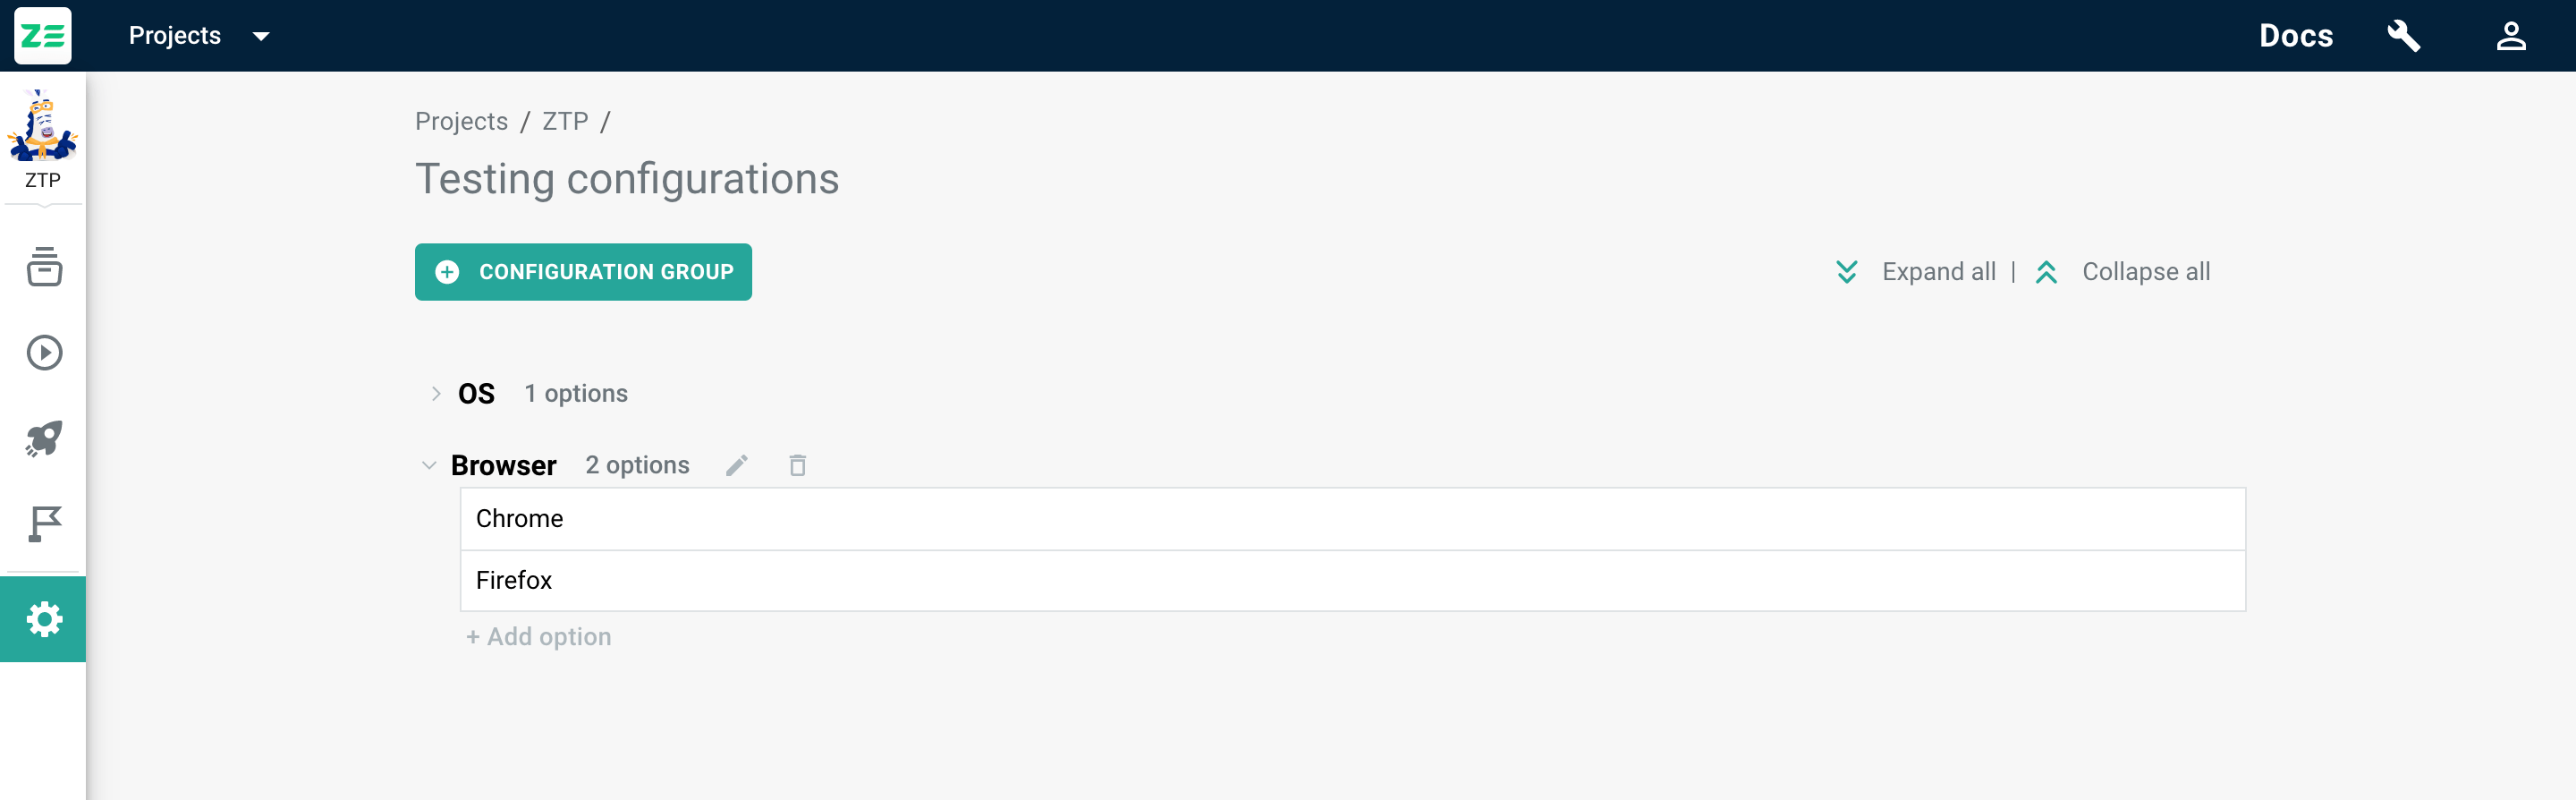
- Create a new Configuration group by clicking +Configuration group. Add title (Browser, in our case), click Create.
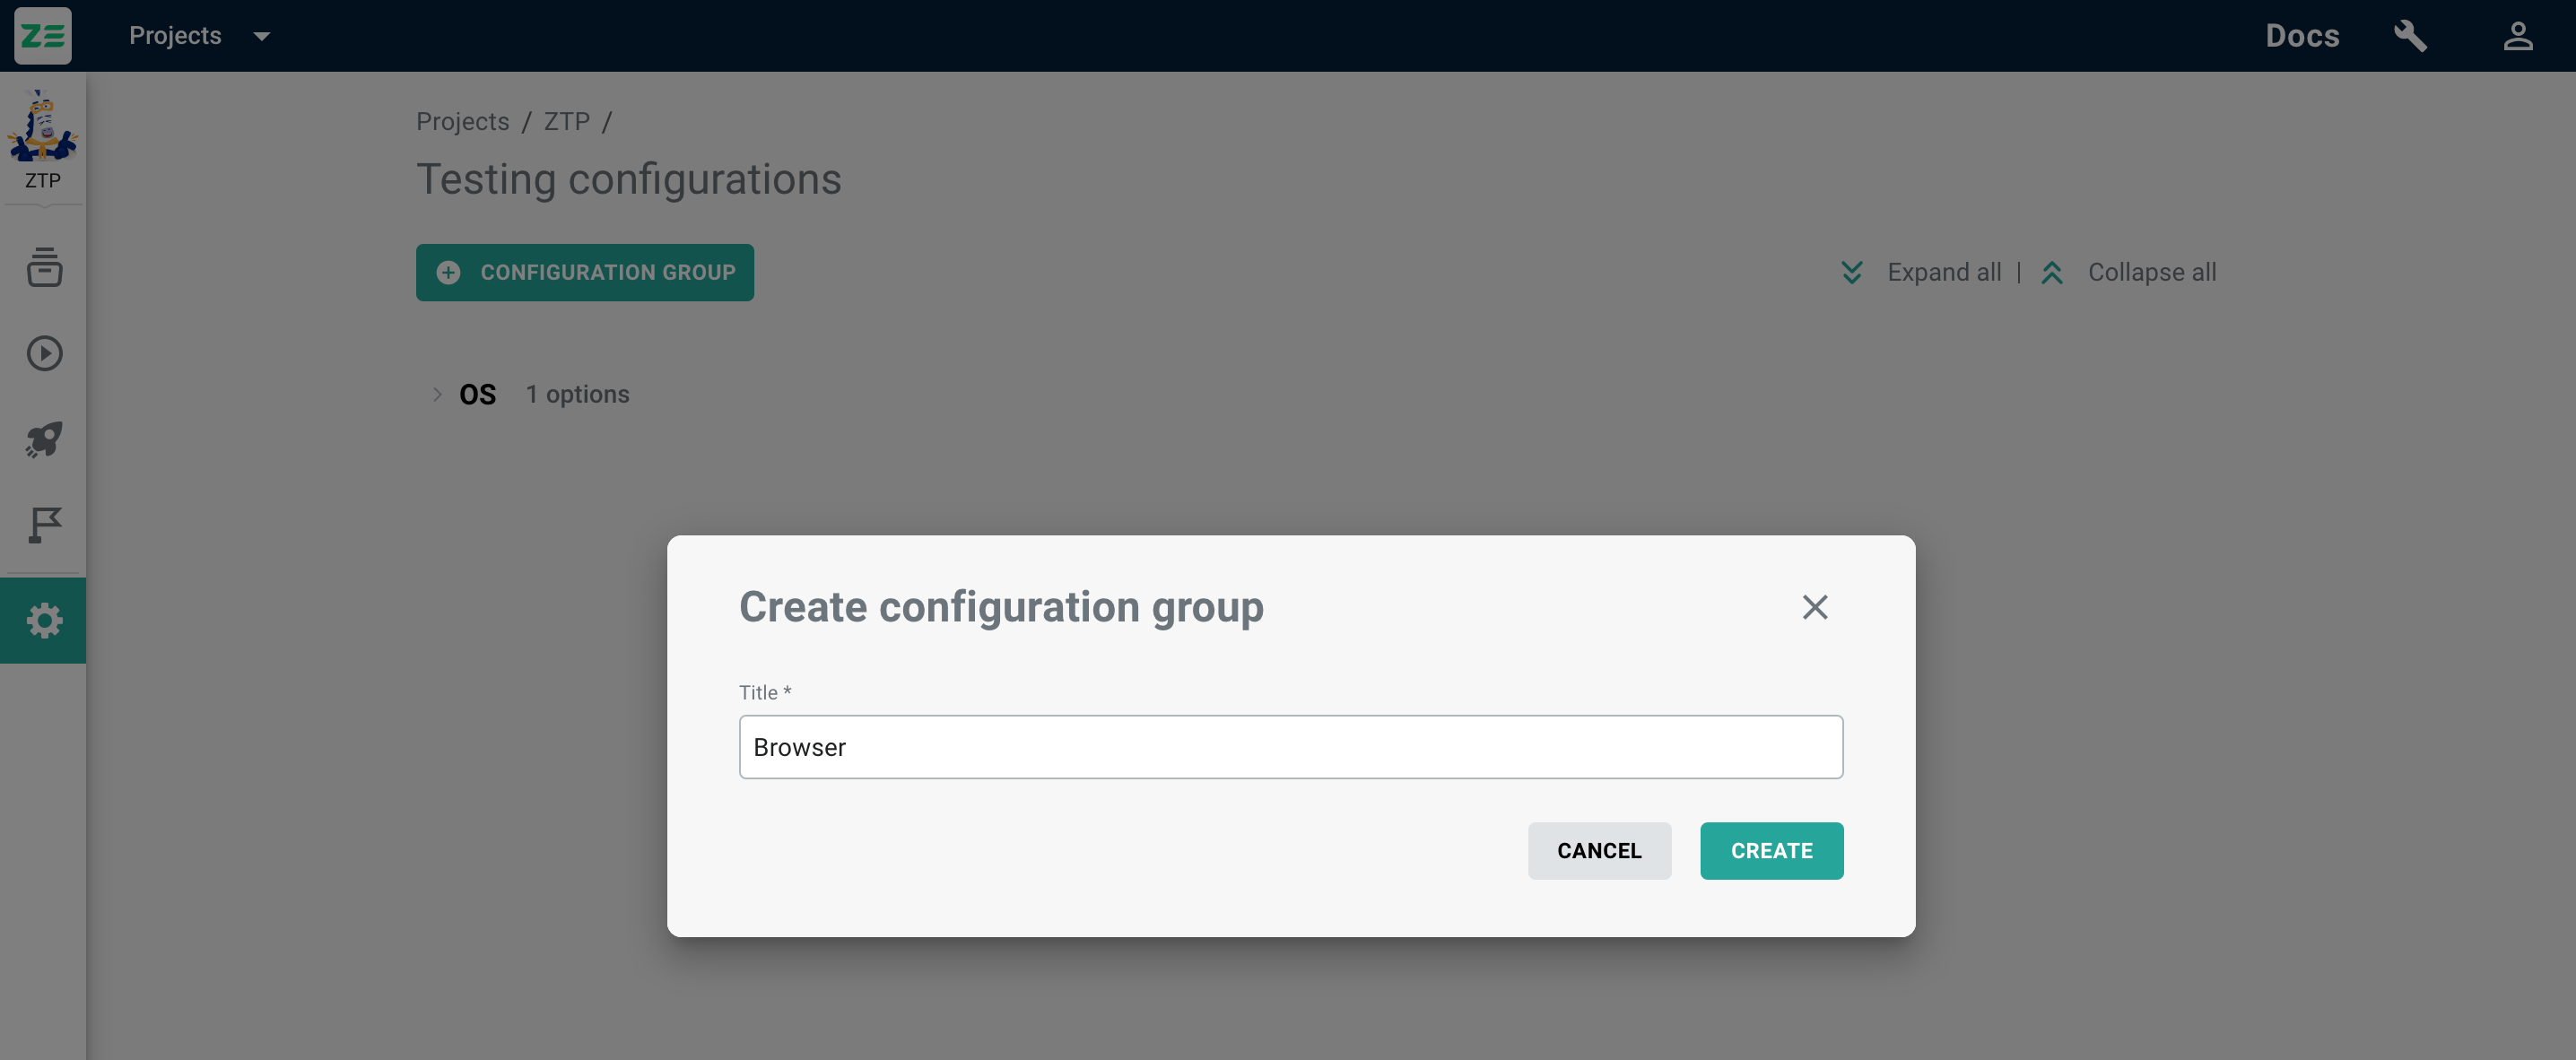
- The group will be added to the page, now you can create the needed options (e.g. Chrome, Firefox, Edge). To do this, click +Add option under the configuration group name. Enter the needed value and click Enter on your clipboard.
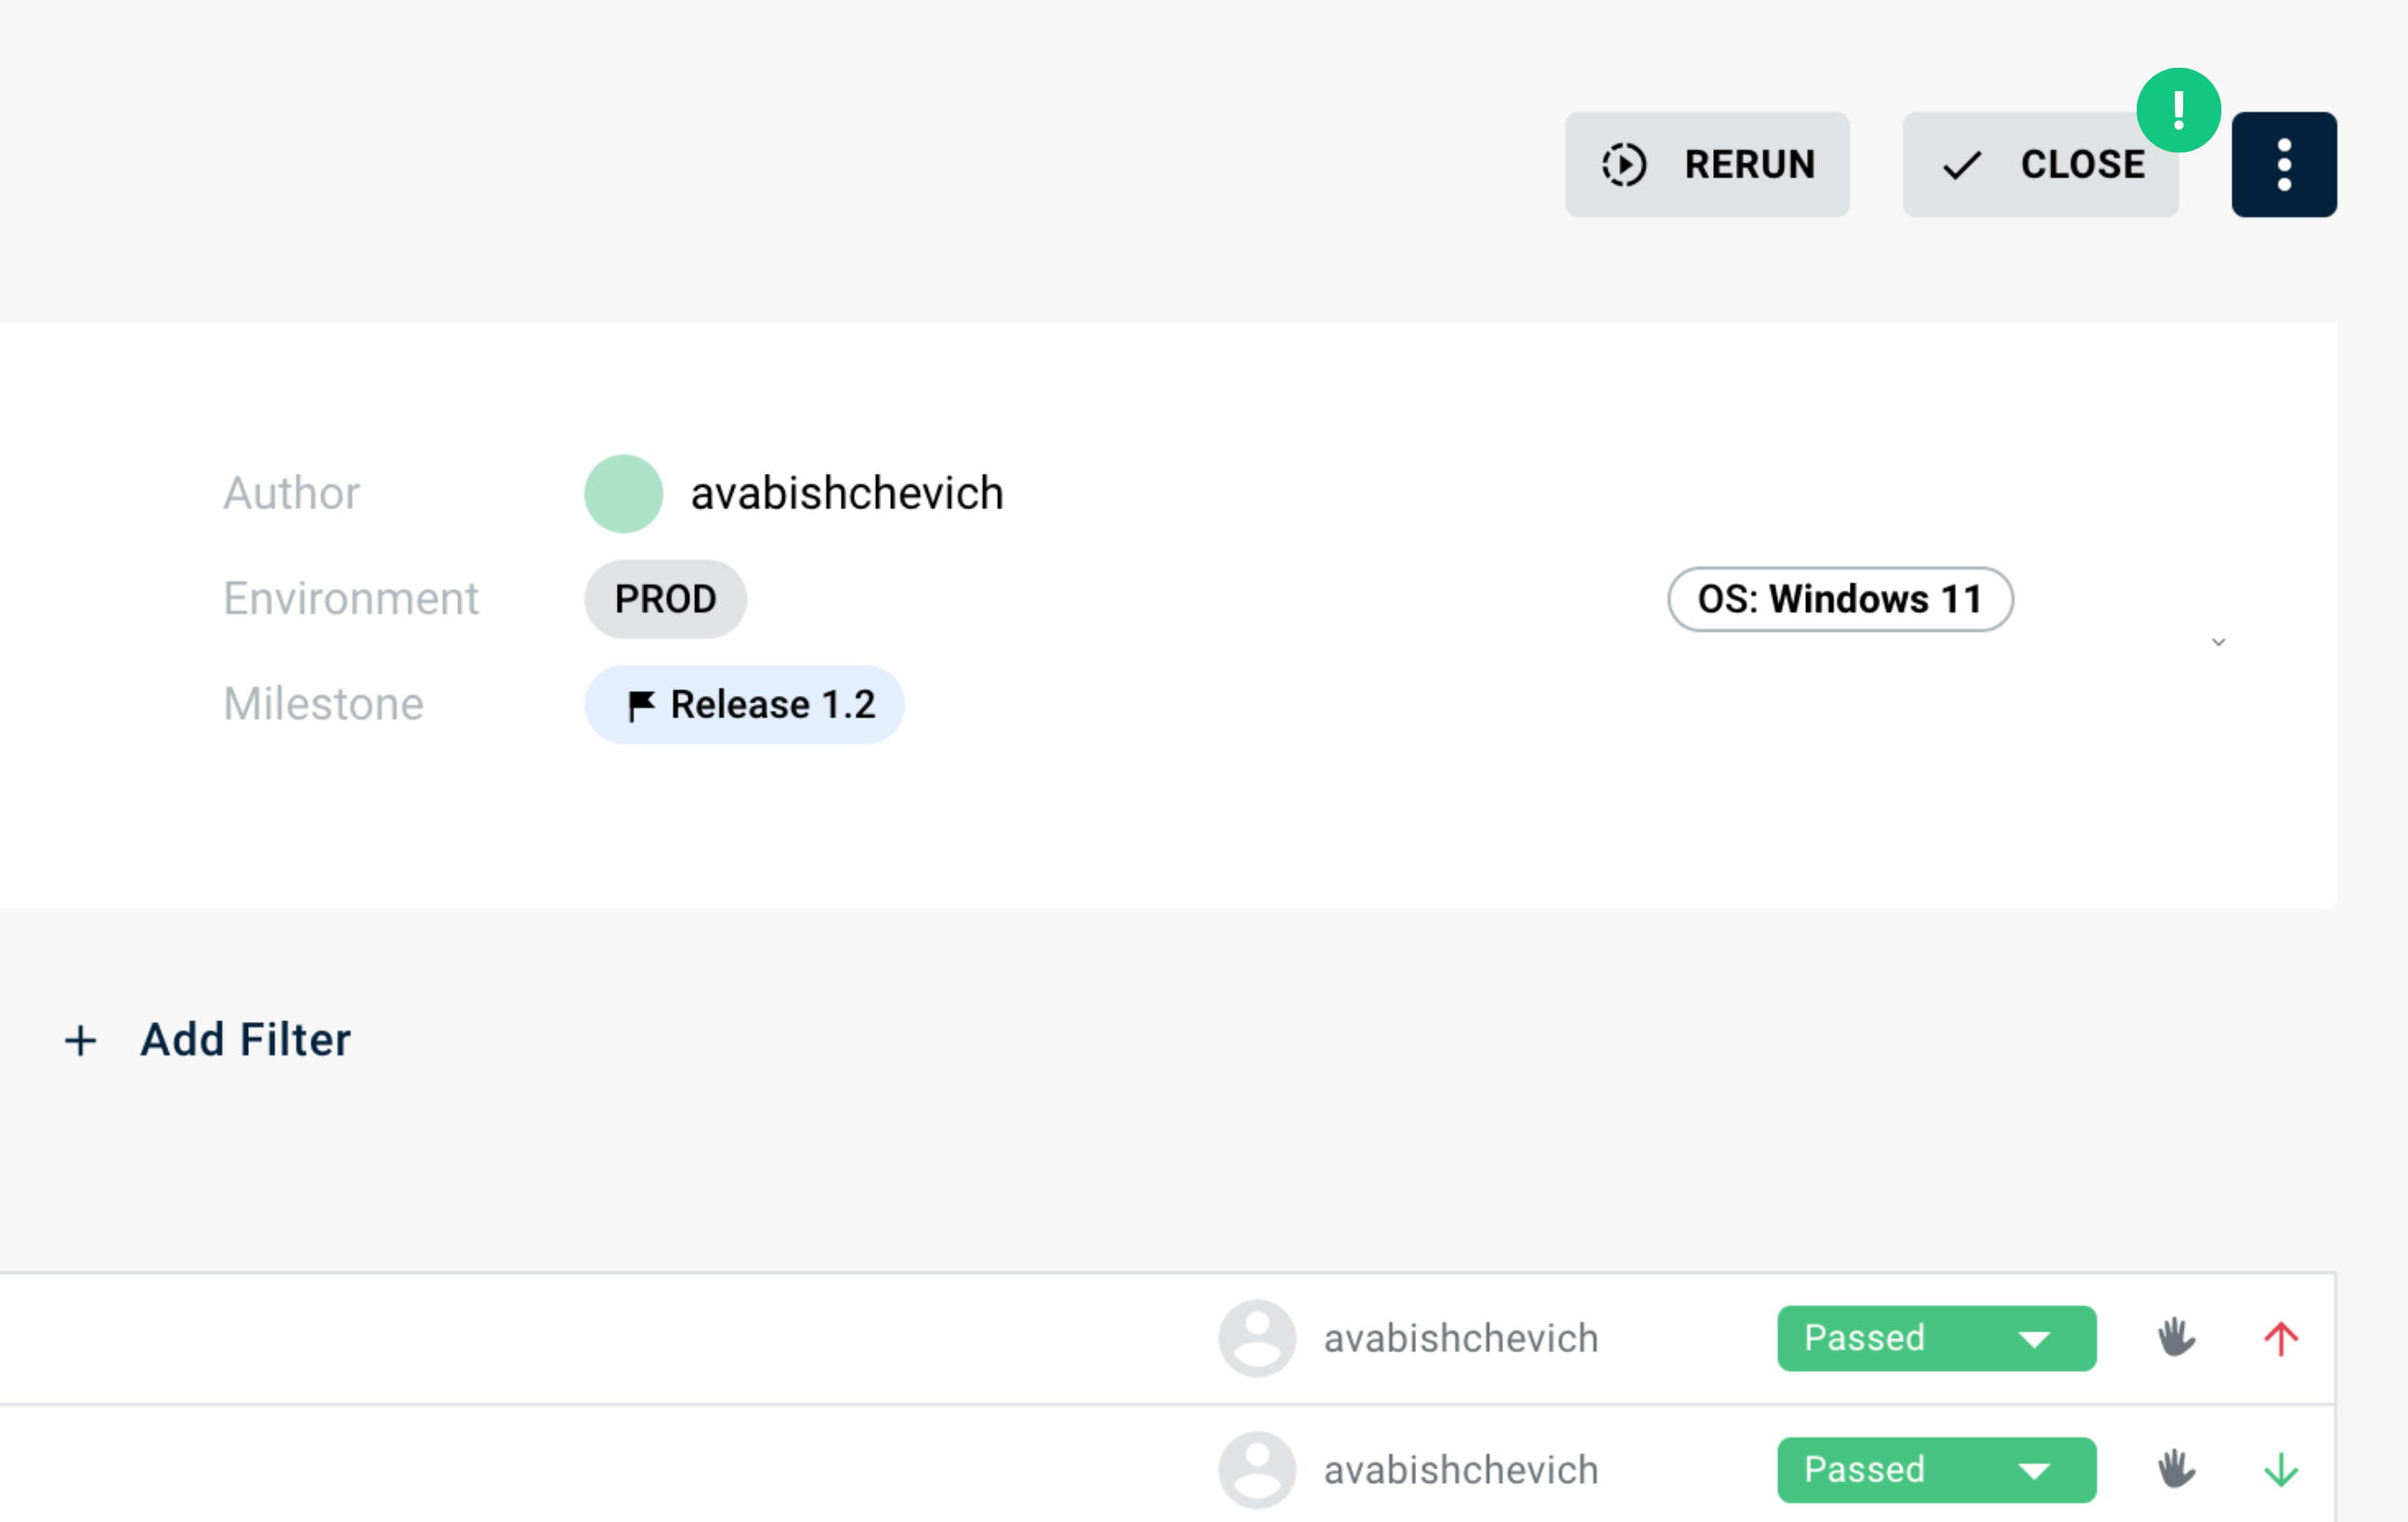
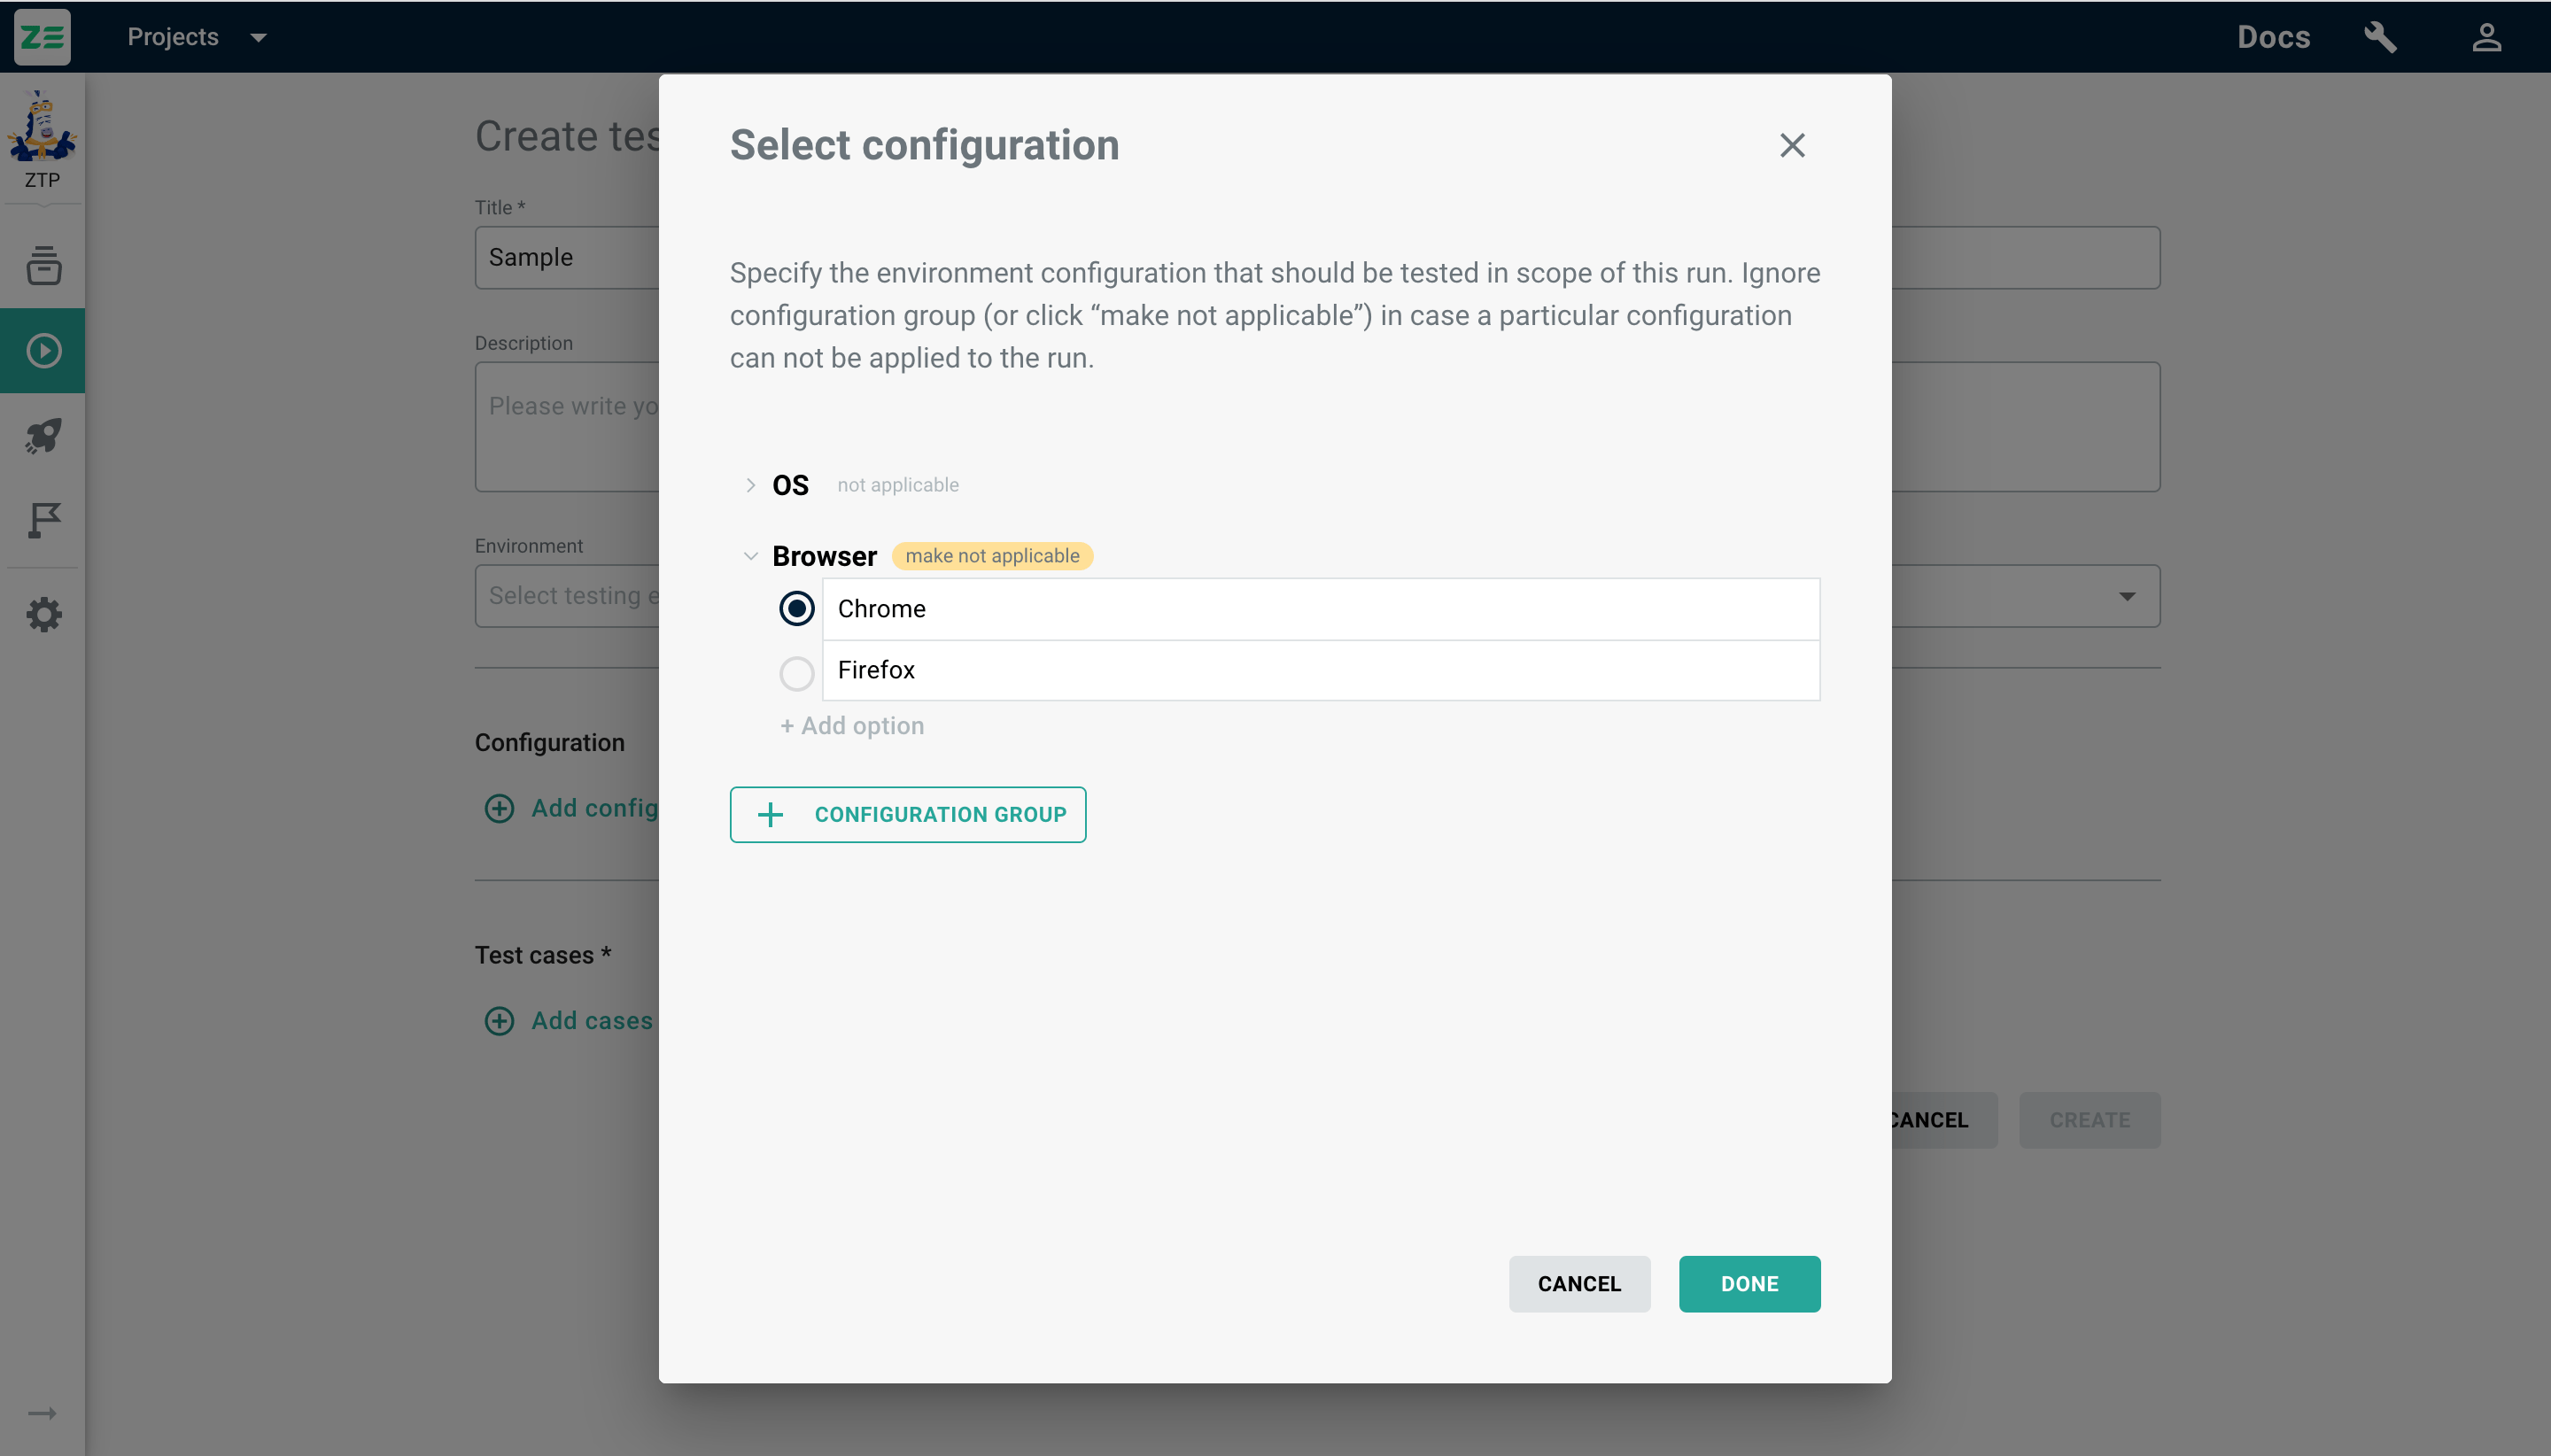
- Add a testing configuration to a test run: while creating or editing a test run, click +Add configuration under the Configuration section and select the needed options. In our case, for one test - Chrome, for the other - Firefox. The selected configuration will be displayed as a label in the test run header in the following format: Group: Option (e.g. Browser: Chrome).
Alternatively, you can create a new configuration group or add a new option right when you create or edit a test run - simply click Add configuration in a corresponding window and perform the actions above.
On the Testing configurations page, you can edit or delete both a group and option by hovering over the needed item and clicking the Edit or Delete icon.
Info
Deletion of a configuration group will lead to deletion of all the associated options. But all test runs that were created using those will remain in the system with options that were used at the moment of their creation.
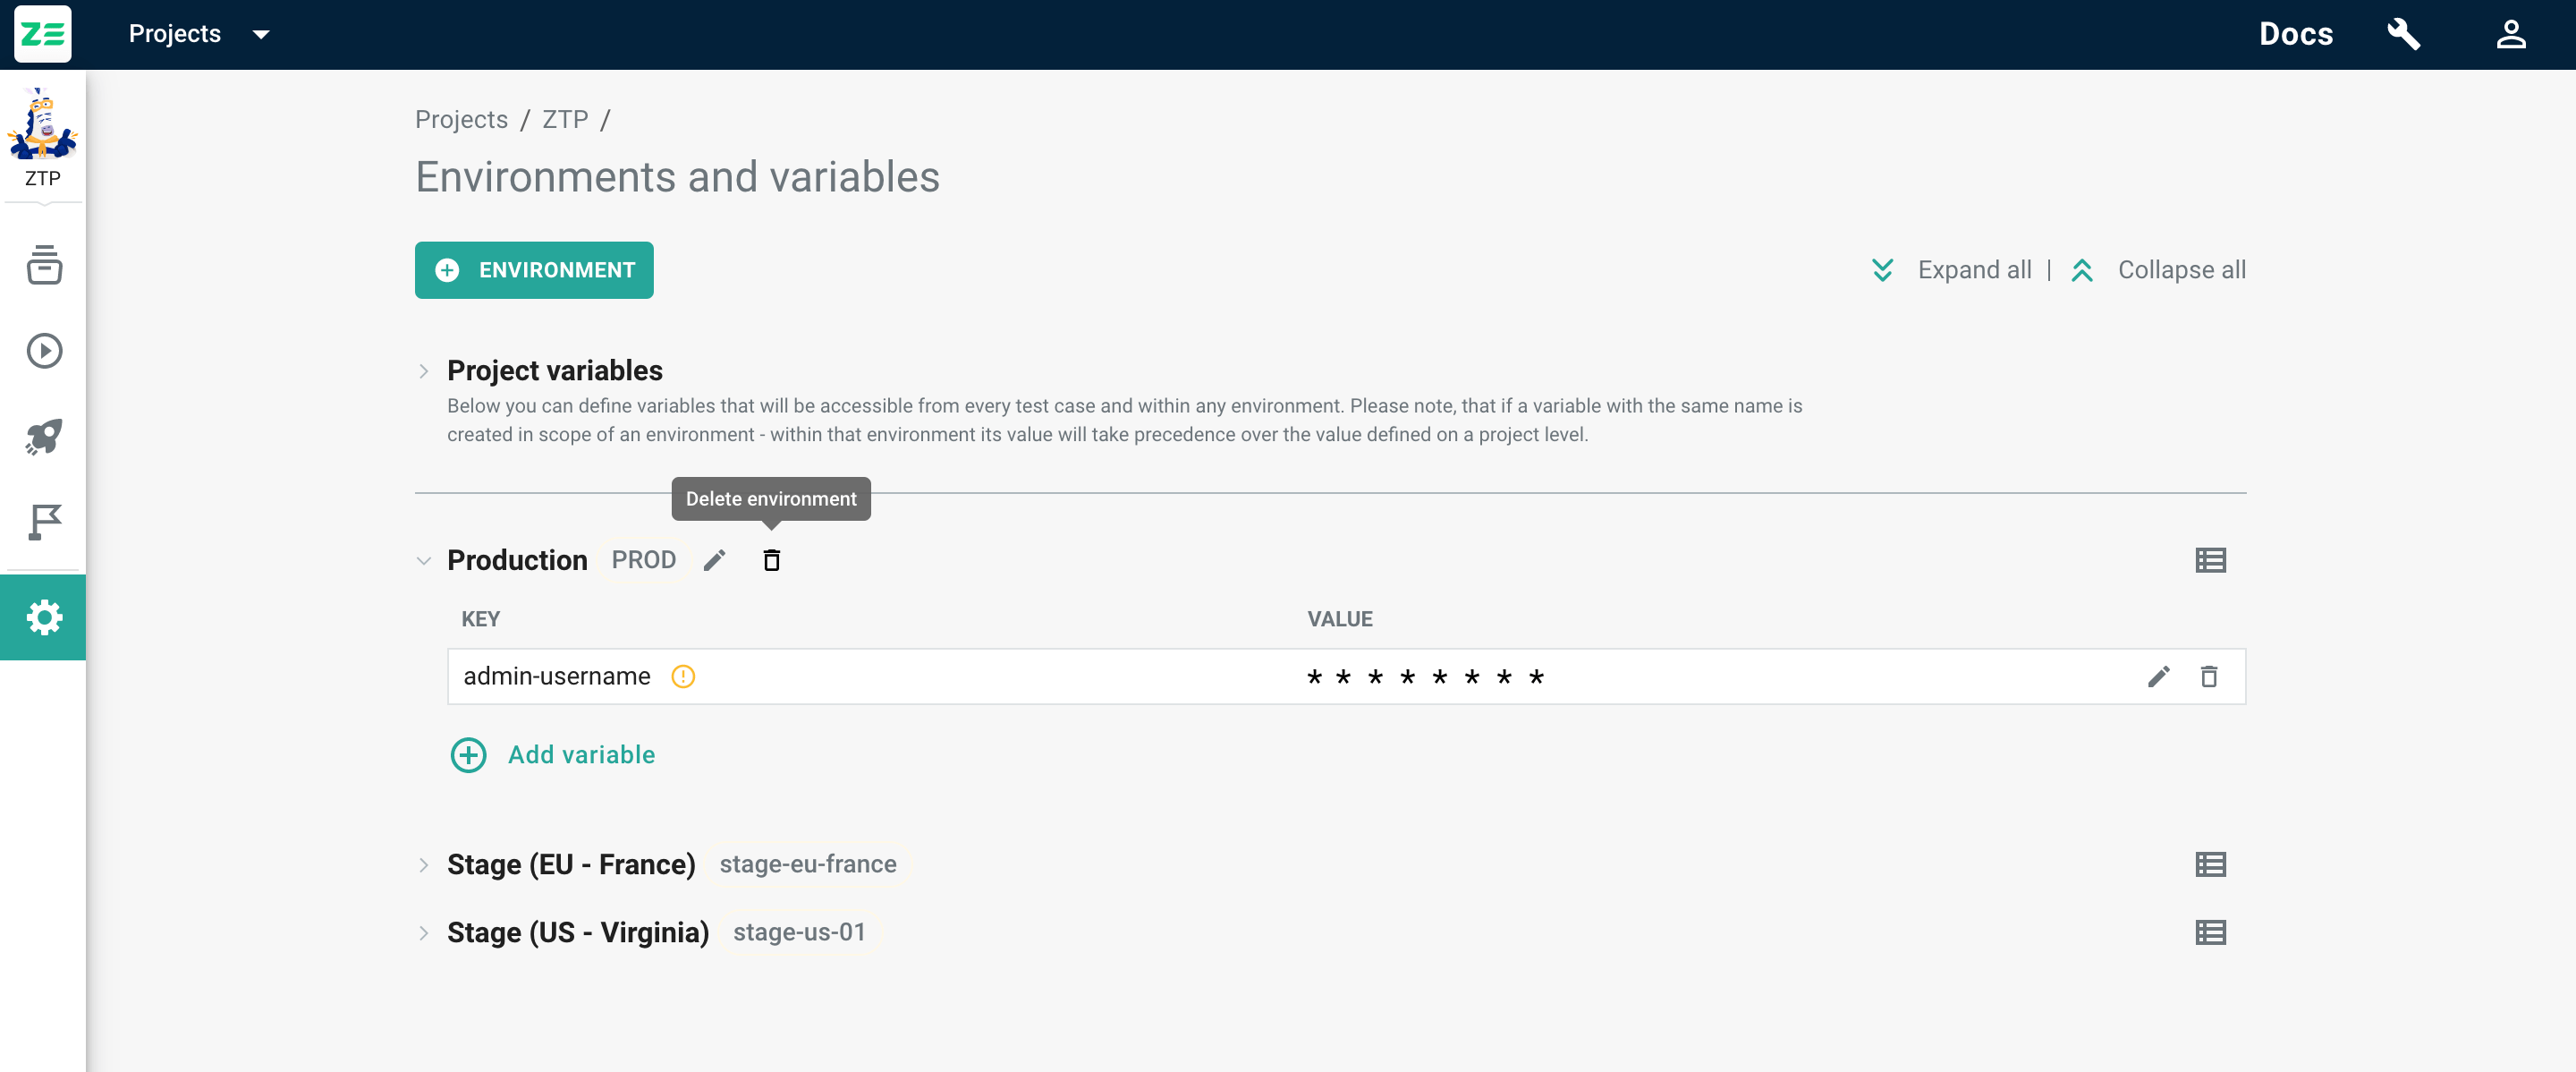
Environments and variables#
Environments and variables is a functionality that can be valuable in terms of a test run, e.g. when you need to specify the credentials needed to execute a test run. In Zebrunner, this is possible both within the whole project or certain environments.
A variable consists of 2 attributes: Key и Value. Key is a common name of a variable (e.g, “password”), while value is its specification (e.g, the password itself).
Please note: if a variable with the same name is created both in scope of the project and an environment, the environment variable value will always take precedence over the value defined on a project level. This way, the use of variables makes full sense in terms of a test run, where users can select the environment within which a test run will be performed.
You can manage environments and variables from Settings ( in the sidebar) → Test case fields → Environments and variables.
Info
Only project Administrators/Managers can manage Environment and variables. Users with the role of Engineers can access this page in a read-only mode.
Creating project variables#
To create a project variable, go to Settings → Environments and variables and perform the following steps:
- Expand Project variables field (via the arrow beside Project variables or Expand all at the top-right corner of the page)
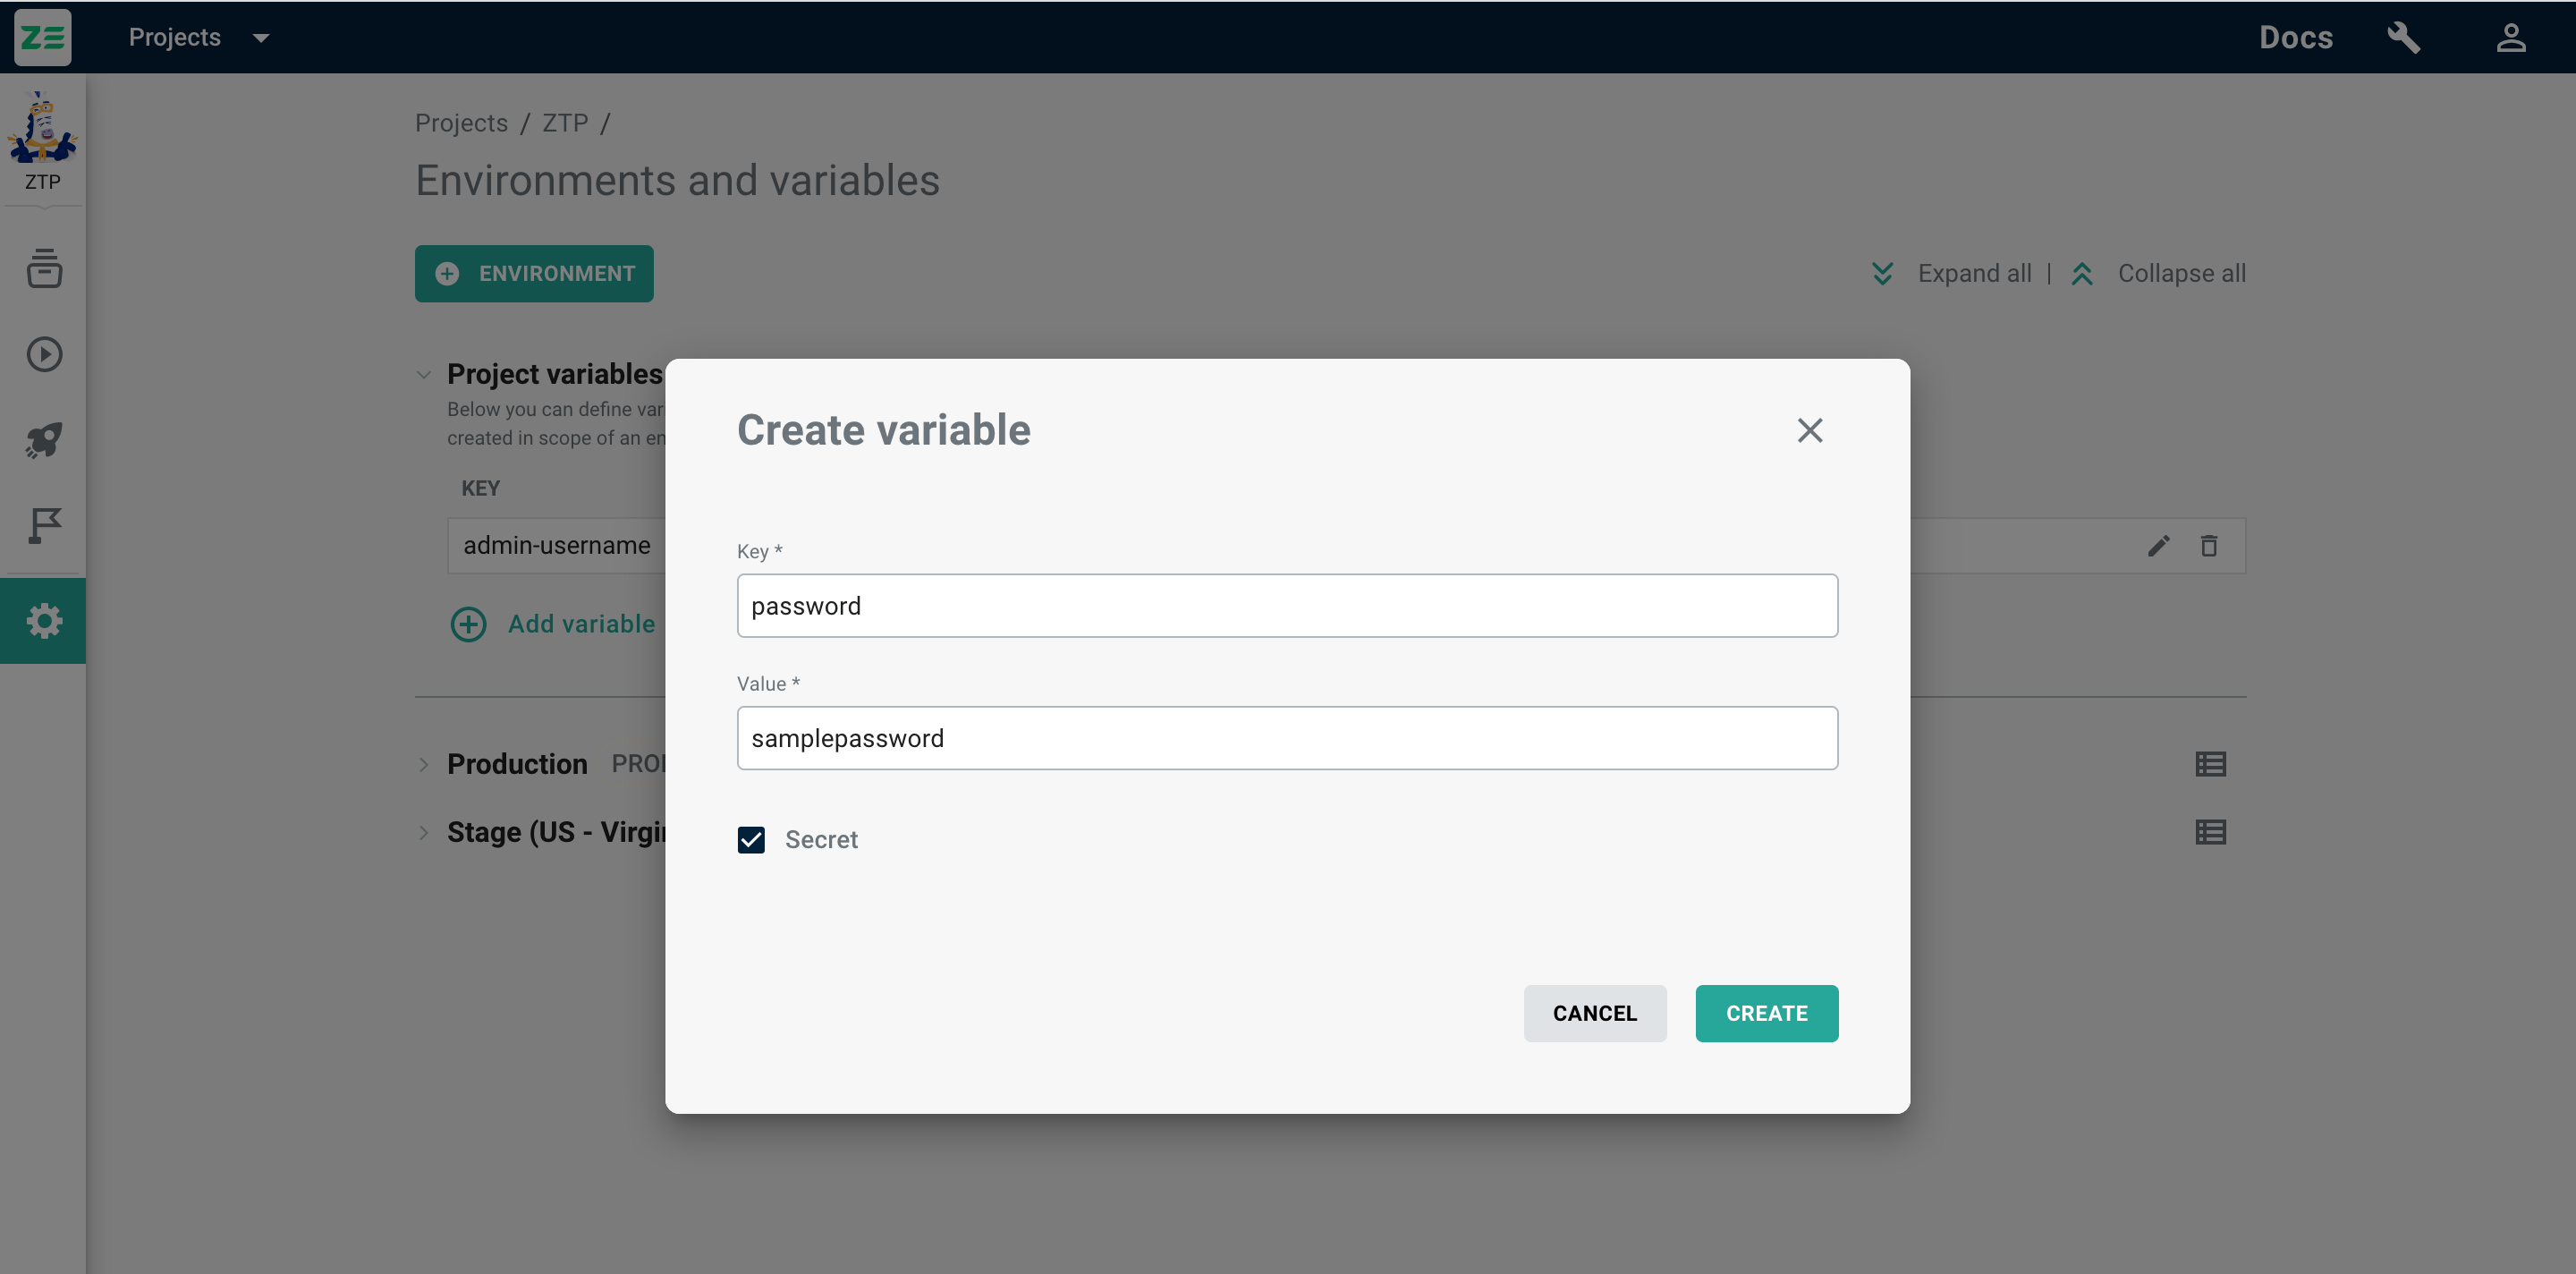
- Click +Add variable. The adding dialogue will appear
- Add Key and Value
- Tick Secret if you’d like your value to be displayed on a screen in a secure way (via ***)
- Click Create
The variable will be created for this project, and now you can add it to a test case. You can copy the key and value for a variable by hovering it and clicking the Copy key/value icon.
Creating environments#
To create an environment, go to Settings → Environments and variables and perform the following steps:
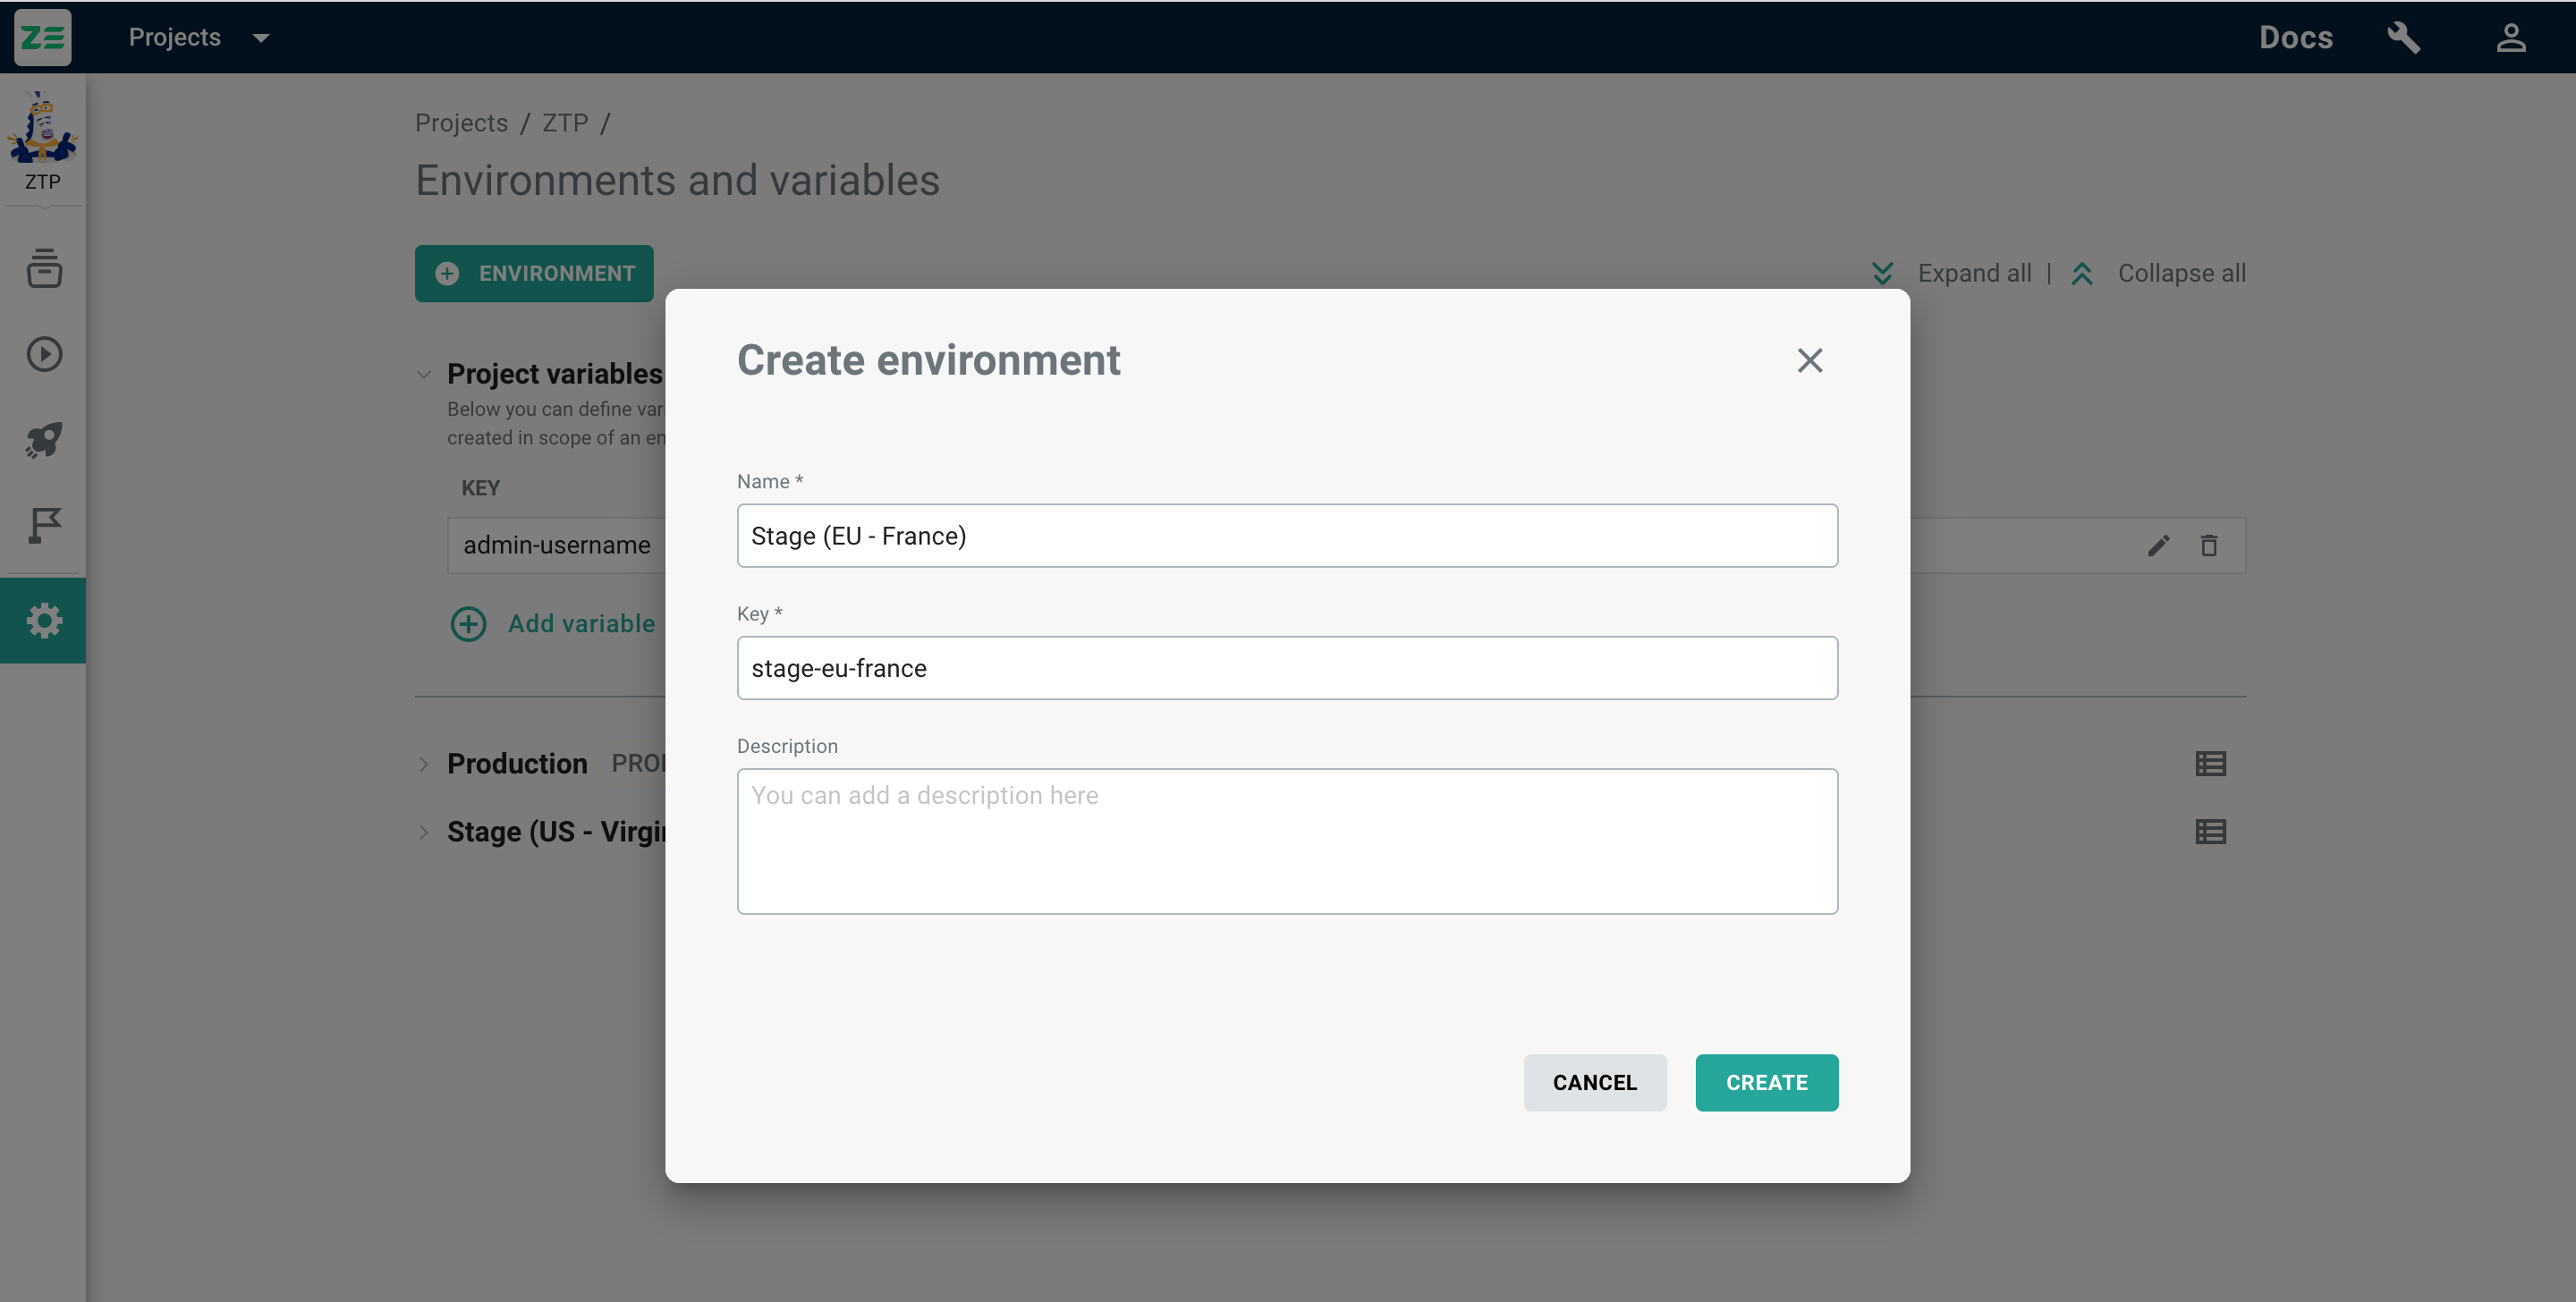
- Click +Environment. The new dialogue will appear
- Specify the name of your environment
- Provide the key for your environment (an abbreviation or simple reference)
- Add the description if needed
- Click Create
The new environment will be added under the project variables - now you can add environment variables for each environment. You can copy the environment key by hovering the cursor over it and clicking the Copy value icon.
Creating environment variables#
In the same way as creating project variables, you can also create variables for each environment by selecting the environment and clicking +Add variable.
Please note: if a variable with the same name is created in scope of an environment - within that environment, its value will always take precedence over the value defined on a project level.
To view all the variables available within a certain environment, click the list icon next to the environment name. You can also copy all the values from there.
Editing/deleting environments and variables#
Both project and environment variables can be edited and deleted from the Settings → Environments and variables by clicking the Edit or Delete icon next to the variable name.
Info
If you delete a variable, all test cases that use that variable will no longer resolve injected key into its value.
It’s possible to edit and delete an environment from the Settings → Environments and variable page by hovering over the needed environment and clicking the Edit or Delete icon.
Info
Deletion of an environment will lead to deletion of all the variables within it! Test cases that use that variable will no longer resolve the injected key into its value.
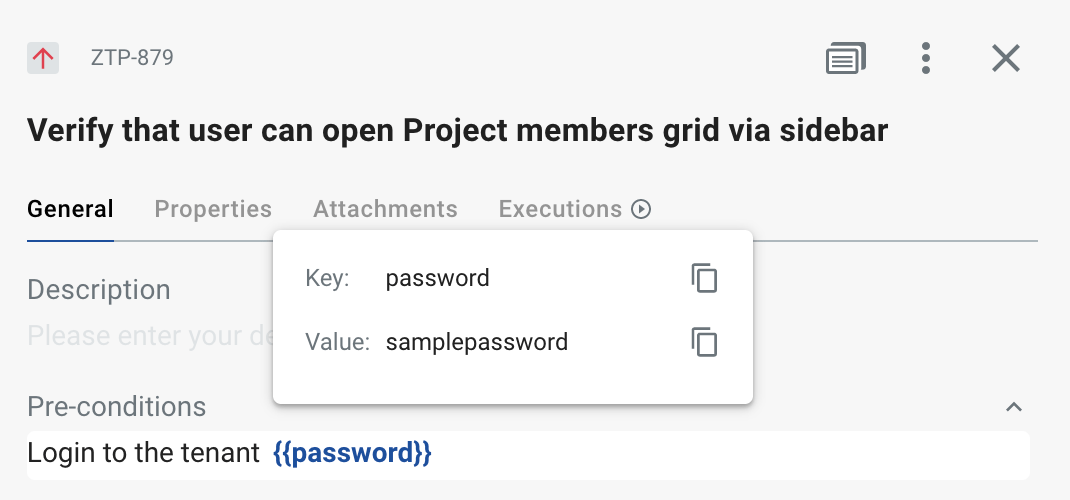
Using variables in test cases and runs#
While creating or editing a test case, you can specify certain variables that the QA team may need to conduct the test run (e.g. login and password to enter the product in a certain environment).
To add a variable value to a test case, select the needed field while creating or editing a test case and enter the variable key as {{key}}. After you click Save, the system will fetch both key and value as soon as you hover over the variable.
The value of project variables will be displayed both in a test repository and test run, and will be highlighted blue in a test case view. The values of environment variables will be available only within a test run - so make sure you’ve selected the environment for your test run (in a test case view, such variables will be highlighted gray).
Granting anonymous public access to a test run#
All information stored in Zebrunner is not publicly available and users are required to be authenticated and have the appropriate permissions to access the data. While in most cases this is a desired security limitation, some teams may need to share information publicly to ensure efficient collaboration with clients, partners, or other external parties who don't have access to their Zebrunner workspace.
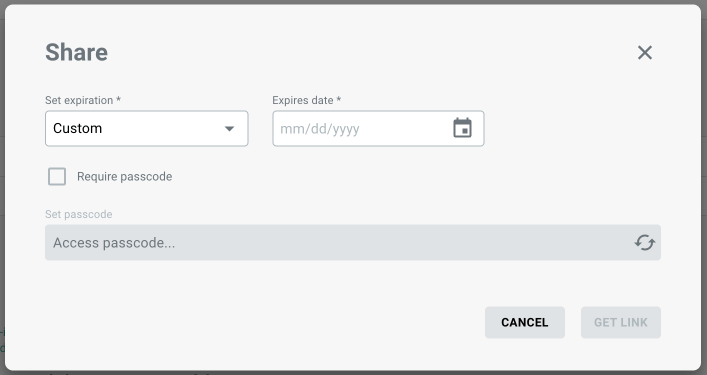
To generate a link for public access to a test run, perform the following steps:
- Navigate to the test run you’d like to share
- Click More actions ⋮ in the top-right corner of the page
- Click the Public access
- Set an expiration period for the link
- Optionally, set or generate a passcode
- Confirm the action by clicking the Enable access button
Note
Only project's Administrators, Managers, and Engineers can control public access to test runs.
The expiration date of the generated link determines the period of its accessibility. This ensures that the link becomes inactive after a certain period, enhancing data security and privacy.
The passcode is a means of preventing undesirable access to your information. If you set or generate a passcode, everyone who opens the link will be asked to enter the passcode in order to access the test run.
Warning
It is essential to understand the security implications of granting public access to your data. You should exercise caution and discretion when sharing such links to prevent unauthorized access to sensitive information. We strongly recommend that you set the expiration date as short as possible and always generate a passcode.
Manage test runs via API#
Zebrunner exposes a set of REST API endpoints for managing test runs. In order to access the API documentation, navigate to <your-zebrunner-workspace>/api/docs, where <your-zebrunner-workspace> is the actual hostname of your Zebrunner workspace. For example, if your workspace is available at https://mycompany.zebrunner.com, then the API documentation is available at https://mycompany.zebrunner.com/api/docs.