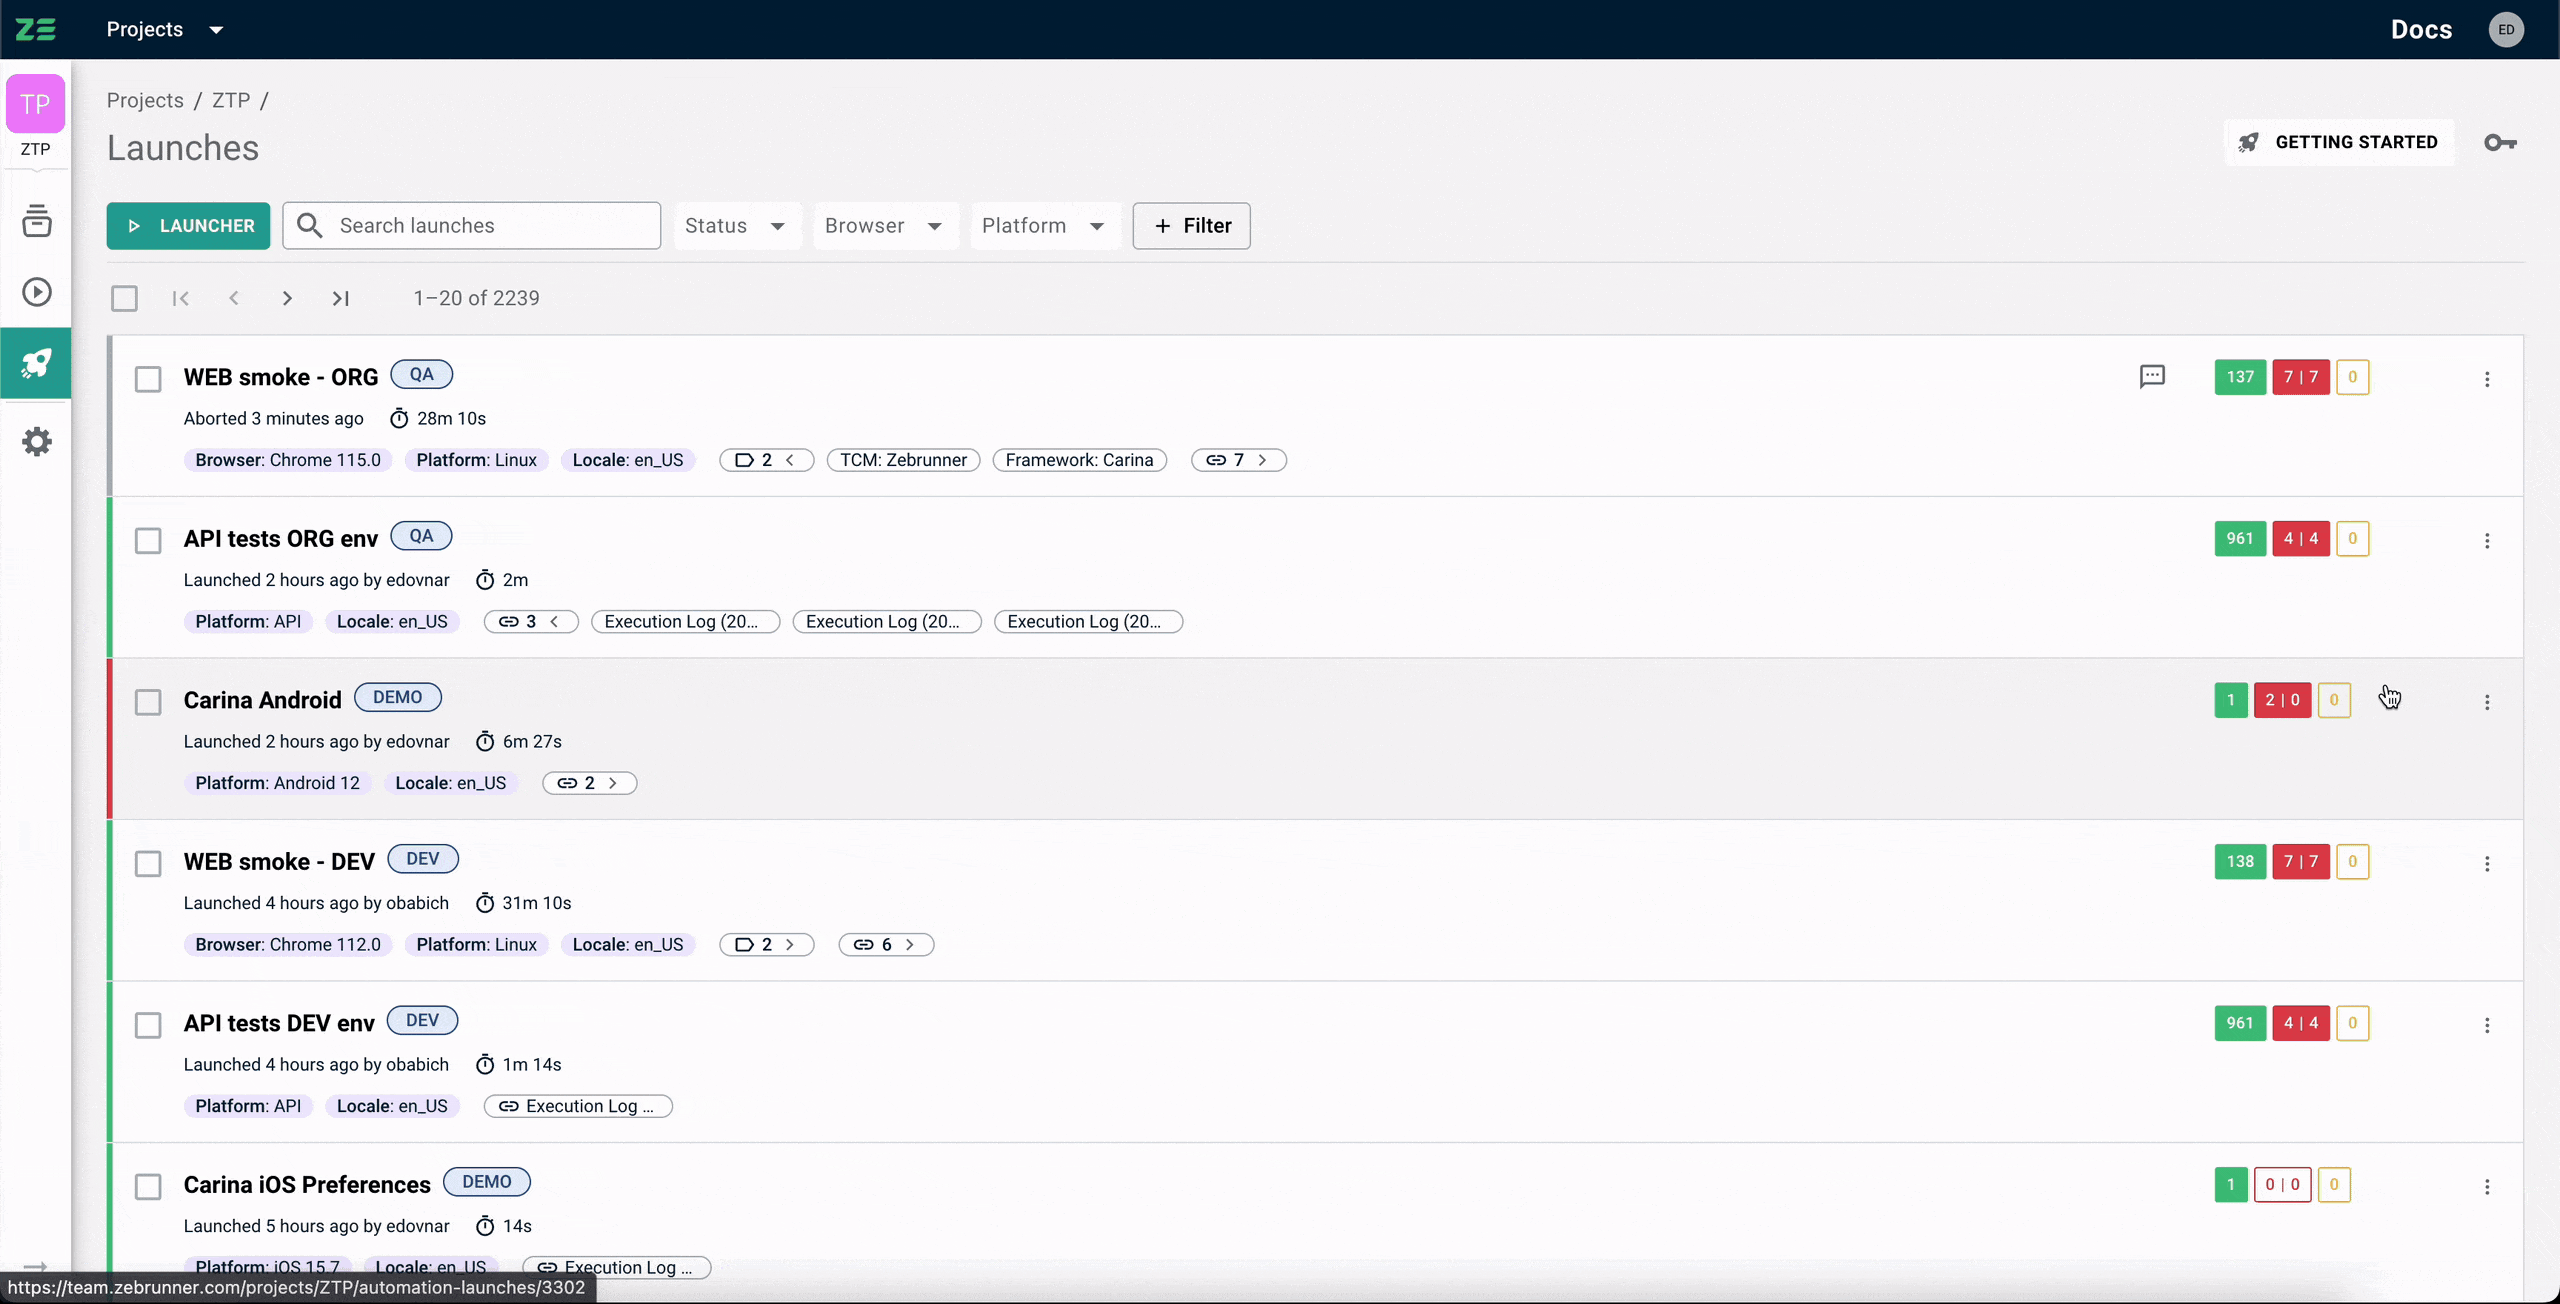
Automation launches#
Automation launch represents a collection of tests executed together (in a way, an automation launch can be treated as a test suite execution) at a particular time.
Automation launch statuses#
An automation launch can have one of the following statuses:
| Status | Definition |
|---|---|
| QUEUED | Indicates that a launch was scheduled via Launcher, but has not actually started yet |
| IN PROGRESS | Indicates that a launch contains tests that are still being executed |
| PASSED | Indicates that that all tests are passed or classified as known issues |
| FAILED | Indicates that a launch contains at least one failure, but is not classified as a known issue or skipped test |
| SKIPPED | Indicates that there were no tests executed |
| ABORTED | Indicates that a launch was interrupted by a user or system (e.g. on timeout) |
Automation launch attributes#
Additionally, an automation launch may have the following optional attributes:
- Environment
-
Indication of an environment where the application under test is deployed (e.g. stage, dev, production). Environment can only be set before execution via reporting agent parameters and cannot be updated once set.
- Platform
-
Indication of an actual platform that is used for application testing. In case of web application UI tests, it can be a combination of a browser name and its version. By default, a platform is set to
API. Can be set via reporting agent parameters and cannot be updated once set. - Labels
-
Labels are a set of arbitrary key-value pairs that can be attached to an automation launch via reporting agent APIs, allowing you to link custom metadata.
- Build
-
Indicates a revision/version/build number of an application under tests. Can be set via reporting agent parameters and cannot be updated once set.
- Notification channels
-
Notification channels are used to supply information on the specific means of notifying users about important events happening during an automation launch (e.g. failed test or launch finish). Notification channels can be defined via reporting agent configuration or set via Launcher.
Working with automation launches#
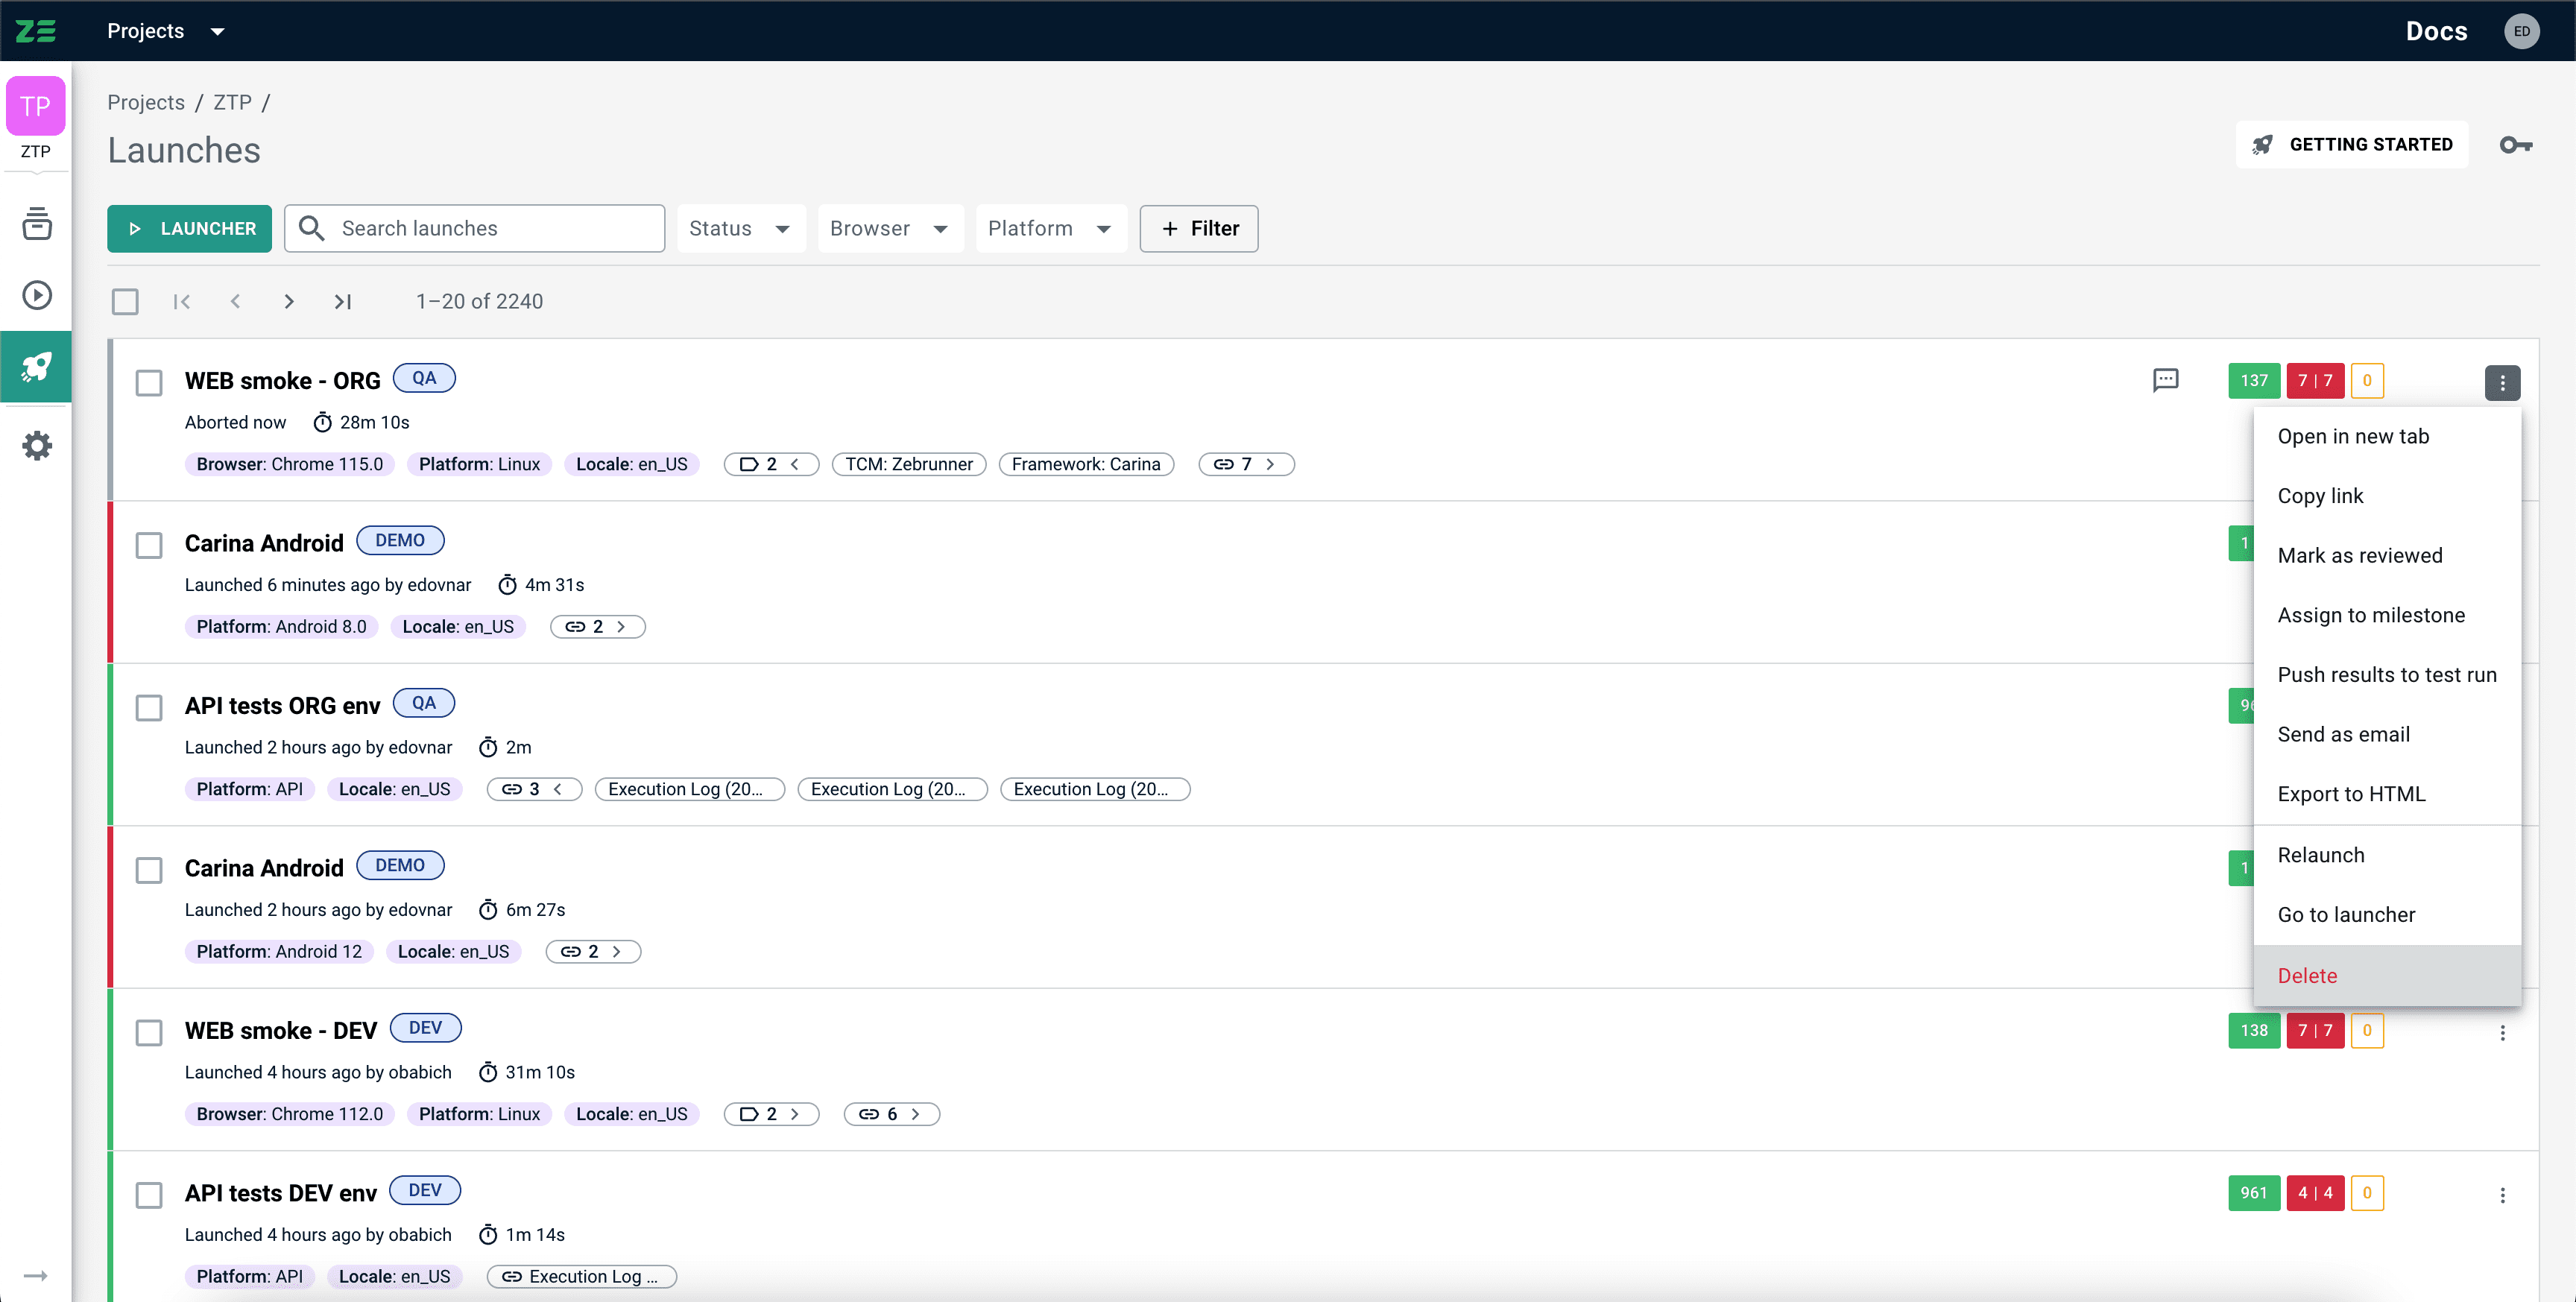
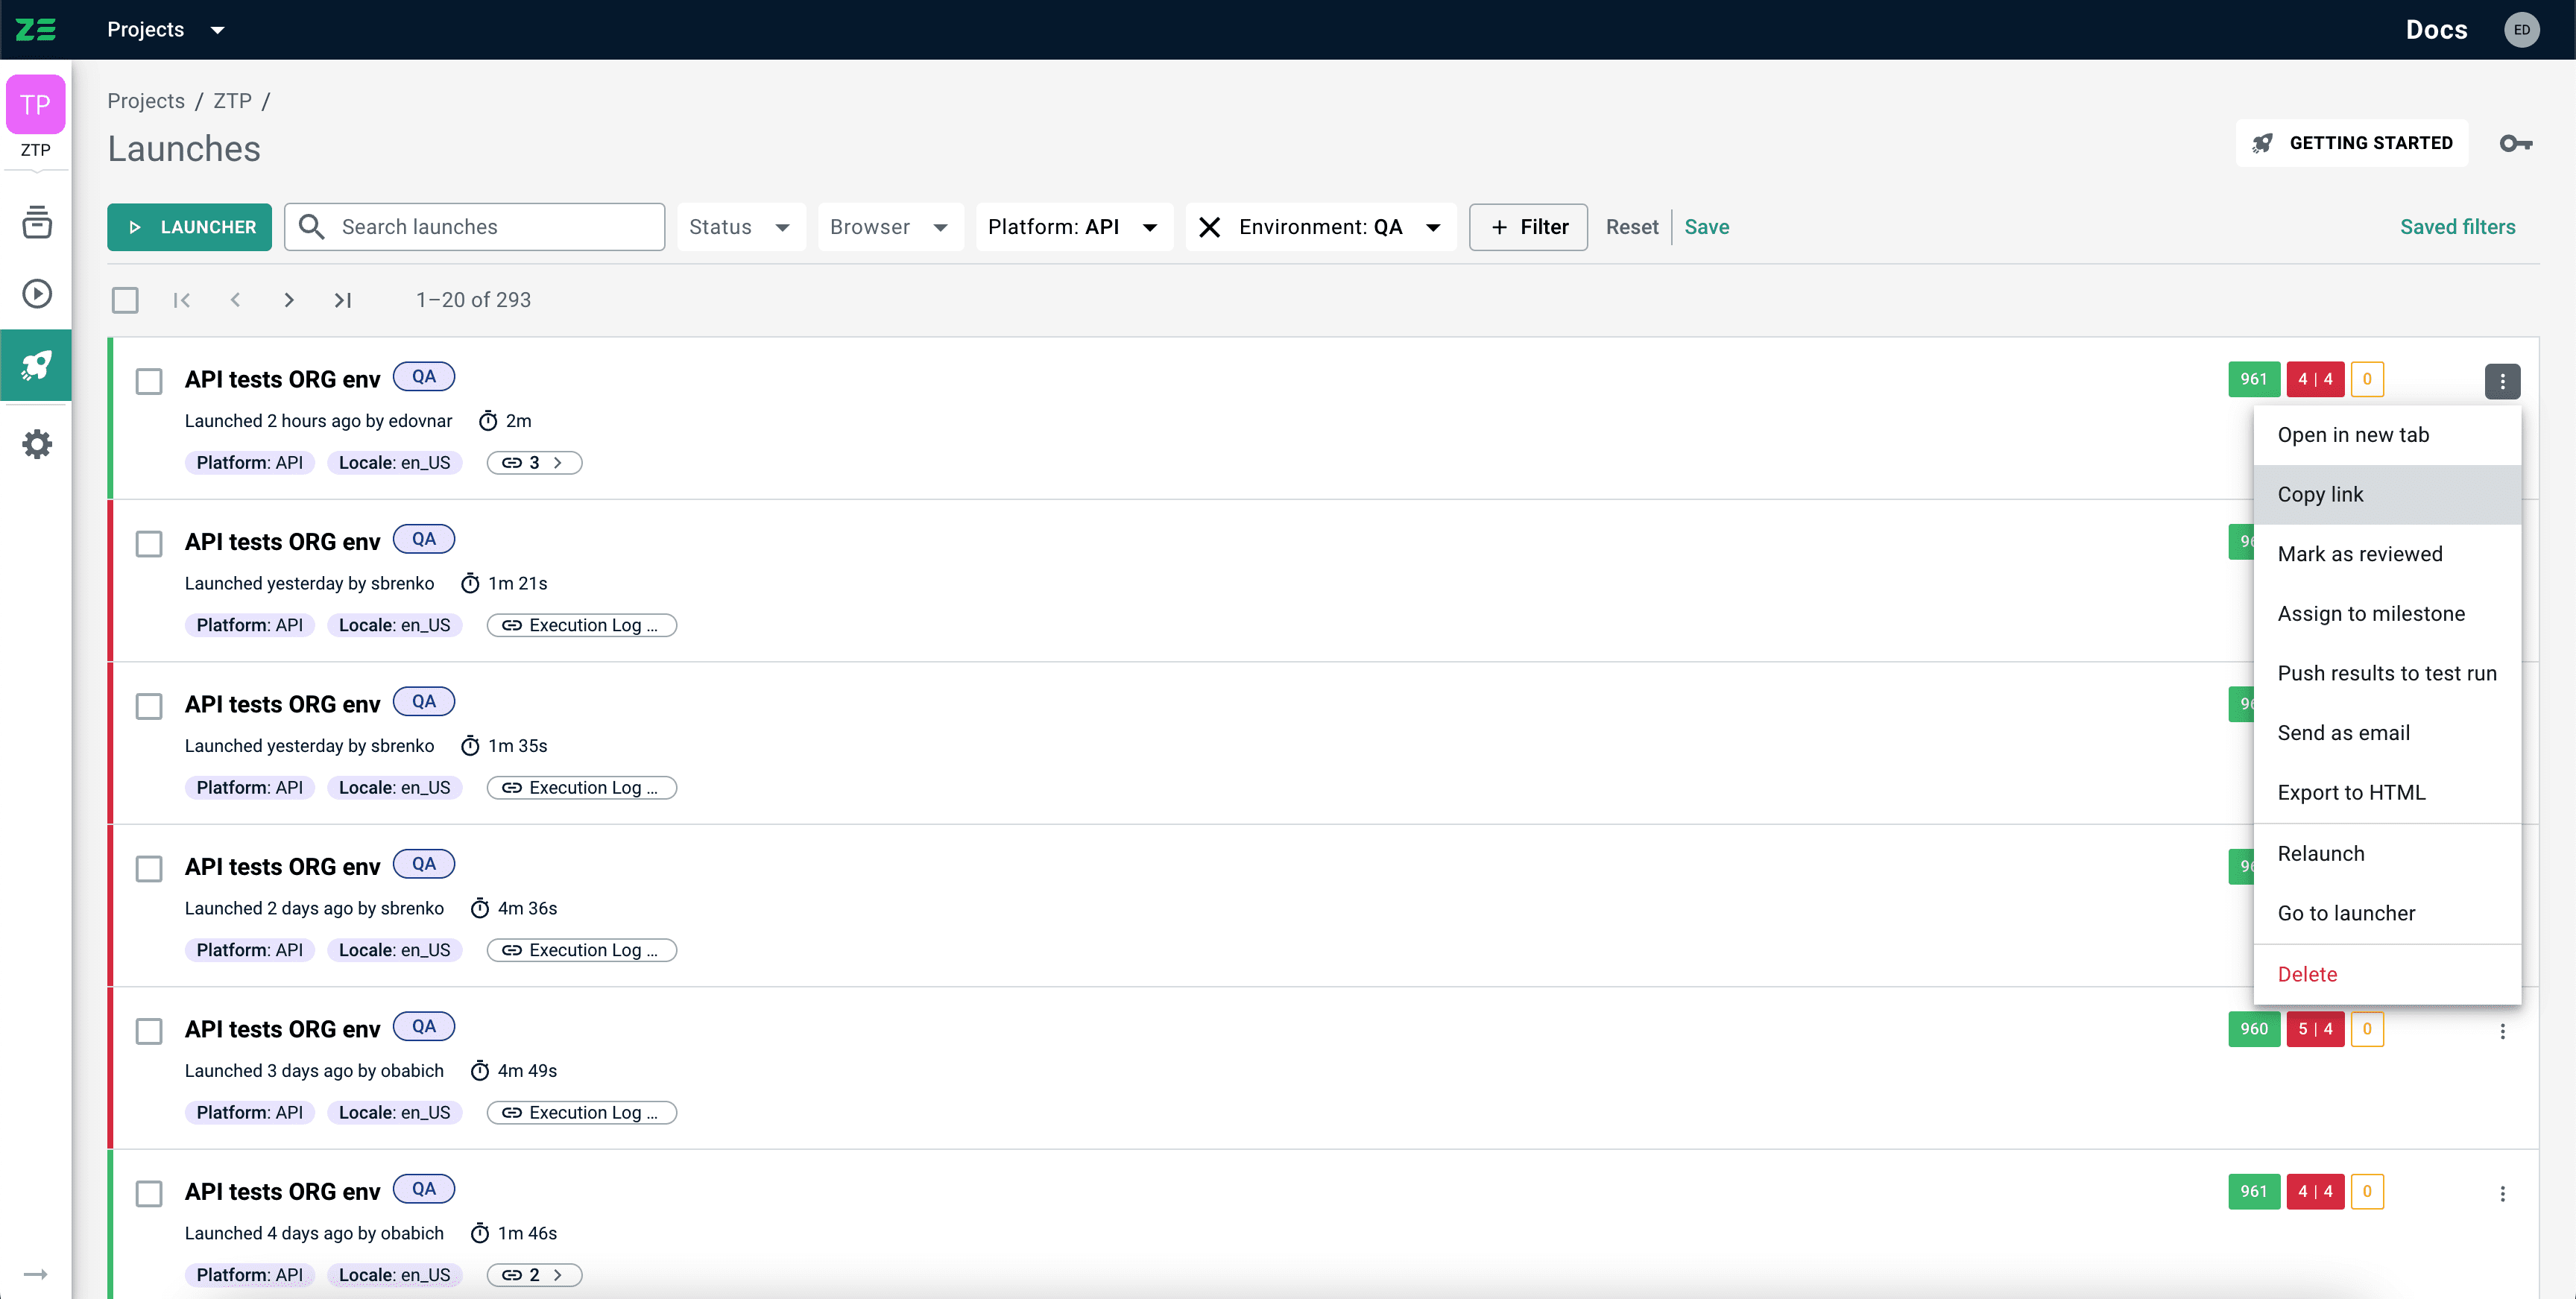
Most operations on an automation launch can be performed from either the Automation launches grid or a detailed Automation launch view (test results). Below is the summary of key operations.
Relaunch#
Relaunch allows to repeat execution of some or all tests with an ability to override or use the exact same configuration that the original launch had. Tests executed in scope of a relaunch will update corresponding executions in the original launch.
Info
The Relaunch action is only available for launches executed via Launcher or an integrated CI server
To perform a relaunch, complete the following steps:
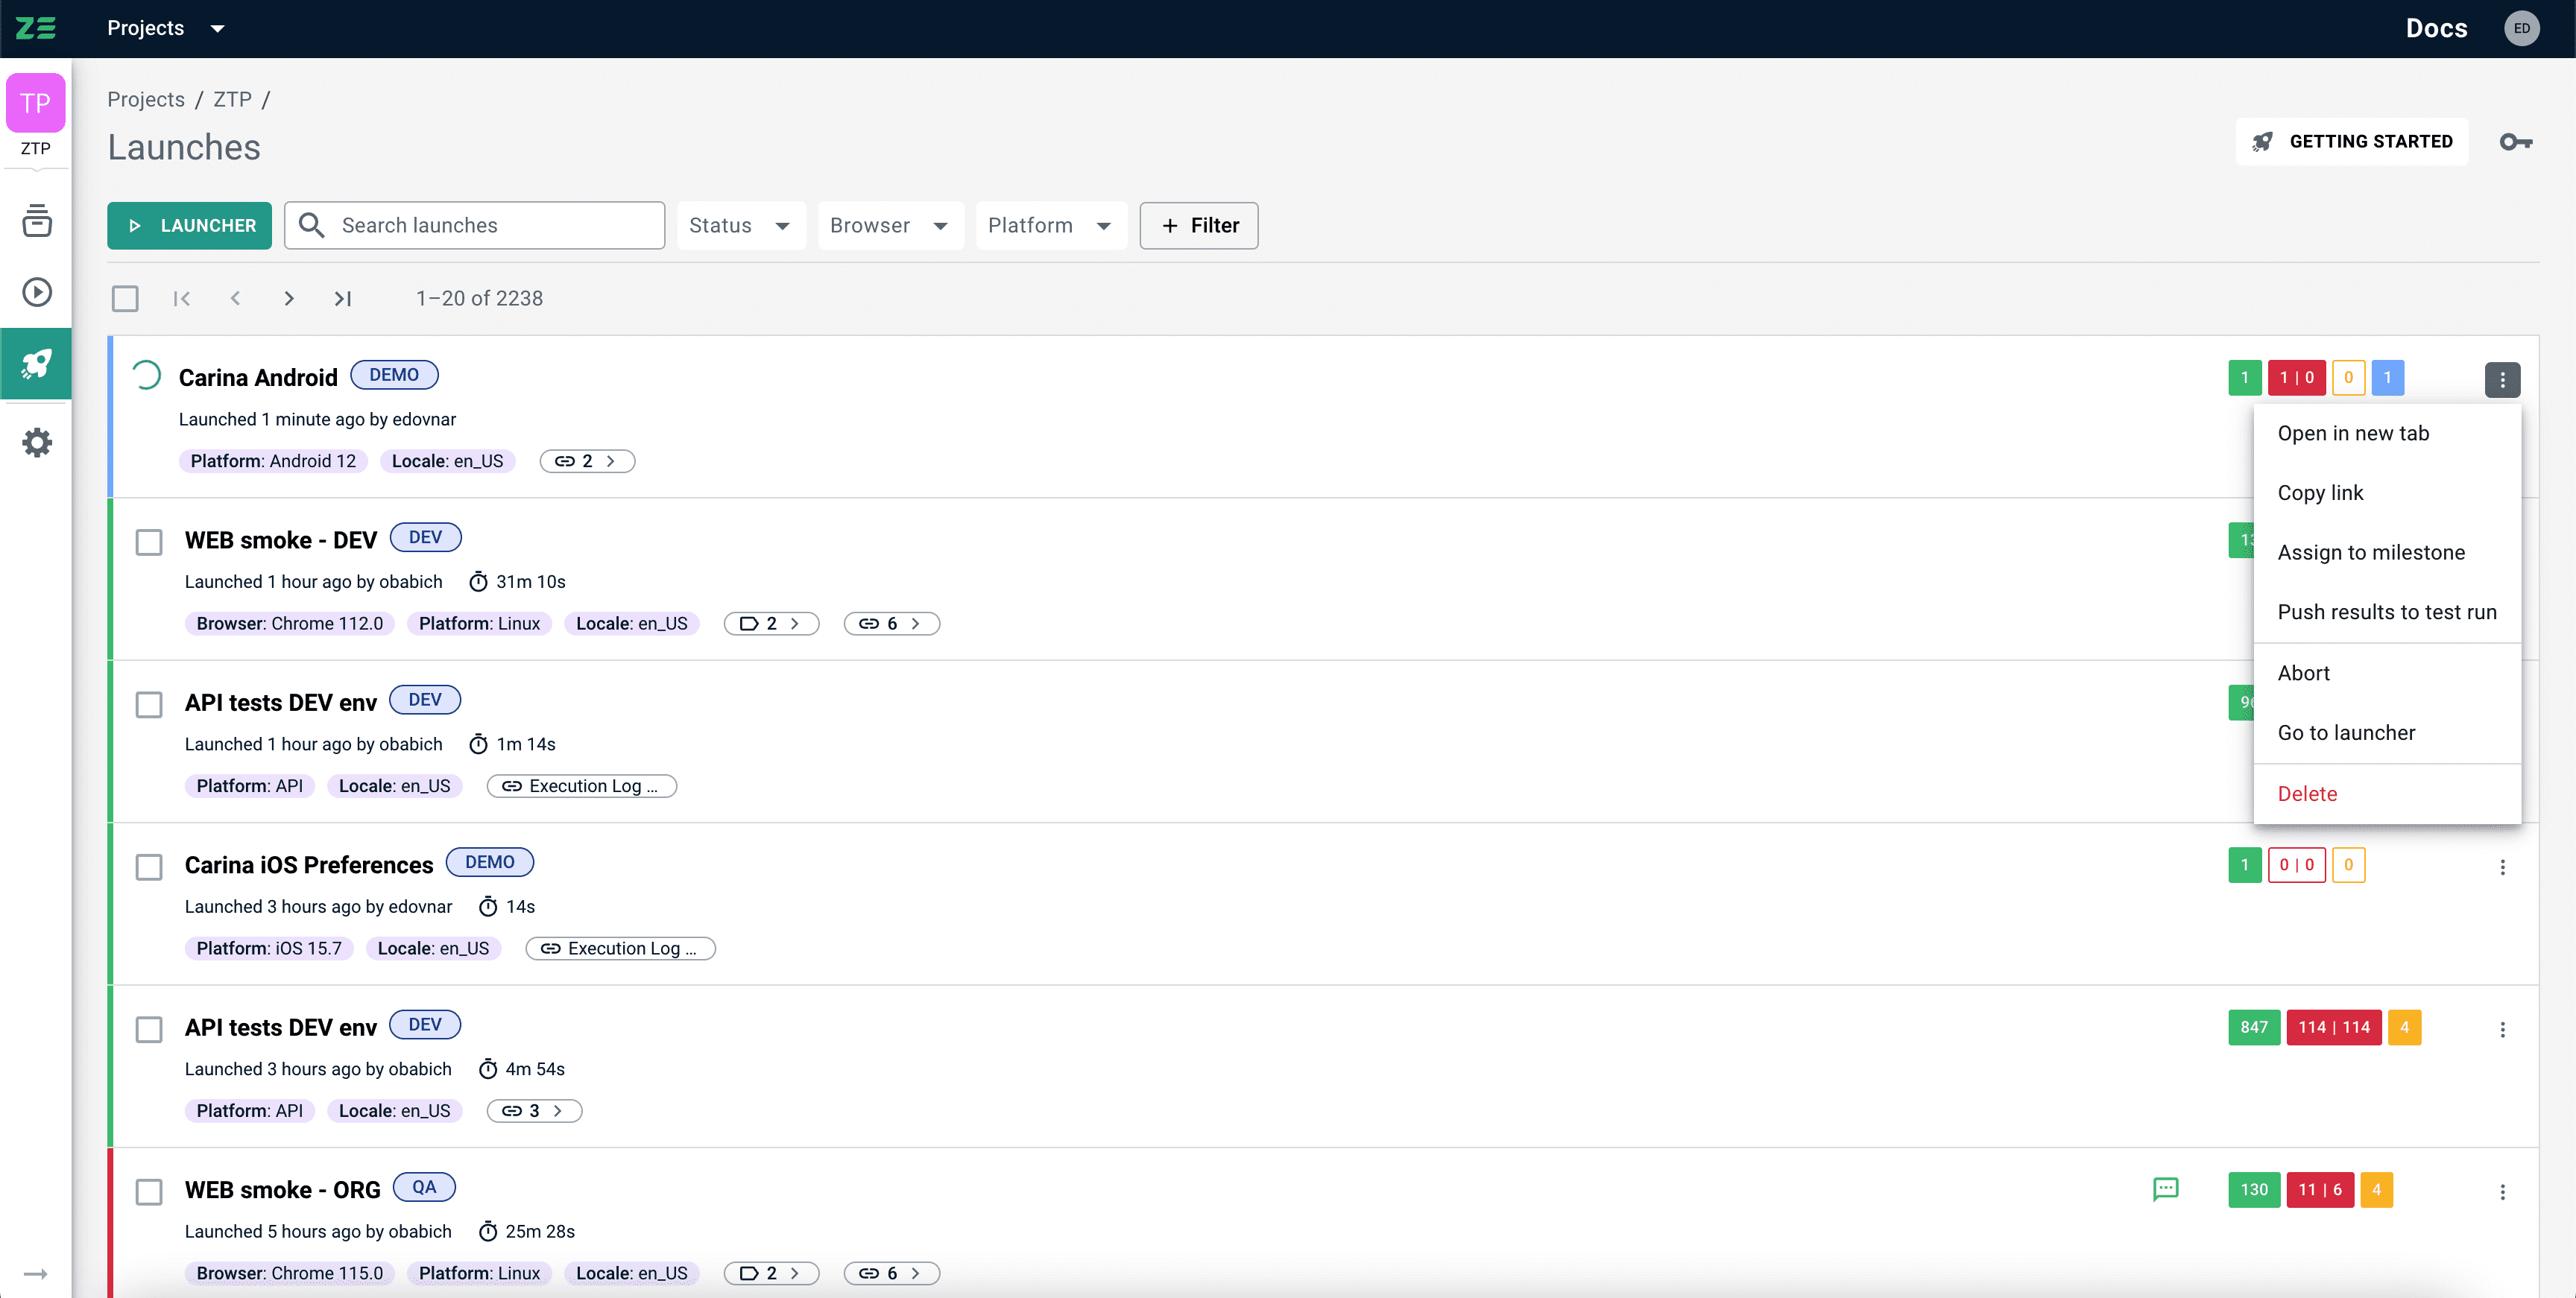
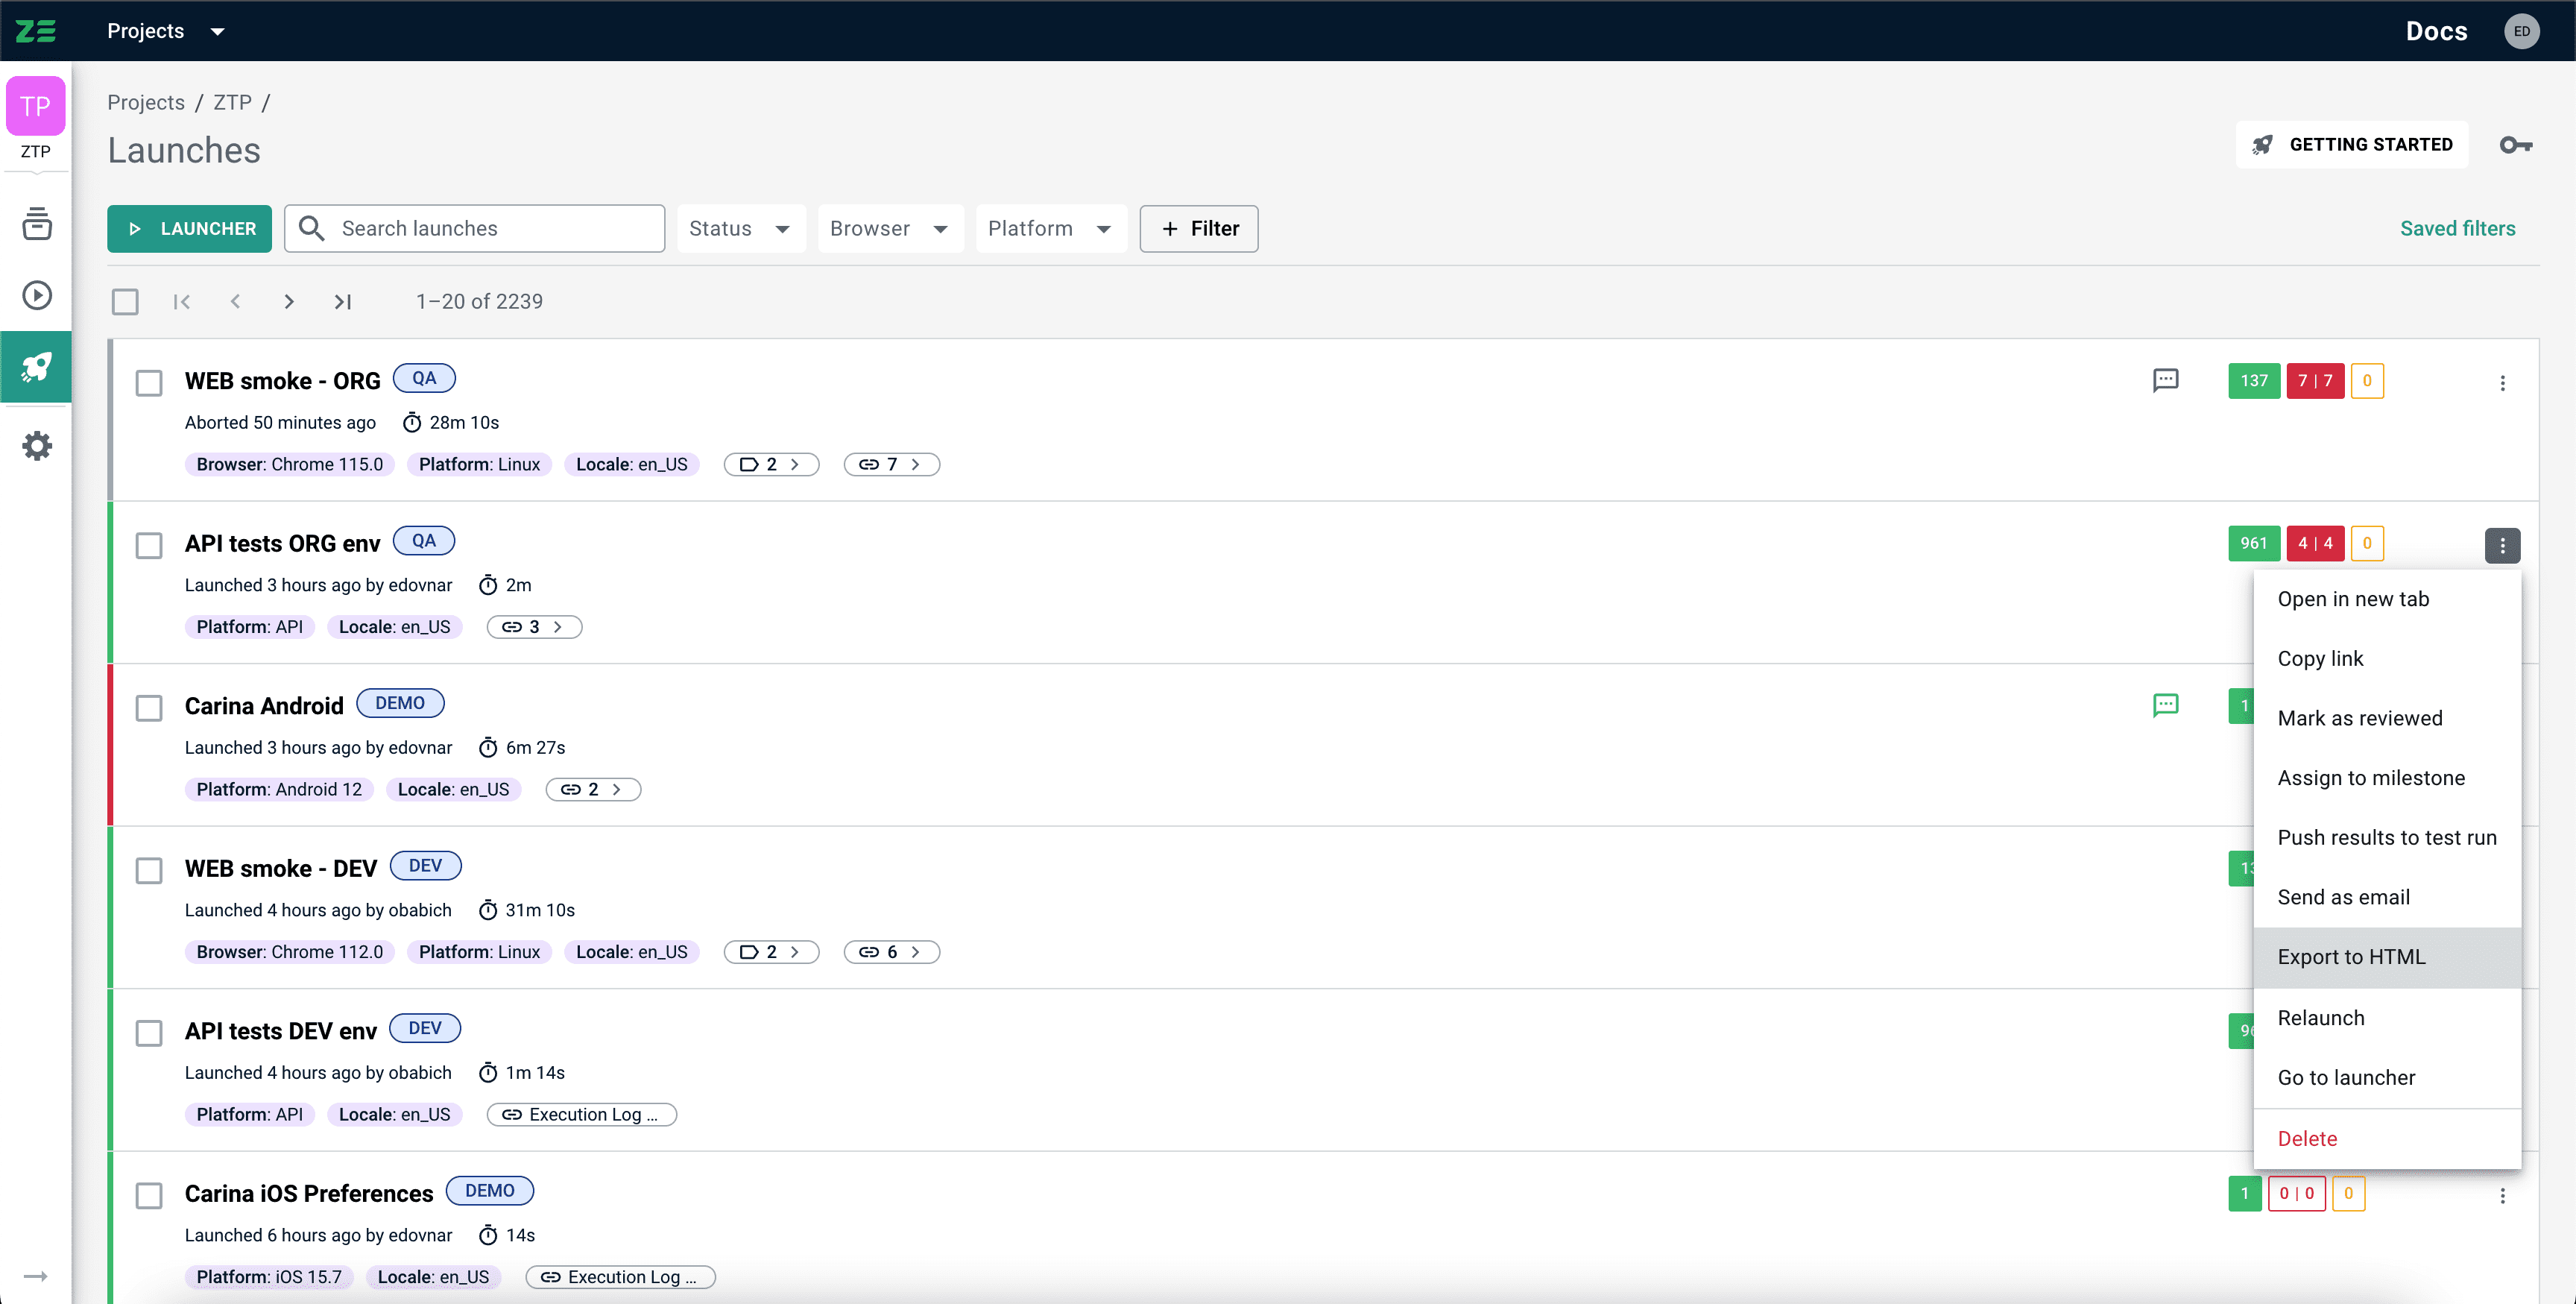
- On the Automation launches grid, pick a launch and go to More Options on the right
- Press Relaunch. The Relaunch dialogue will appear
- Choose what tests you want to relaunch: all tests or failures only
- Confirm the selection by pressing Relaunch. You’ll be redirected to the Launcher wizard with the configurations provided during the previous execution.
- Change the automation launch configurations if needed (learn more about Launcher)
- Click Launch
Alternatively, a relaunch may be triggered from the Automation launch view (test results) by clicking :

Bulk relaunch
You can relaunch several automation launches at a time. Select multiple automation launches using checkboxes on the Automation launches grid and click Relaunch in the bulk actions panel (it will appear above the grid)
Go to launcher#
Go to launcher allows to repeat execution of tests with an ability to override or use the exact same configuration that the original launch had. Tests executed as a result of Go to launcher will create a new automation launch.
Info
Go to launcher action is only available for launches executed via Launcher
To start an automation launch with updated configurations or same configurations, complete the following steps:
- On the Automation launches grid, pick a launch and go to More Options on the right
- Press Go to launcher. You’ll be redirected to the Launcher wizard with the configurations provided during the previous execution
- Change the automation launch configurations if needed (learn more about Launcher)
- Click Launch
Alternatively, Go to launcher may be triggered from the Automation launch view (test results) by clicking :

Abort#
To abort an automation launch that is in progress, perform the following steps:
- On the Automation launches grid, pick a launch and go to More Options on the right
- Press Abort and confirm the action.
The automation launch will become aborted.
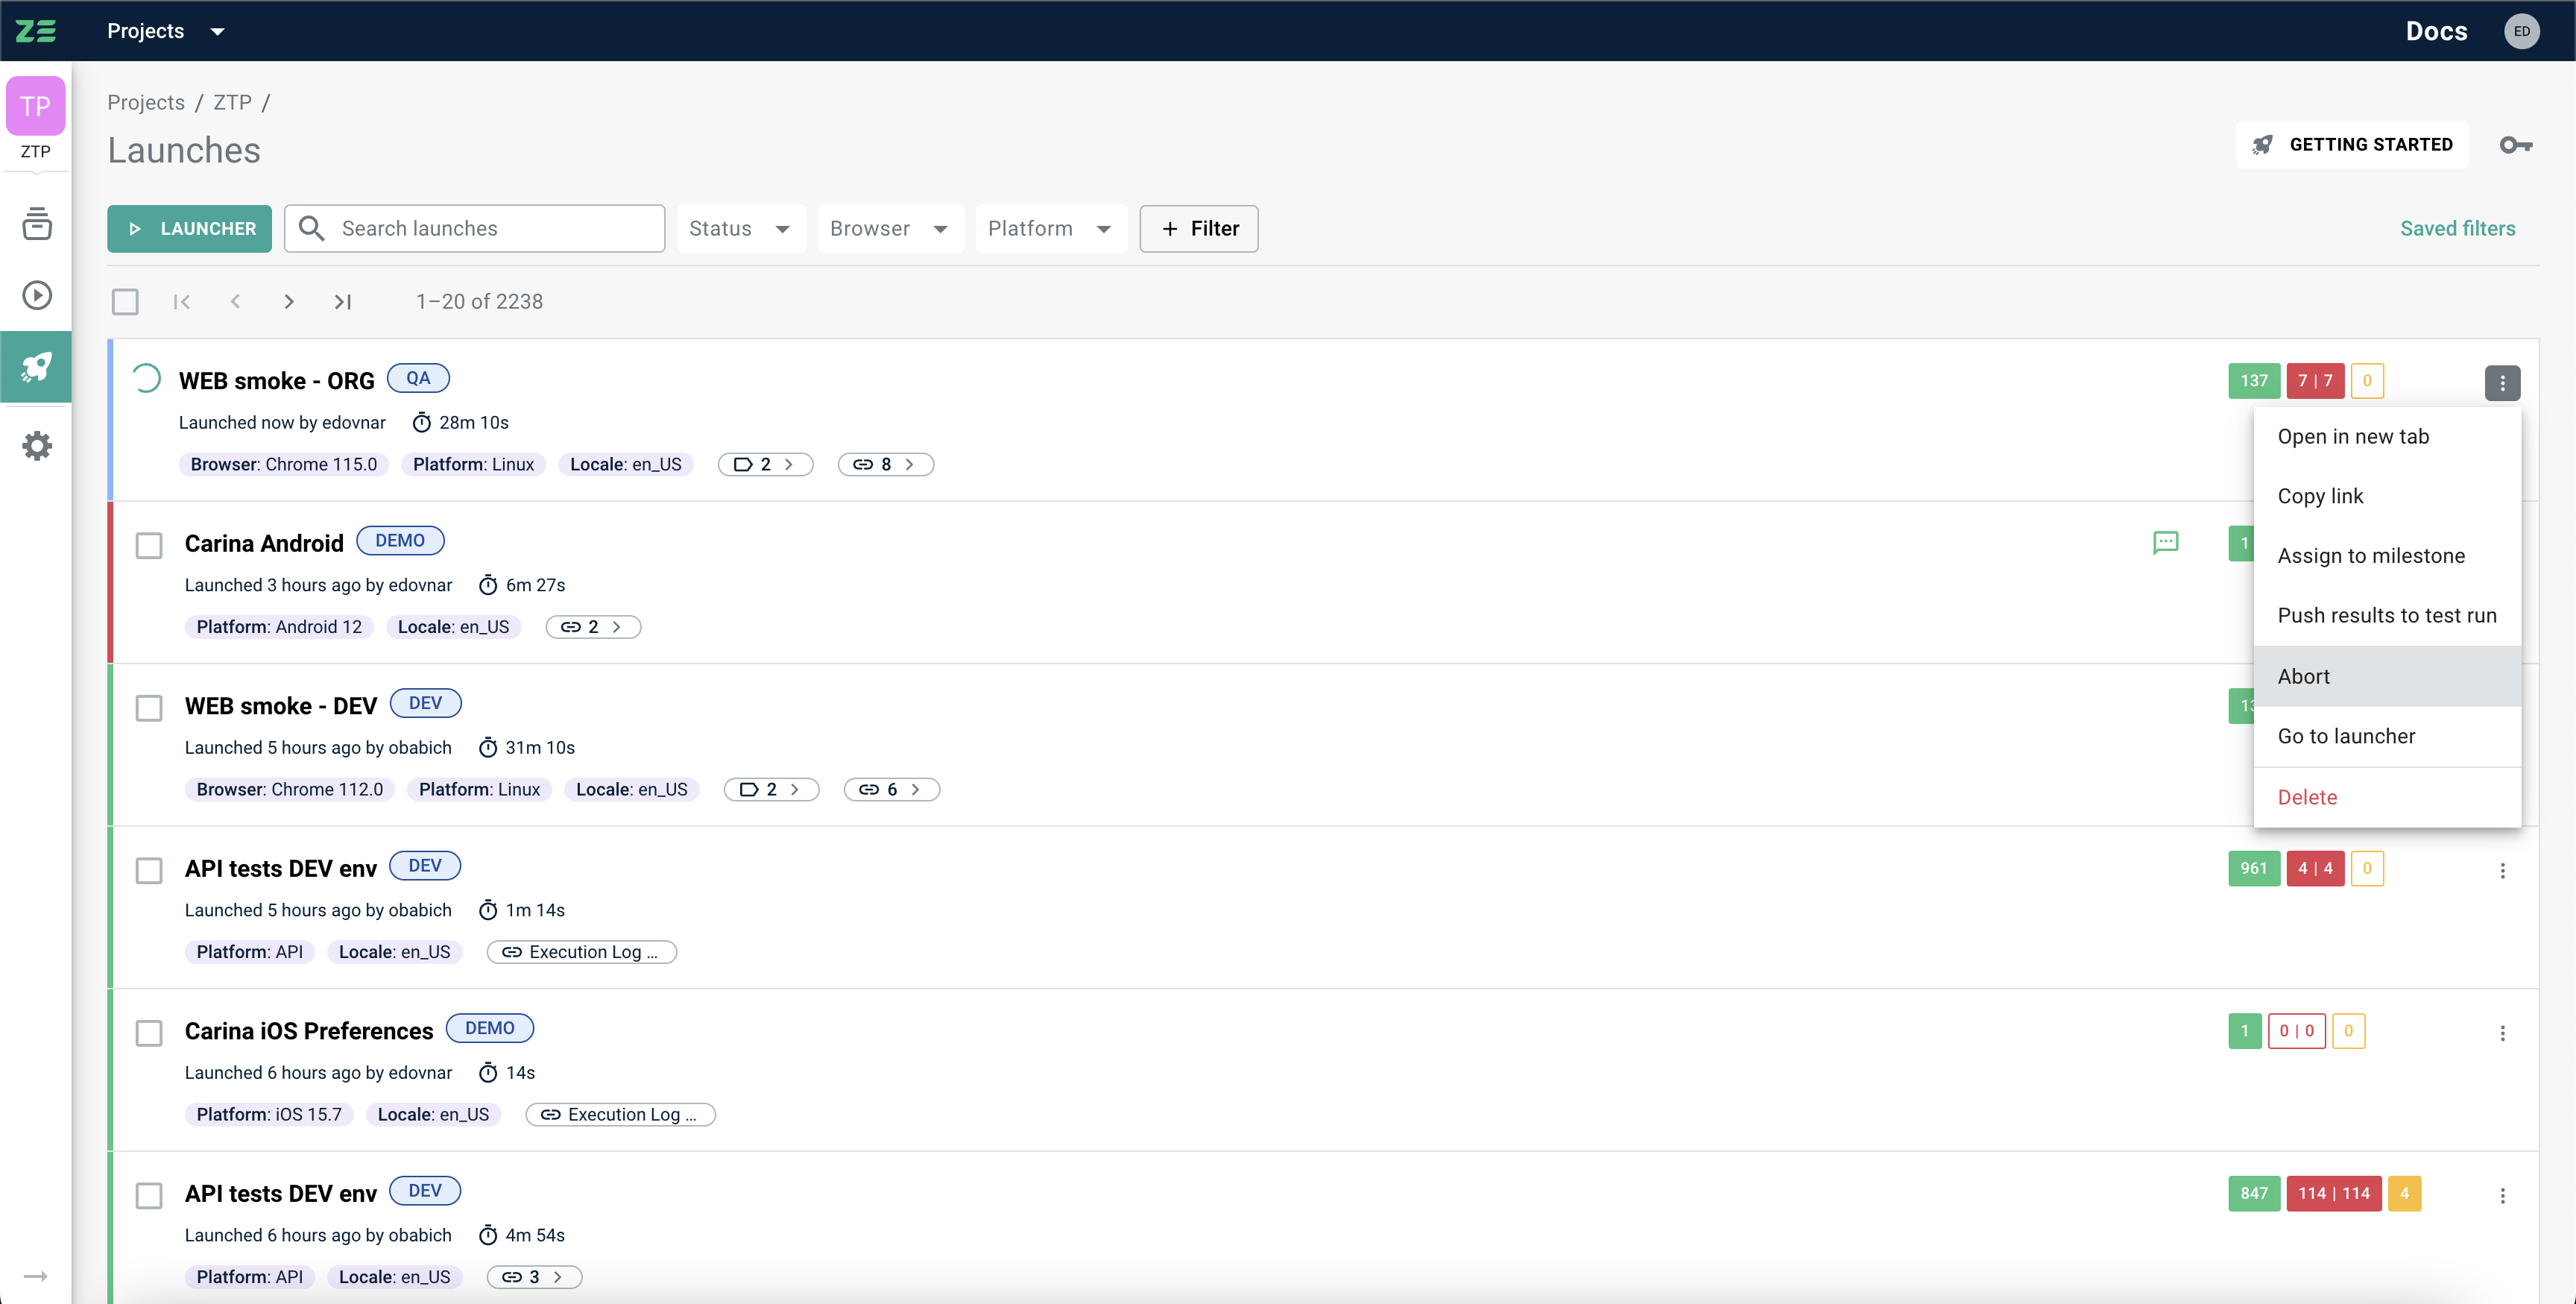
Bulk abortion
You can abort several automation launches at a time. Select multiple automation launches using checkboxes on the Automation launches grid and click Abort in the bulk actions panel (it will appear above the grid). Note: this action will only be available (active) when the selection contains launches eligible for abortion
Delete#
To delete an automation launch perform the following steps:
- On the Automation launches grid, pick a launch and go to More Options on the right
- Press Delete and confirm the action
The automation launch will be removed.
Bulk deletion
You can delete several automation launches at a time. Select multiple automation launches using checkboxes on the Automation launches grid and click Delete in the bulk actions panel (it will appear above the grid)
View launch summary#
Launch summary panel is available from a detailed Automation launch view (test results) and provides quick access to core automation launch attributes (such as platform, environment (if set), milestone (if set), labels and attached artifacts). Additionally, it contains a test results donut chart and a pass rate trend for this particular suite.

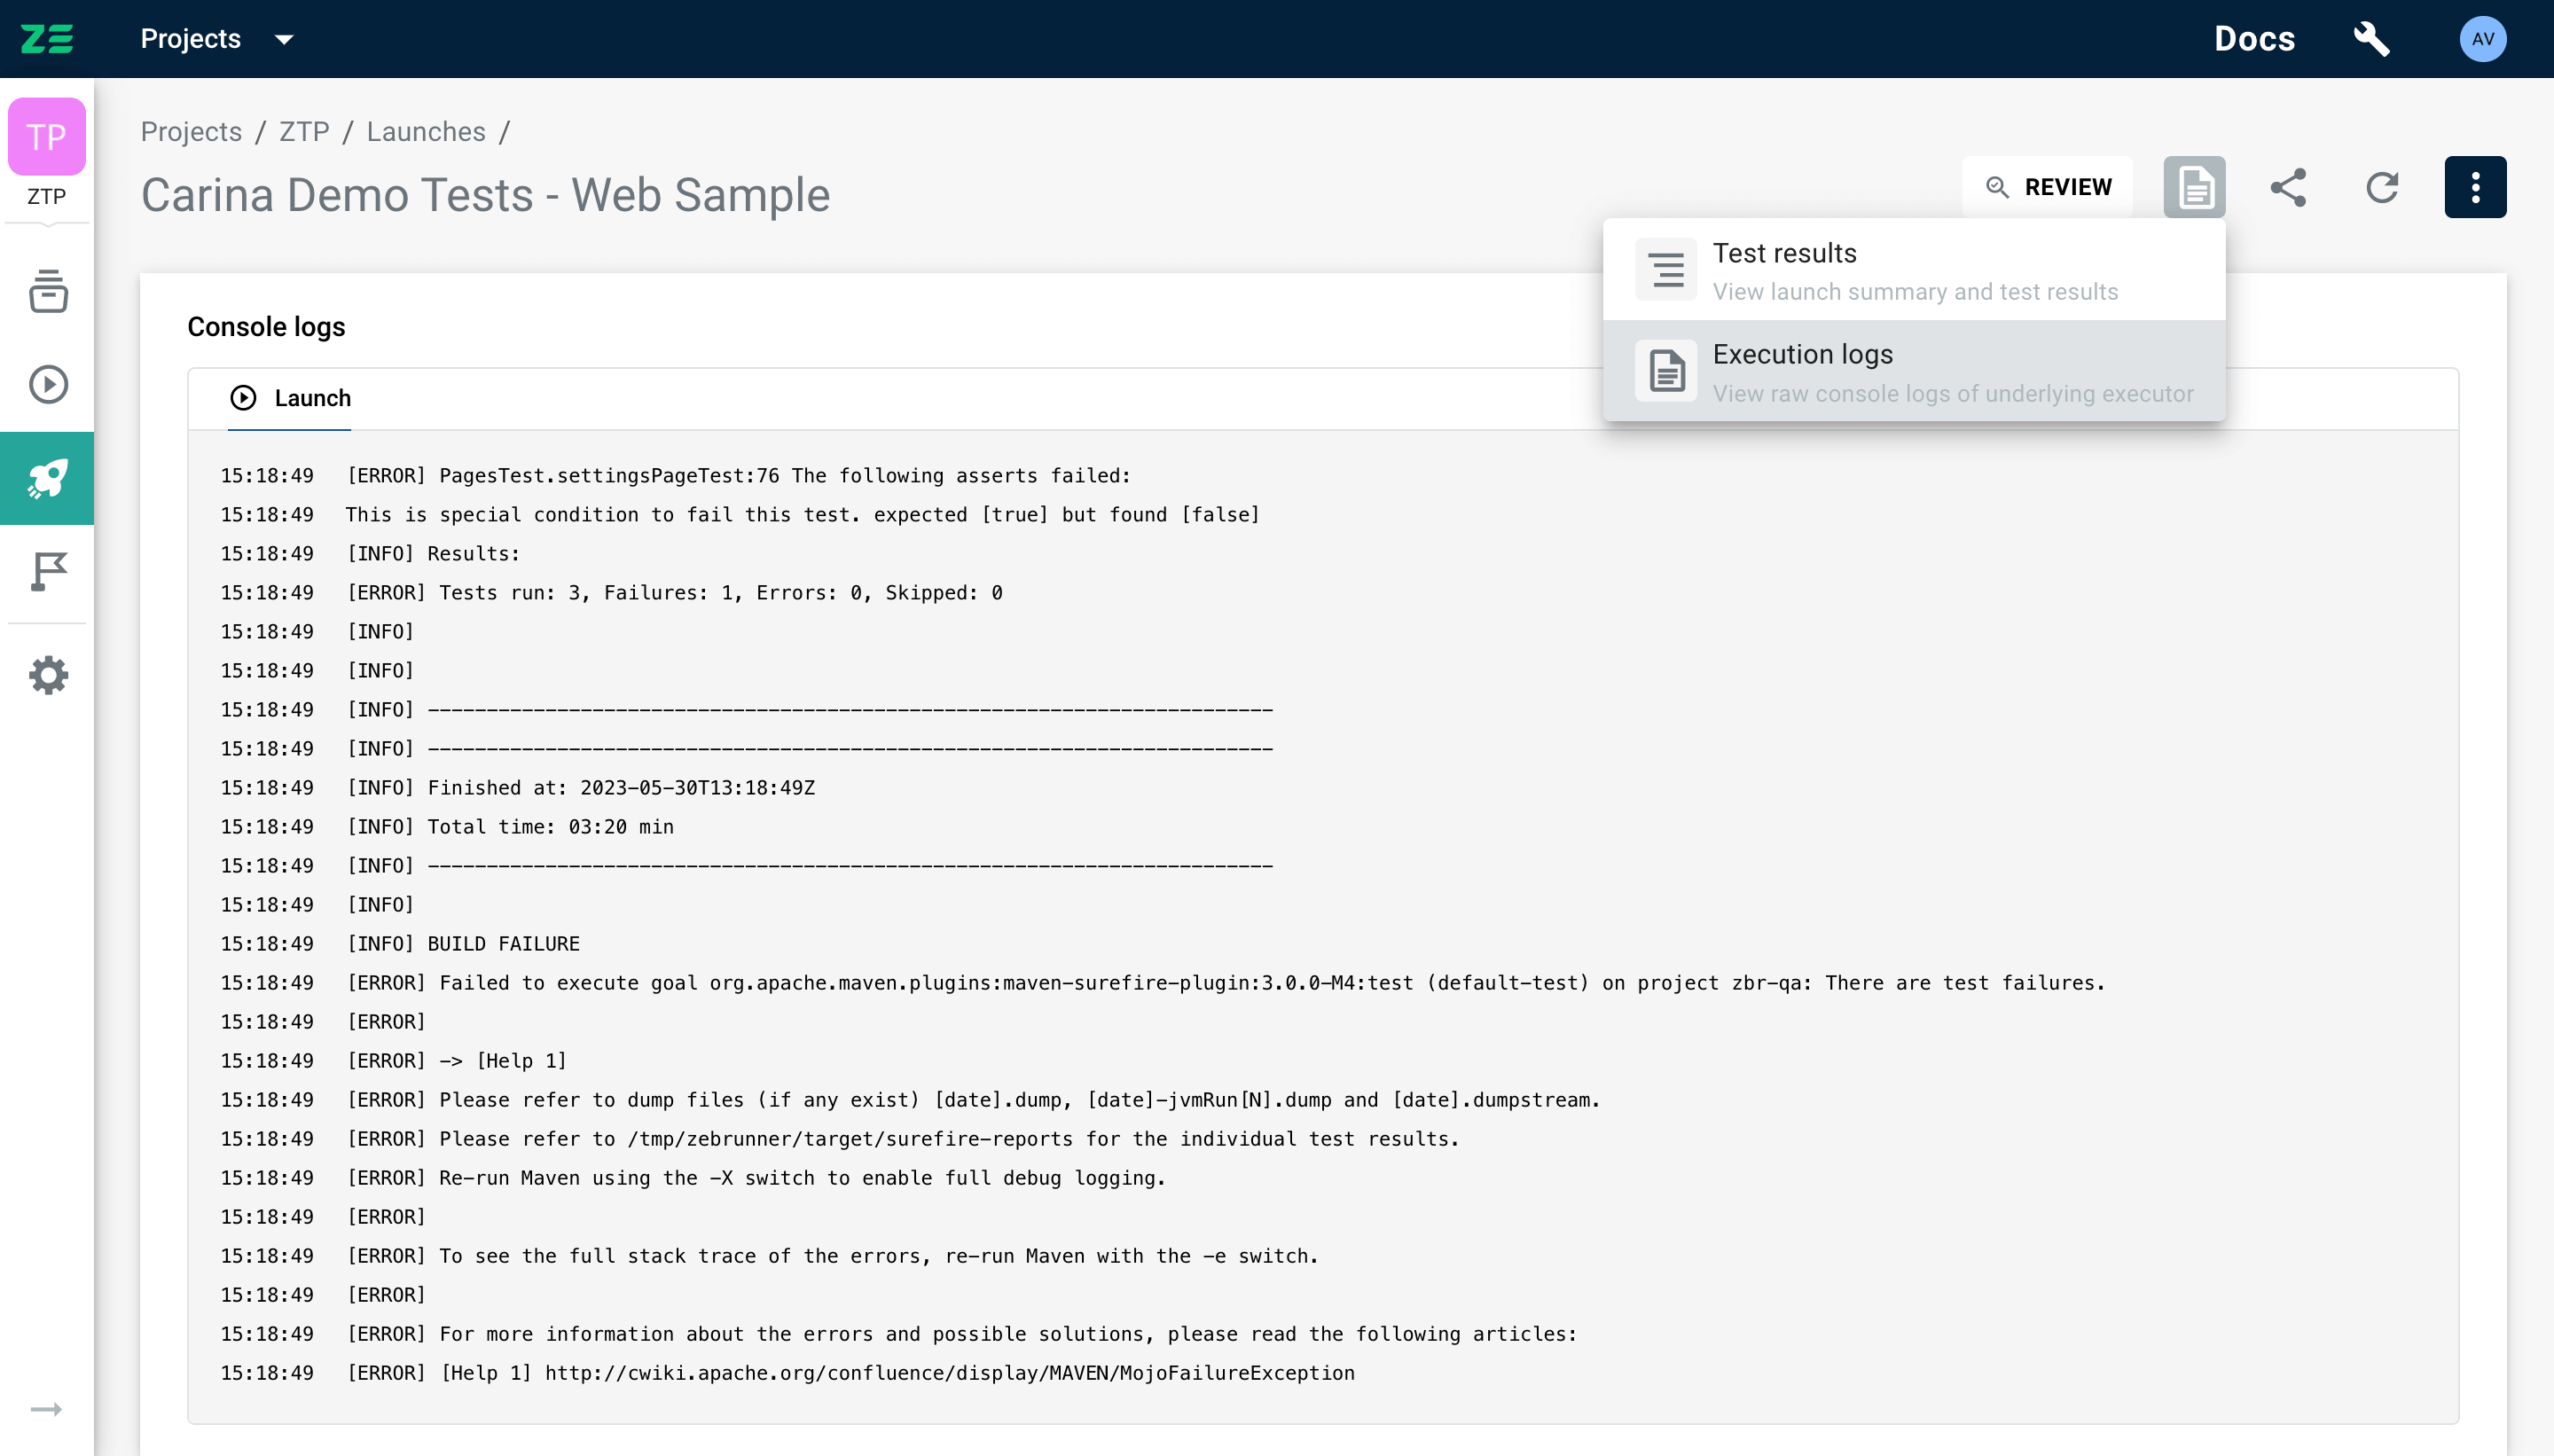
View execution logs#
Users can switch between viewing the test results and the execution logs by clicking on the "Test Results" and "Execution Logs" buttons, respectively.
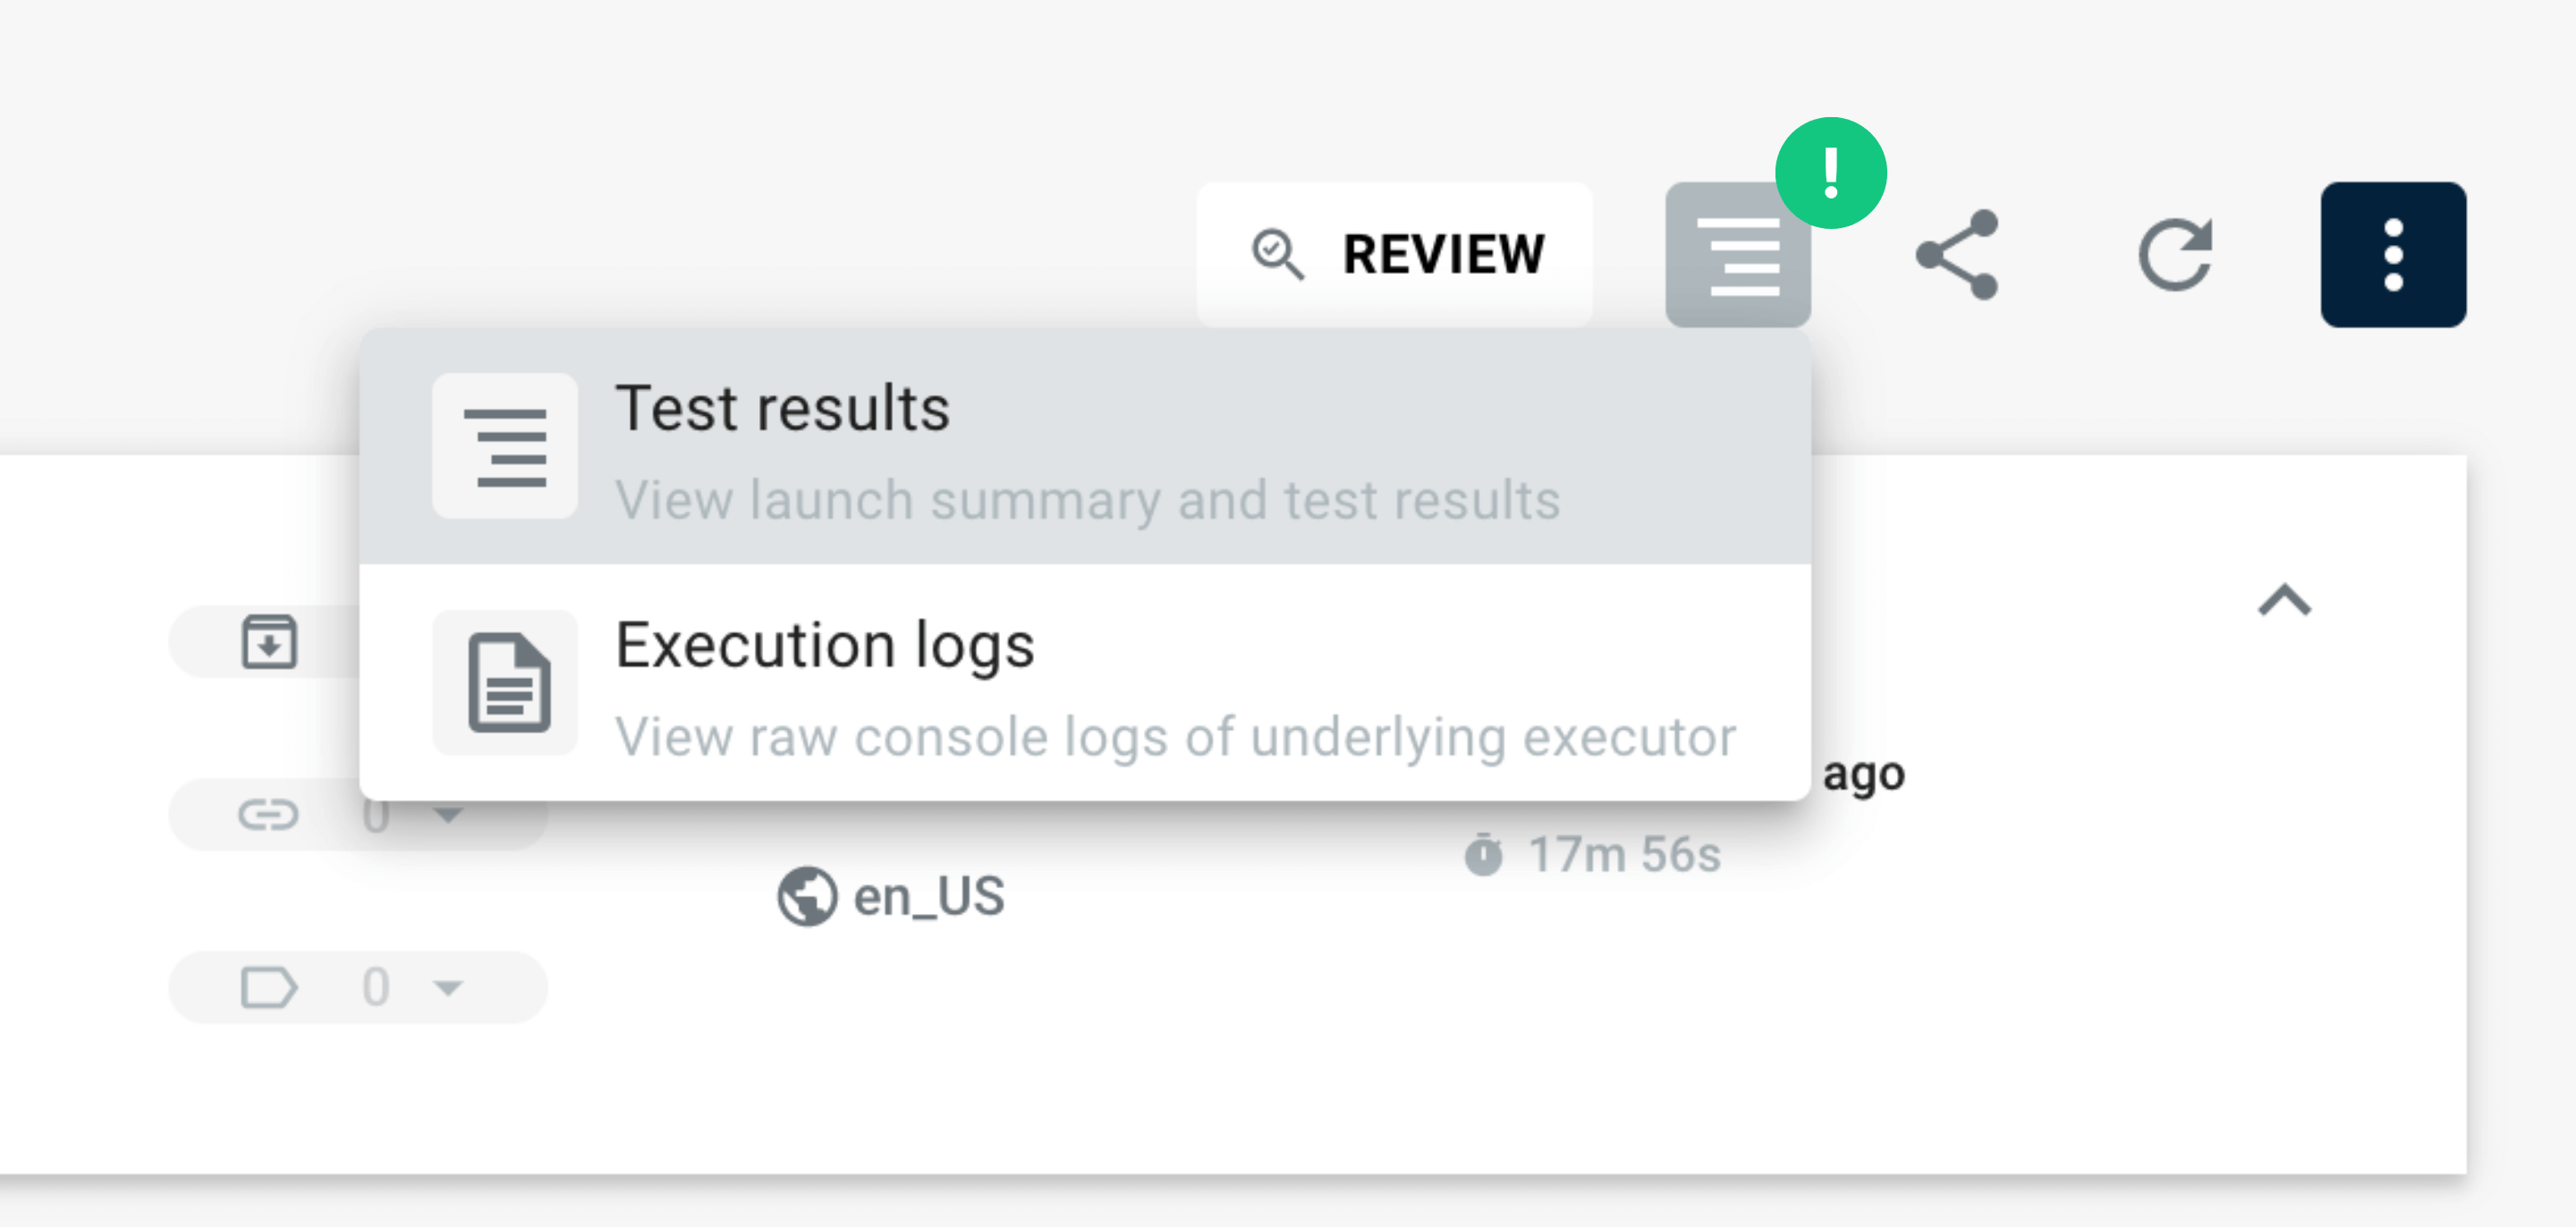
The Execution logs page will display a log viewer that allows users to view the logs for each launch attempt.
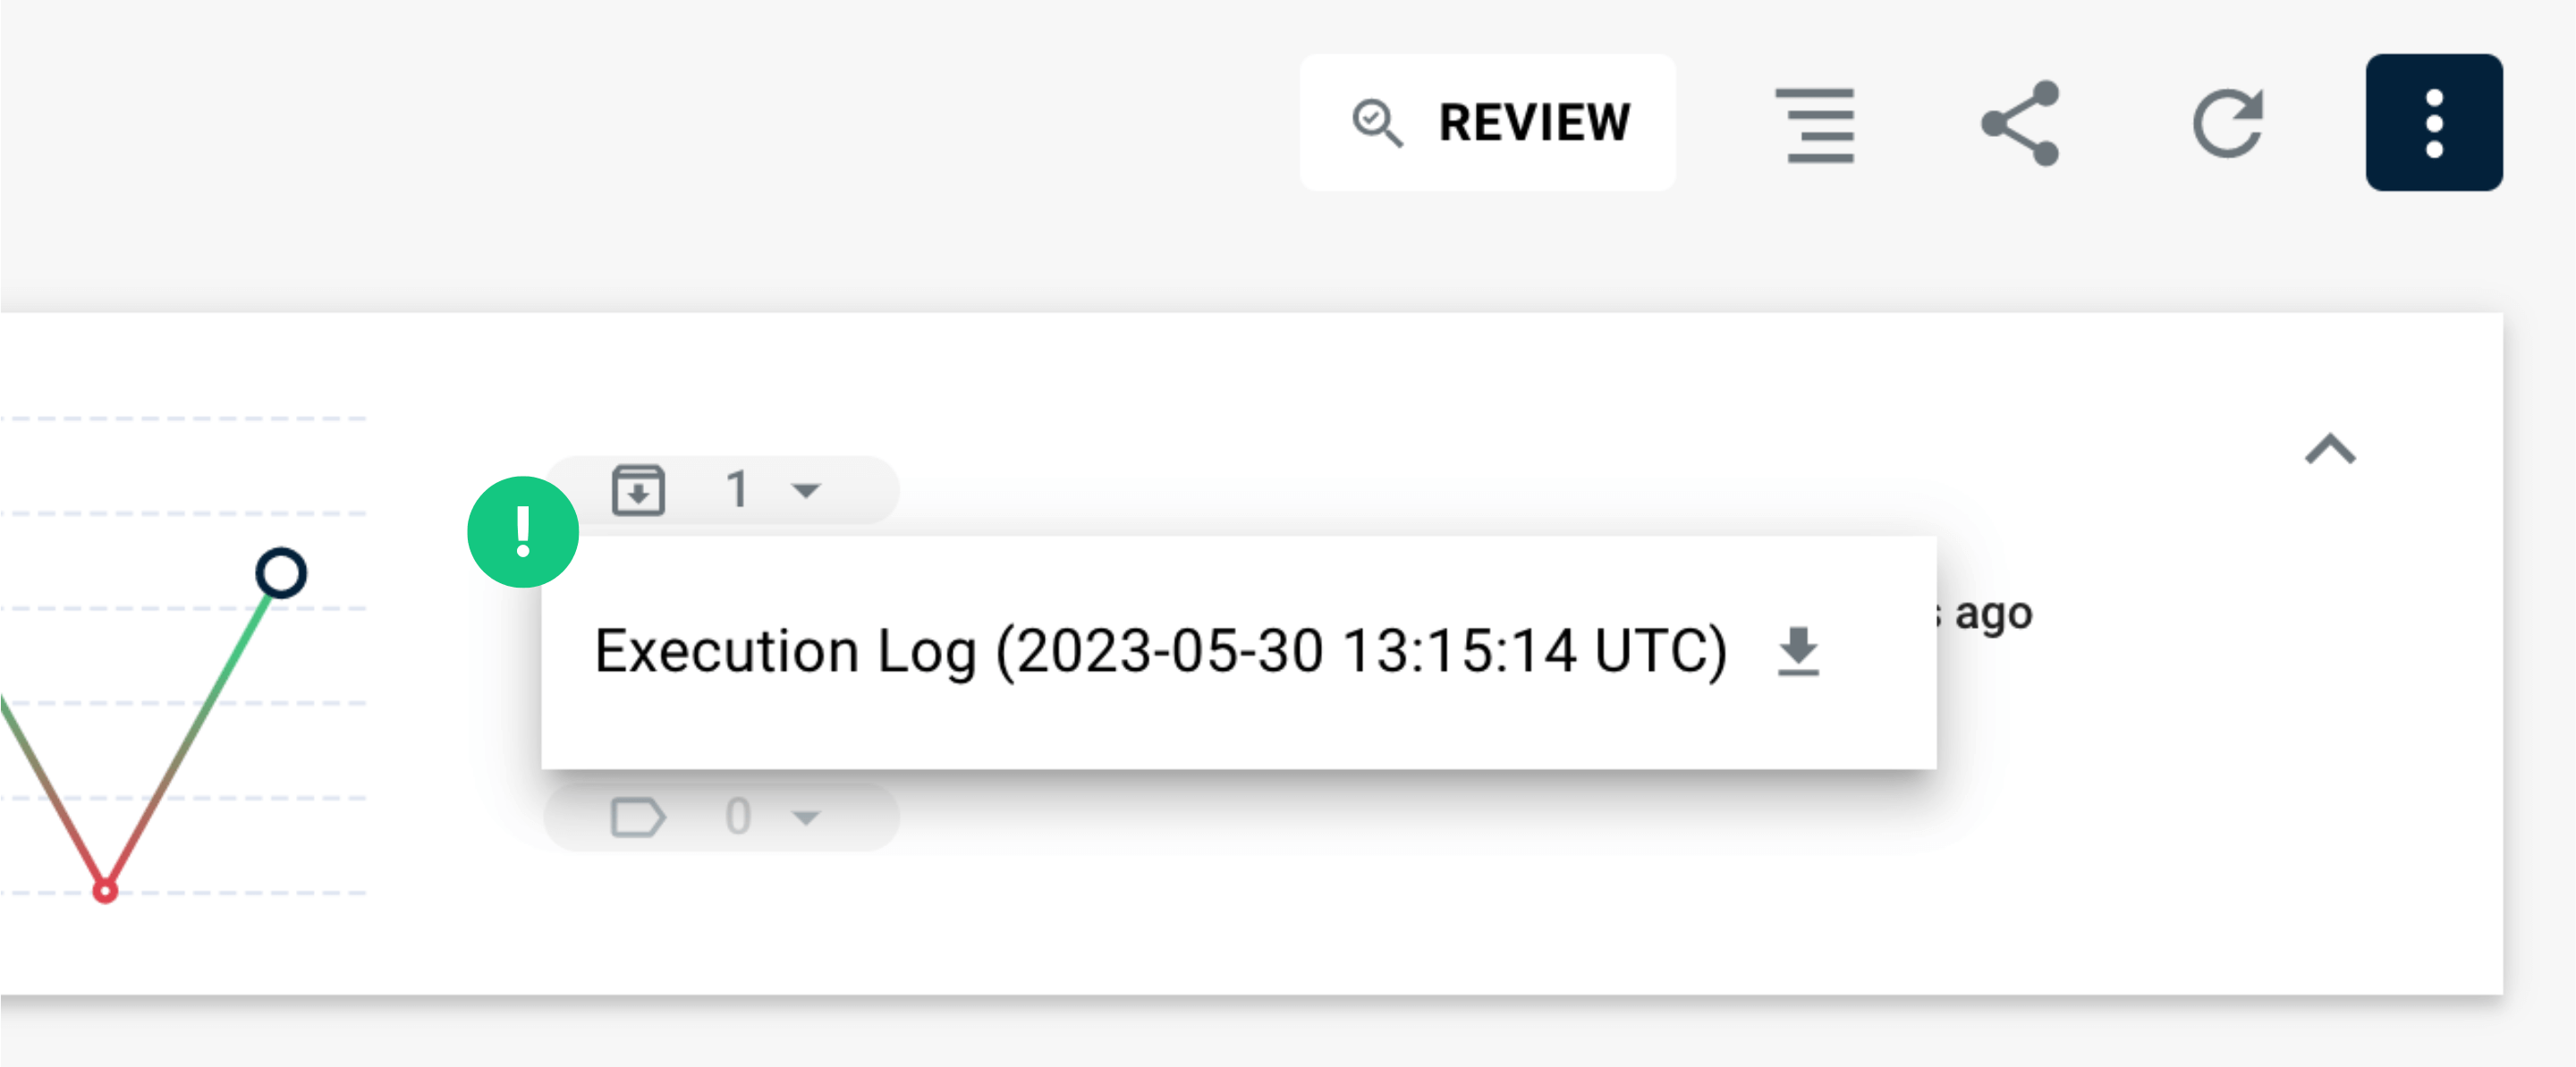
Users can also download the logs by clicking on the download button next to corresponding launch summary panel dropdown.
Review#
Zebrunner allows to maintain a high level of collaboration inside the automation team by providing comments for other users when someone has already reviewed the results of the automation launch and performed the required actions (e.g. reported to the team or filed an issue).
To mark an automation launch as reviewed, perform the following steps:
- On the Automation launches grid, pick a launch and go to More Options on the right
- Click Mark as reviewed, the Review dialogue will appear
- Provide a comment if necessary
- Click Mark as reviewed
A comment icon will appear. You can open the comment by clicking on the icon.
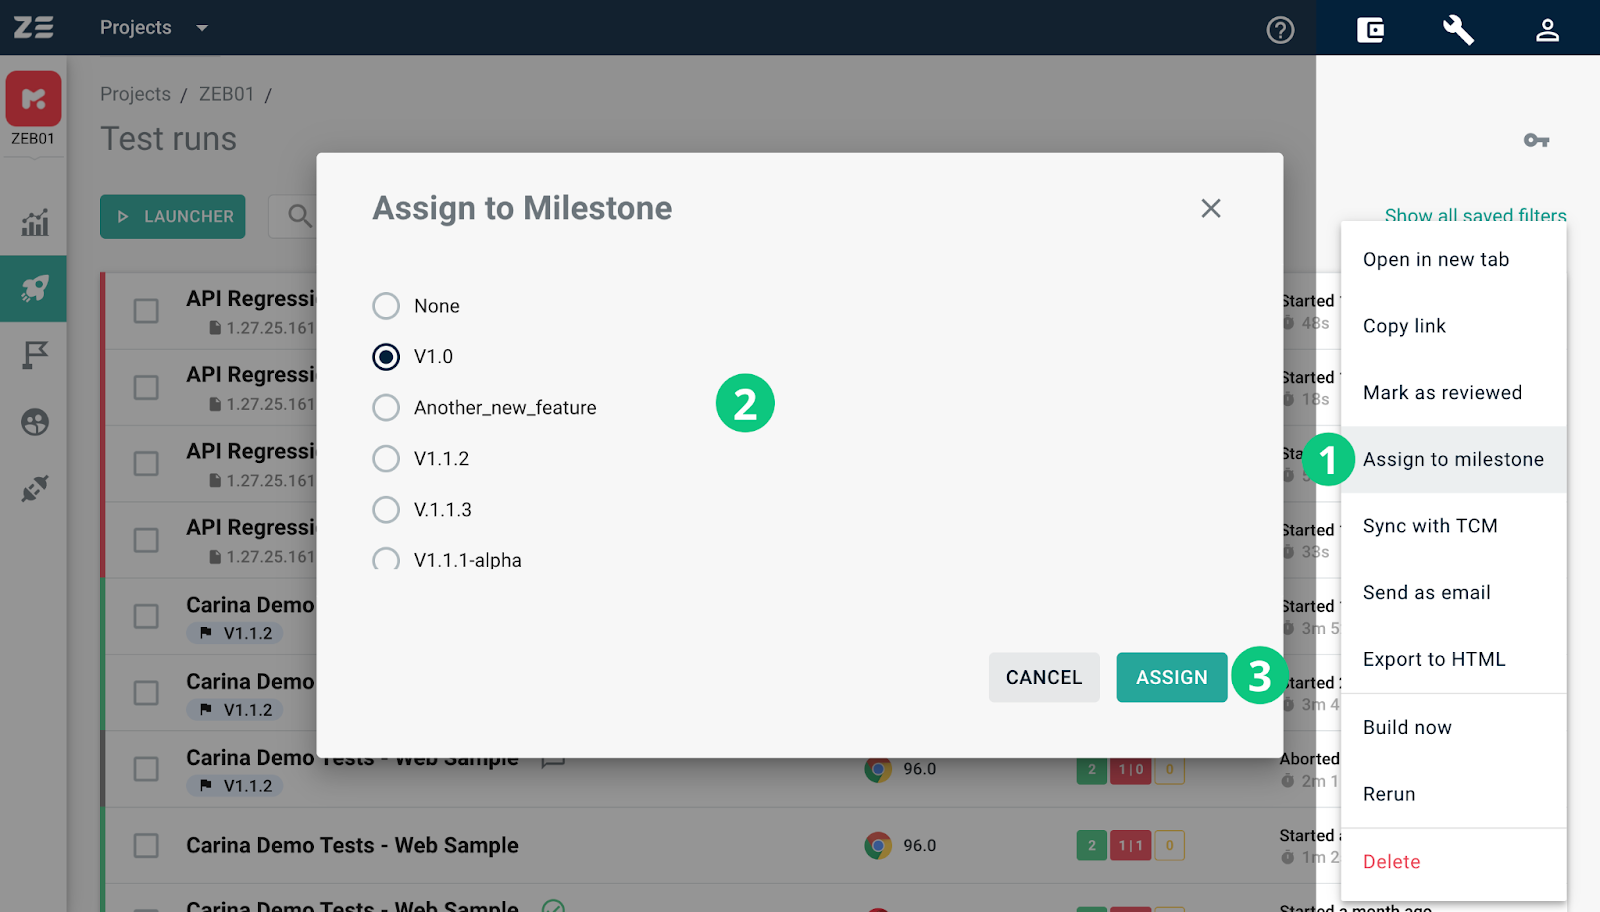
Assign to milestone#
Milestones provide an easy and convenient way to organize your automation launches, track the testing progress and plan release timelines.
By linking launches to milestones, you can organize test strategy according to the upcoming product update or feature release.
Info
Automation launch can only be assigned to an existing open milestone, meaning that it should be created beforehand. Please refer to the Milestones docs to learn how to do that
To assign an automation launch to a milestone, perform the following steps:
- On the Automation launches grid, pick a launch and go to More Options on the right
- Choose Assign to milestone. The assignment dialogue will appear on the screen
- Choose the milestone to assign and click Assign.
Alternatively, a milestone can be assigned from the Automation launch view (test results) by clicking More Options → Assign to milestone.
Bulk assignment
You can assign several automation launches to a milestone at a time. Select multiple automation launches using checkboxes on the Automation launches grid and click Assign to milestone in the bulk actions panel (it will appear above the grid)
Sync with TCM#
Zebrunner provides an ability to push test executions to external test case management systems (TCMs) on automation launch finish. For some TCMs, it is possible to upload results in real-time during the automation launch execution.
Test cases and launch mapping
In order for this functionality to work, tests should be mapped to corresponding test cases and an automation launch should be mapped to corresponding run in a TCM system. To learn more on how to create such mappings please refer to the documentation of reporting agent you are using
This section describes how to sync test executions of a launch that initially was not configured for sync. It may be useful in cases when:
- Users reviewing results need to manually update test statuses first
- When executions were synced in one run, but due to some reason need to be synced with another
- When sync for the launch was simply not enabled, but that was not desired
To sync test executions, perform the following steps:
- On the Automation launches grid, pick a launch and go to More Options on the right
- Choose Sync with TCM. The syncing dialogue will appear
- Enter id of target test run in TCM and click Sync. Note: if this launch already has an id of a TCM run associated with it, this id will be pre-set in the input box. You can override this value to sync executions to another TCM run of your choice
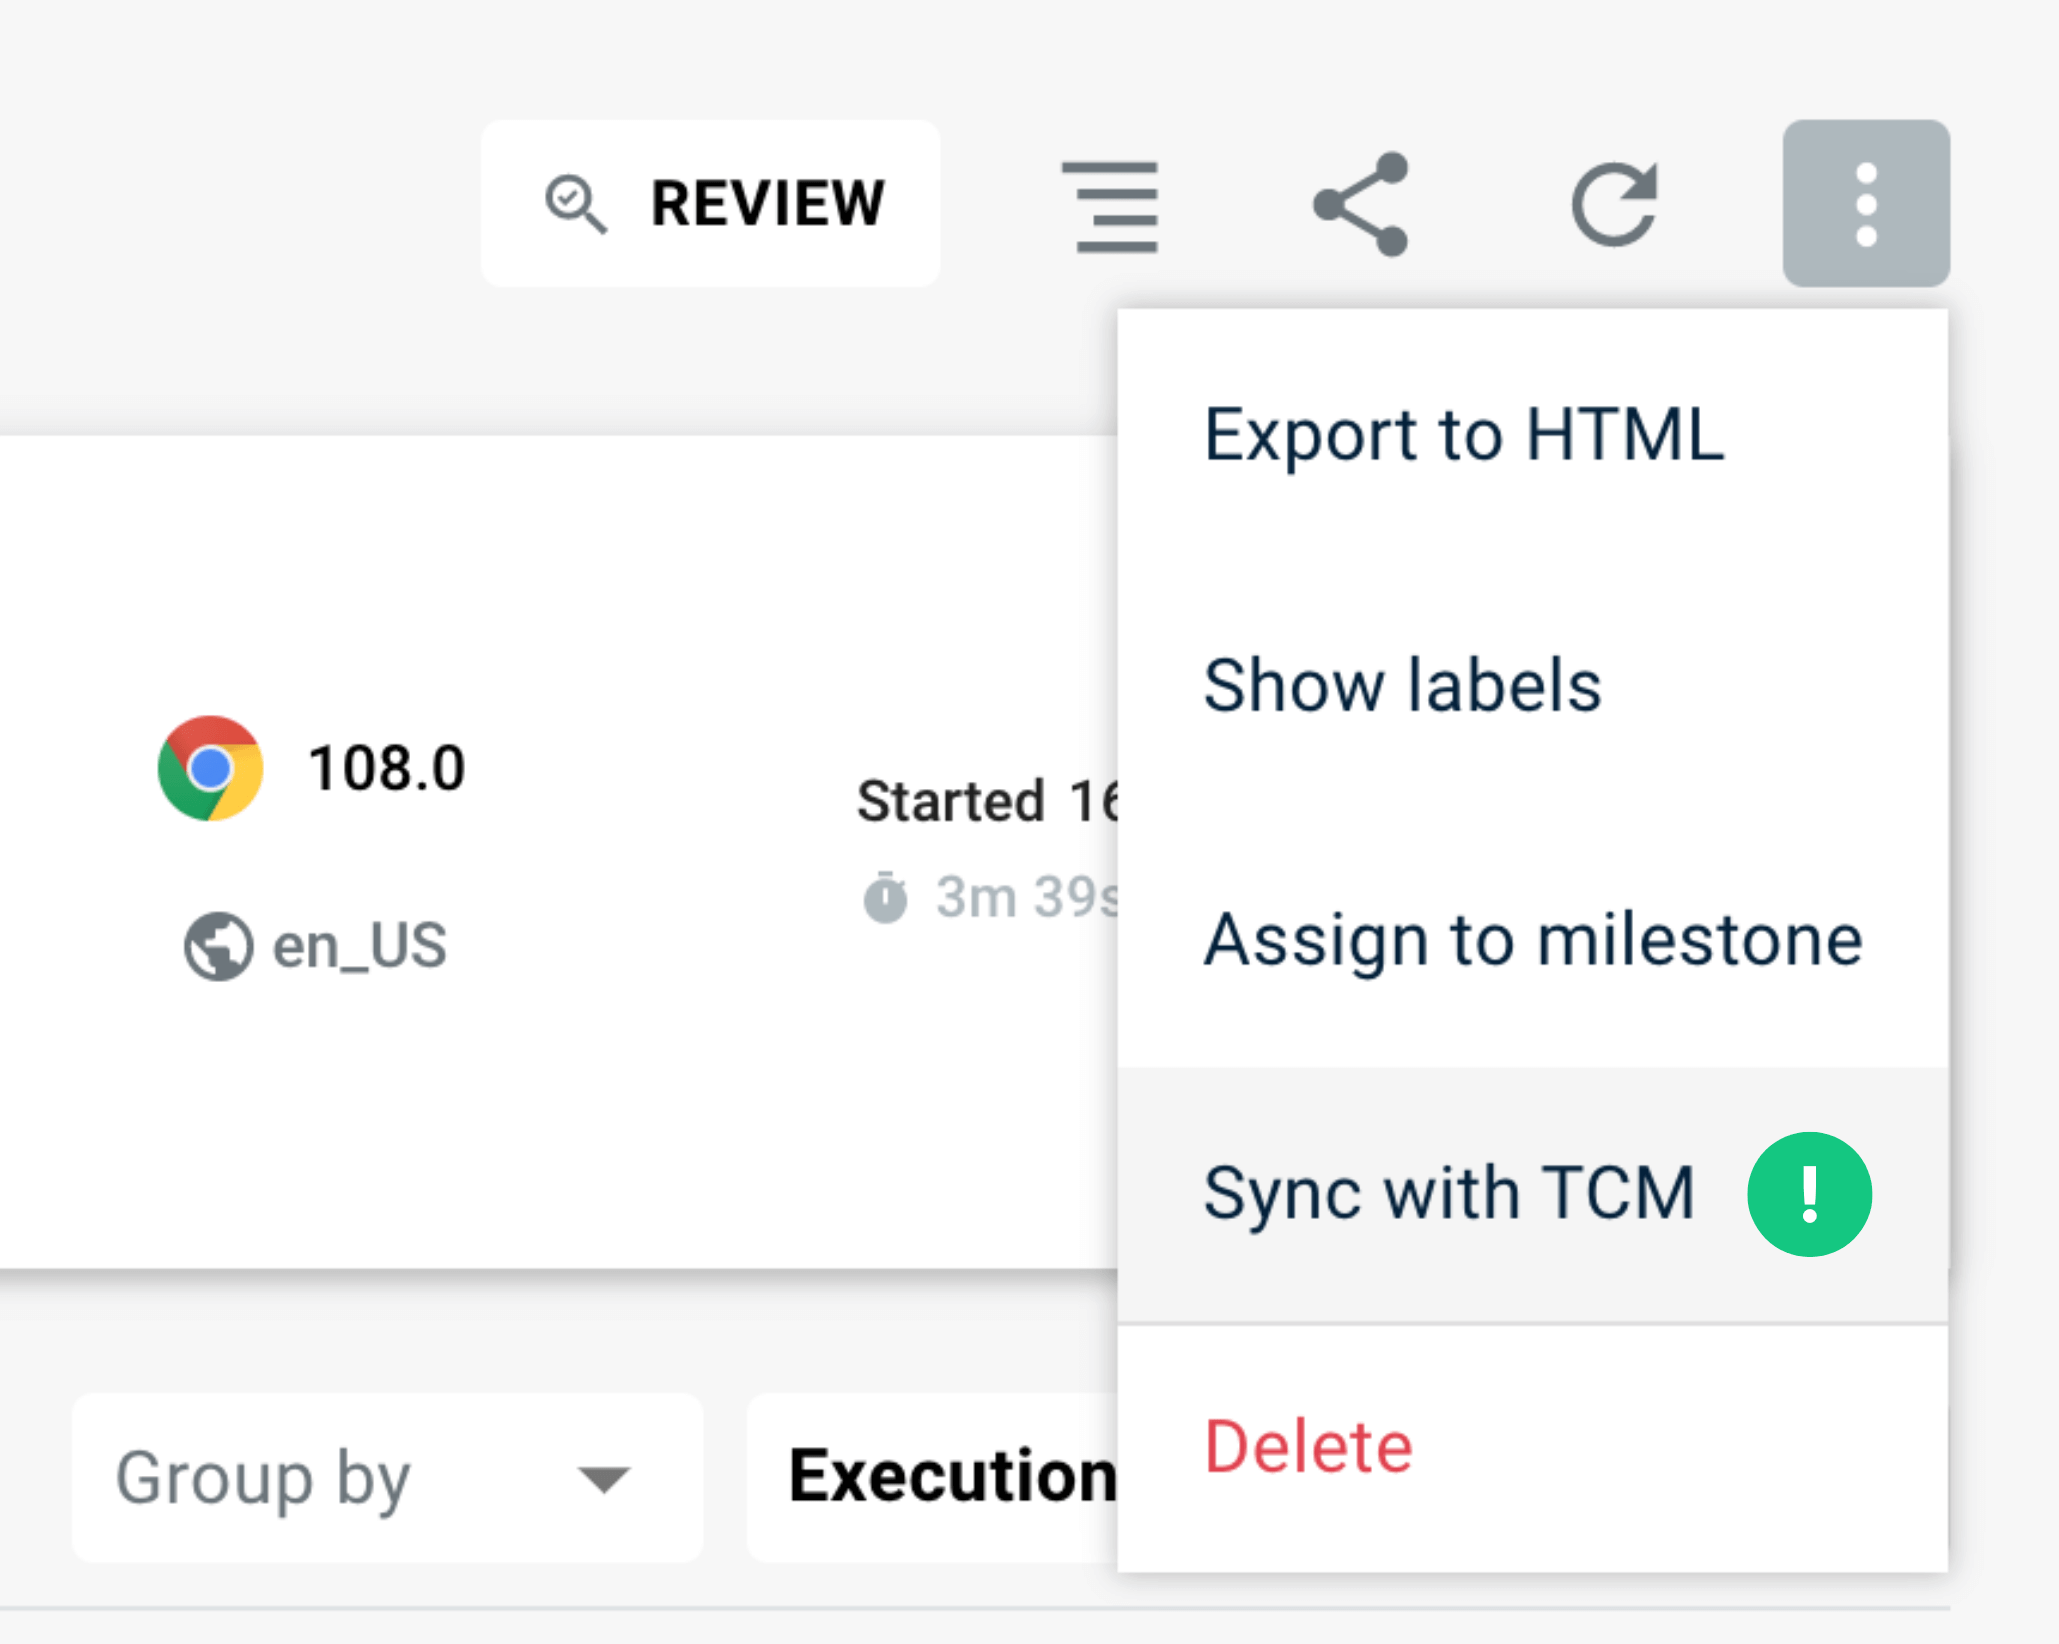
Alternatively, sync can be performed from the Automation launch view (test results) by clicking More Options → Sync with TCM.
Filtering and sorting#
With the growing amount of automation launches on the Automation launches grid, it can be useful to filter them by different attributes. It is also important to have a quick access to the most relevant filters. To fulfill this need, Zebrunner users can construct filters based on multiple predicates and work with data in a more efficient and convenient way.
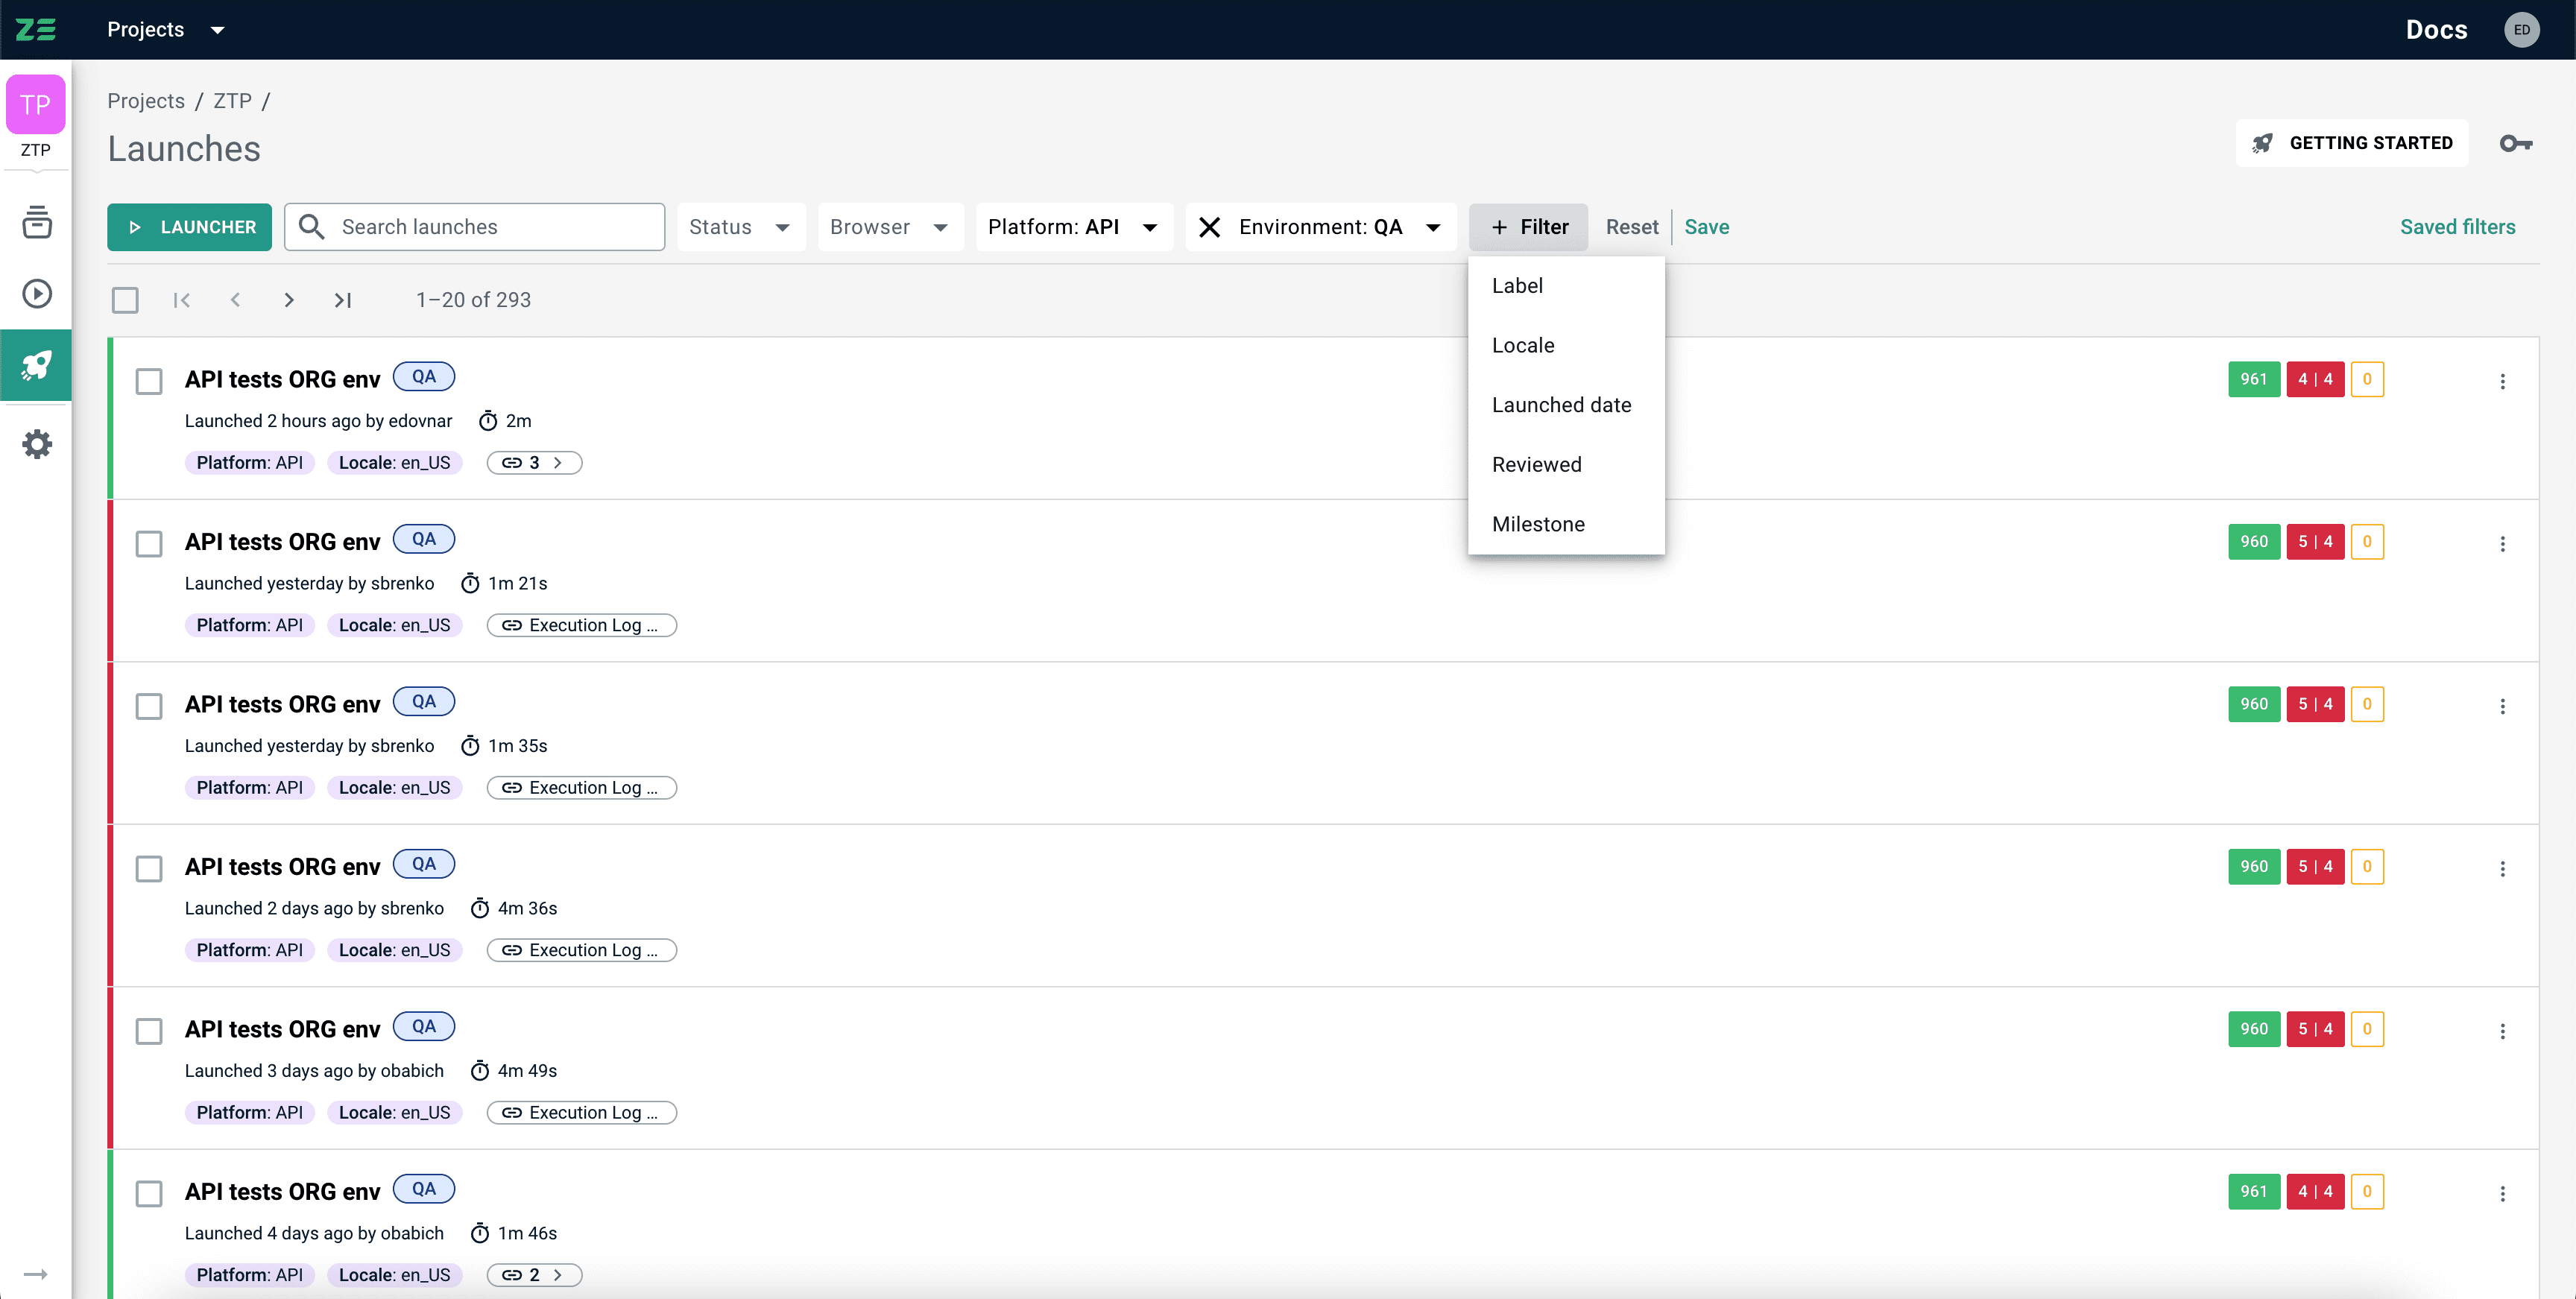
Below are some of the attributes that can be used for filtering:
- Automation launch name
- Browser
- Platform
- Status
- Label
- Environment
- Locale
- Date
- Reviewed
- Milestone
Most-used filters can be seen on UI next to the search input box, while others are not displayed by default and can be accessed by clicking + Filter. Depending on the attribute type, it is possible to apply exact match predicates (combining multiple for the same attribute with a logical OR condition) or ranges (in case of dates). All predicates described different attributes will be combined using logical AND.
Saved filters#
It is possible to save a filtering preset for quick and convenient future access. To do this, complete the following steps:
- Apply all the predicates you need in the filter panel
- Click Save (it will become active once at least one predicate is applied)
- Give this filter a name and click Save
The new filter will be saved to the list with the brief info (available by hovering over the info icon) and the filter owner.
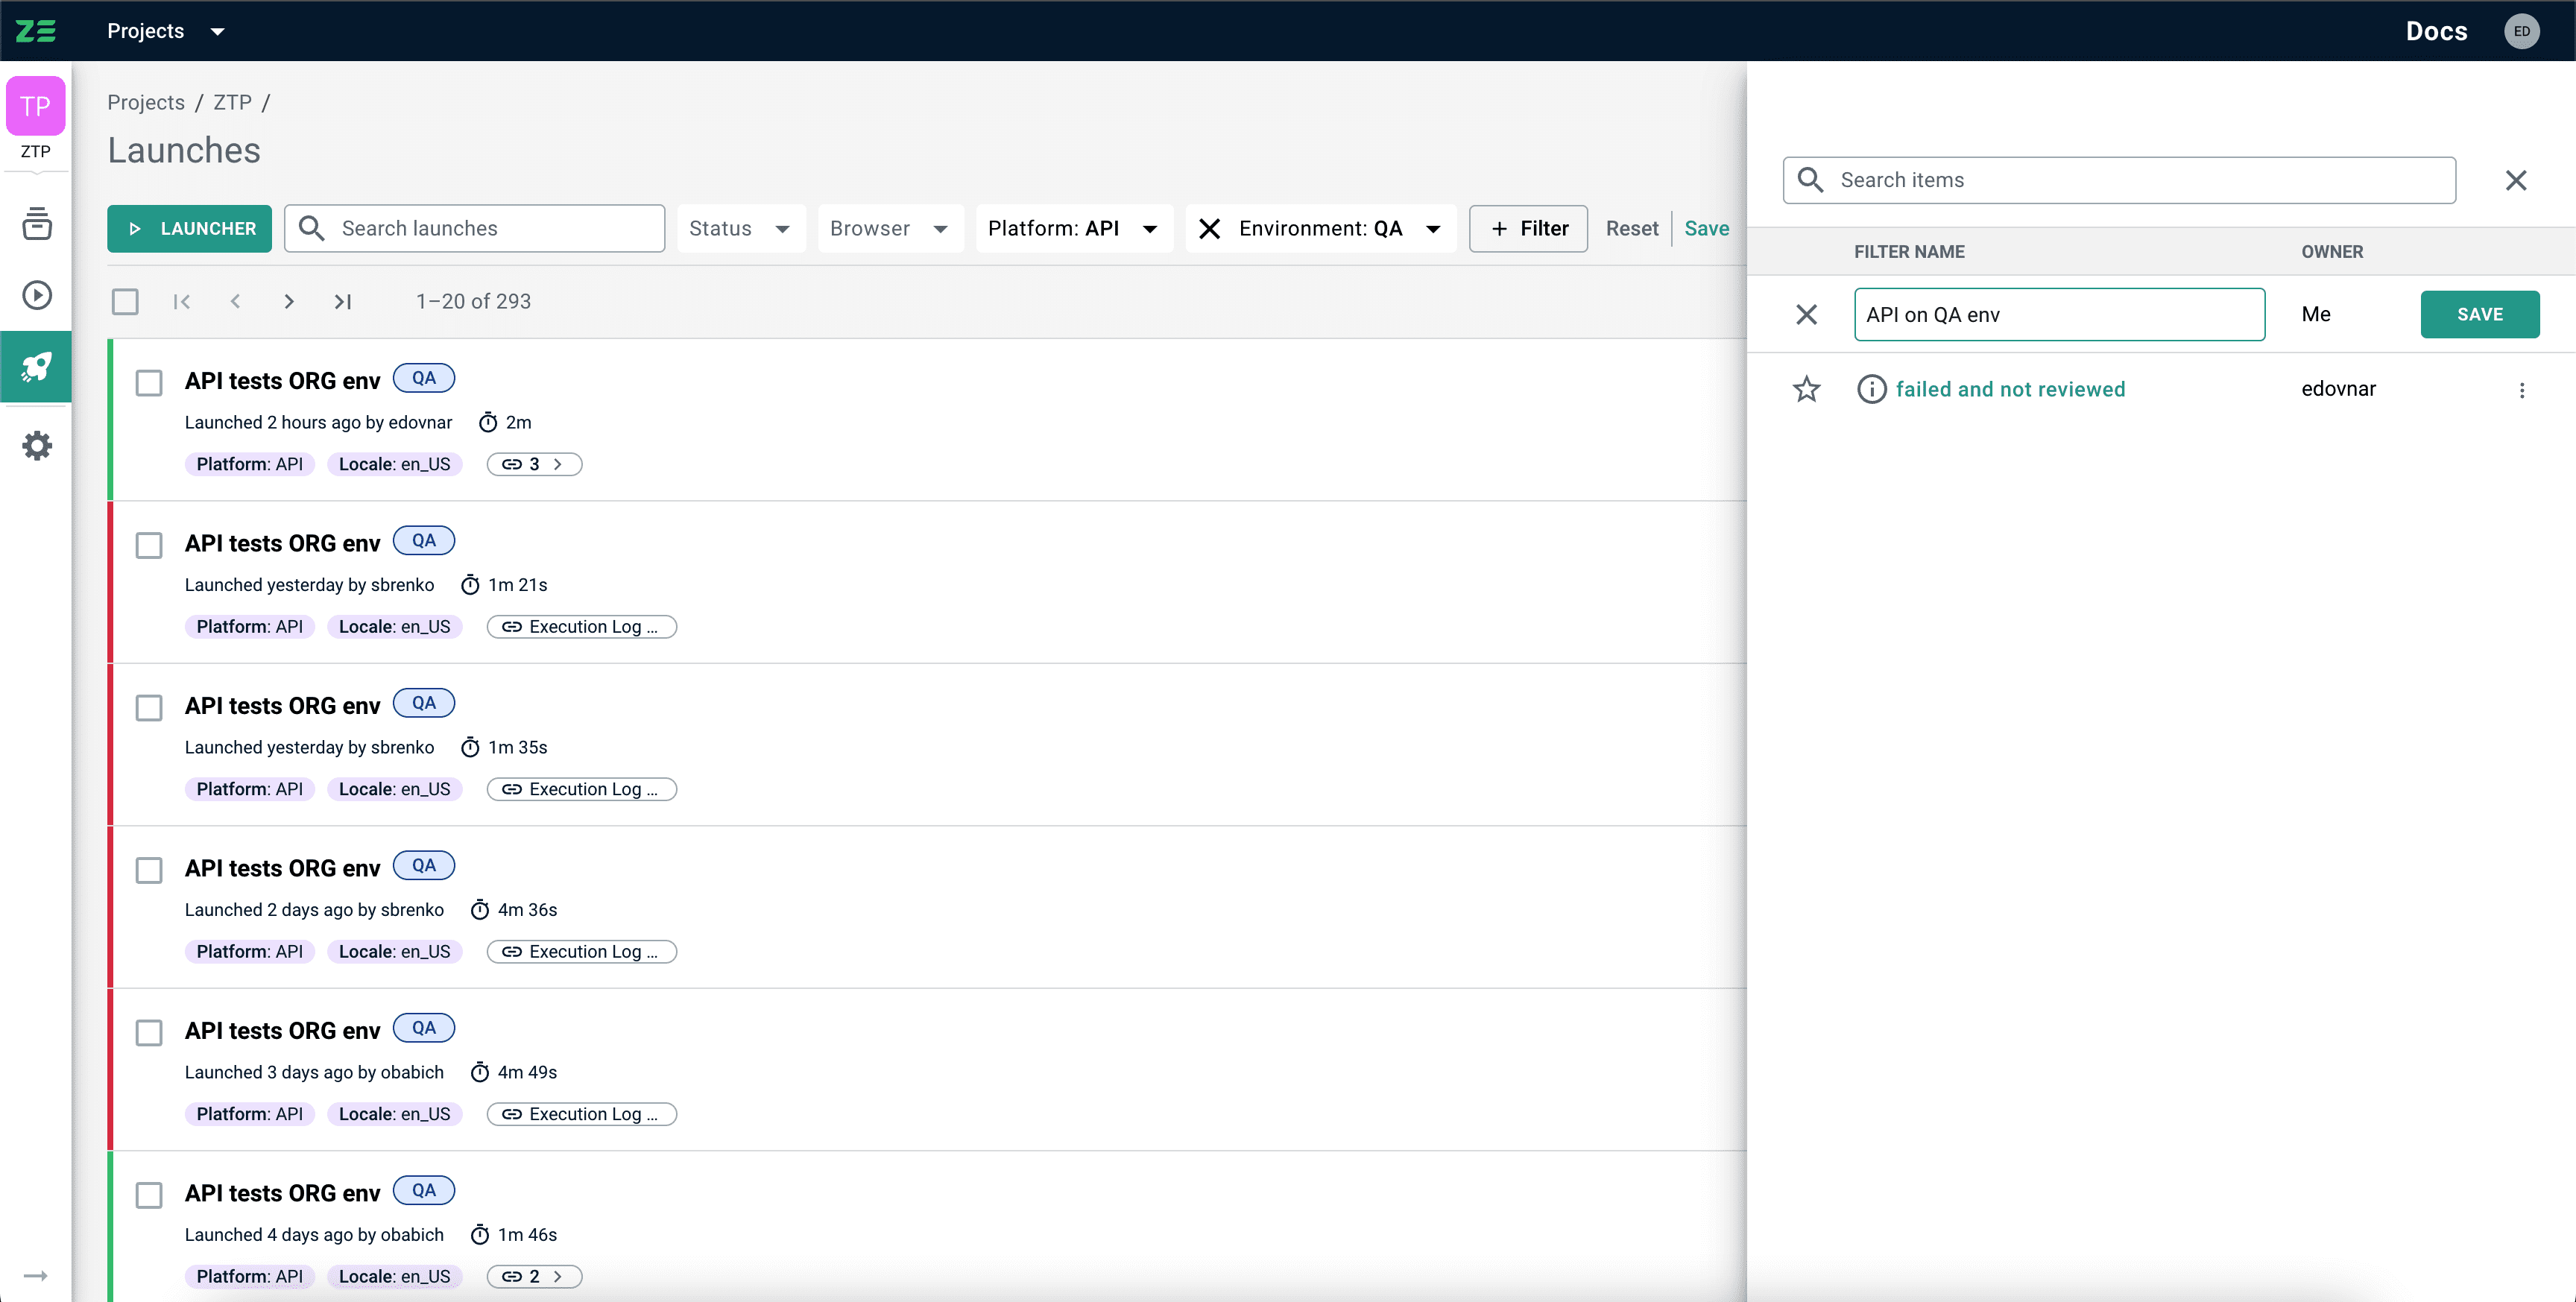
Filters access control and favorites
- By default, after you save a new filter to the list, it is private - meaning that only you can see it and use it. But you can make it public, allowing all members of your project to use it by going to More Options next to the filter name and clicking Make public
- It is possible to define a set of favorite filters that will be always displayed on top of the list. To do this, hit the star icon. Click it once again to remove the filter from favorites
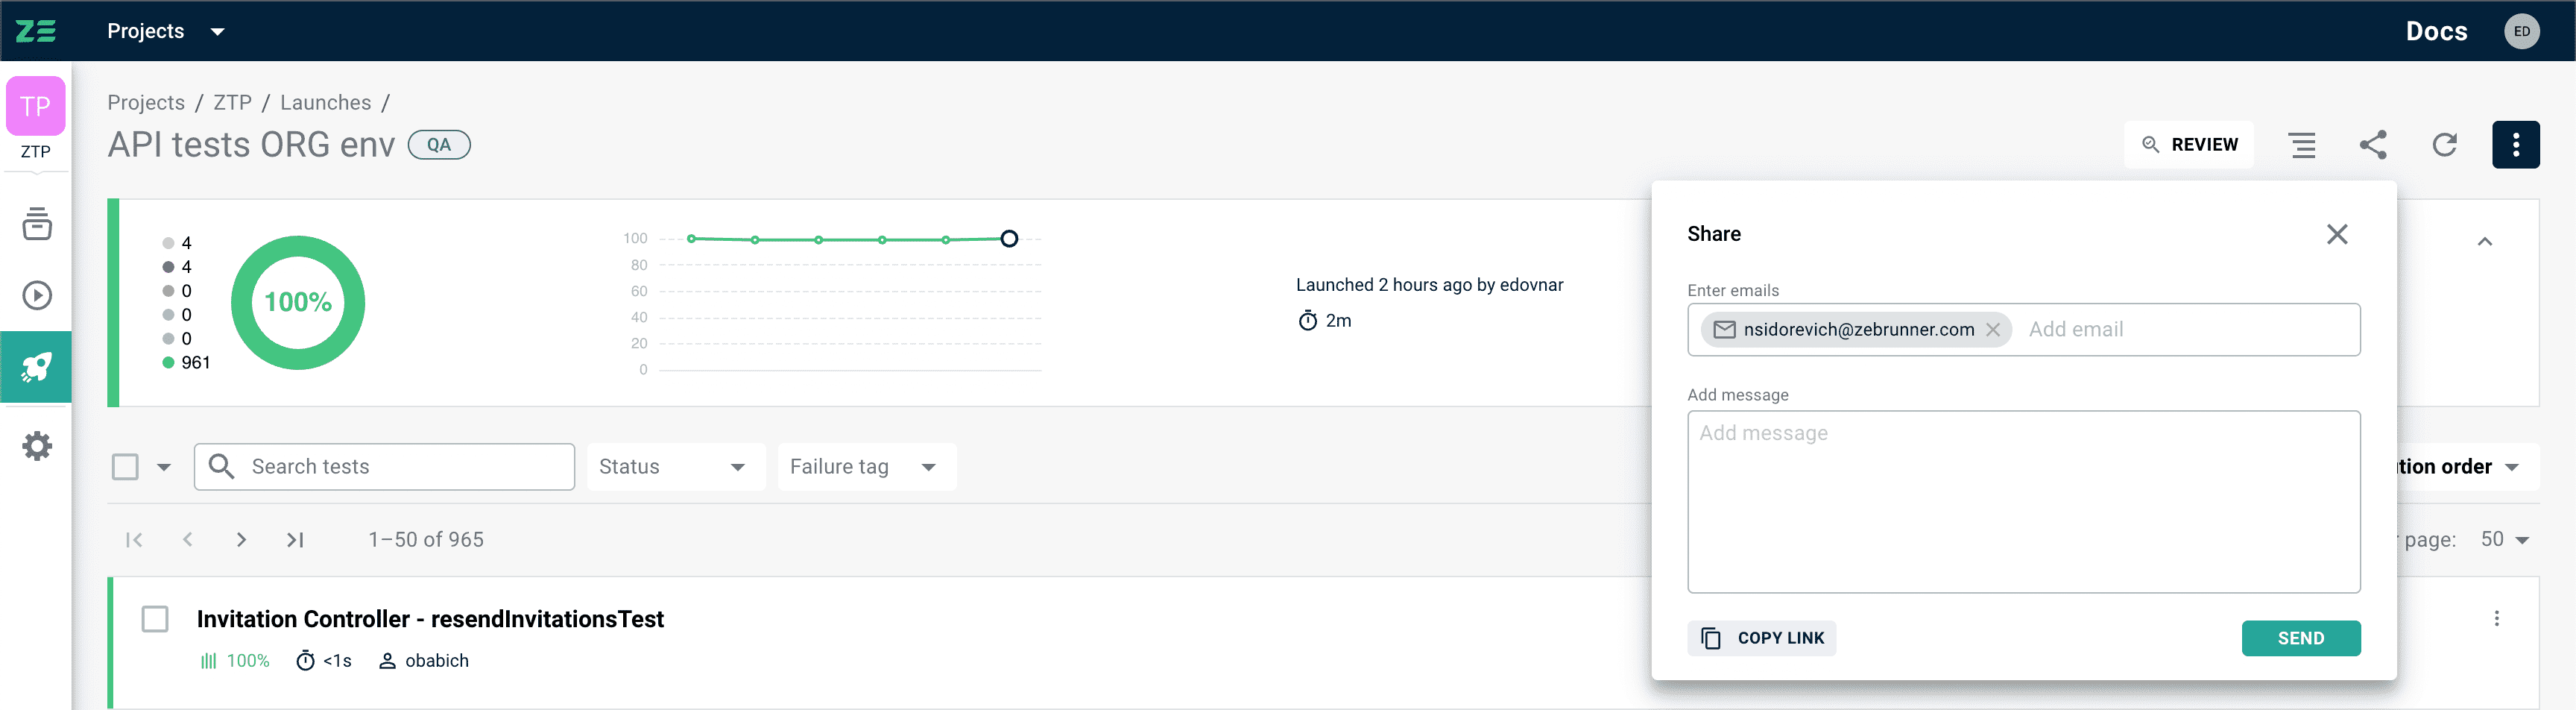
Sharing automation launch report#
Sometimes it may be useful to bring someone's attention to an automation launch by sharing it. Zebrunner supports sharing options that work both for users inside and outside of your workspace.
via link#
Sharing results via link allows you to send an automation launch for further inspection in Zebrunner to another workspace user.
To quickly obtain the link to an automation launch, perform the following steps:
- On the Automation launches grid, pick a launch and go to More Options on the right
- Click Copy link
Link to the automation launch will be copied to your buffer.
Alternatively, you can obtain the link from the Automation launch view (test results) by clicking Share in the top right corner and hitting Copy link button:
via email#
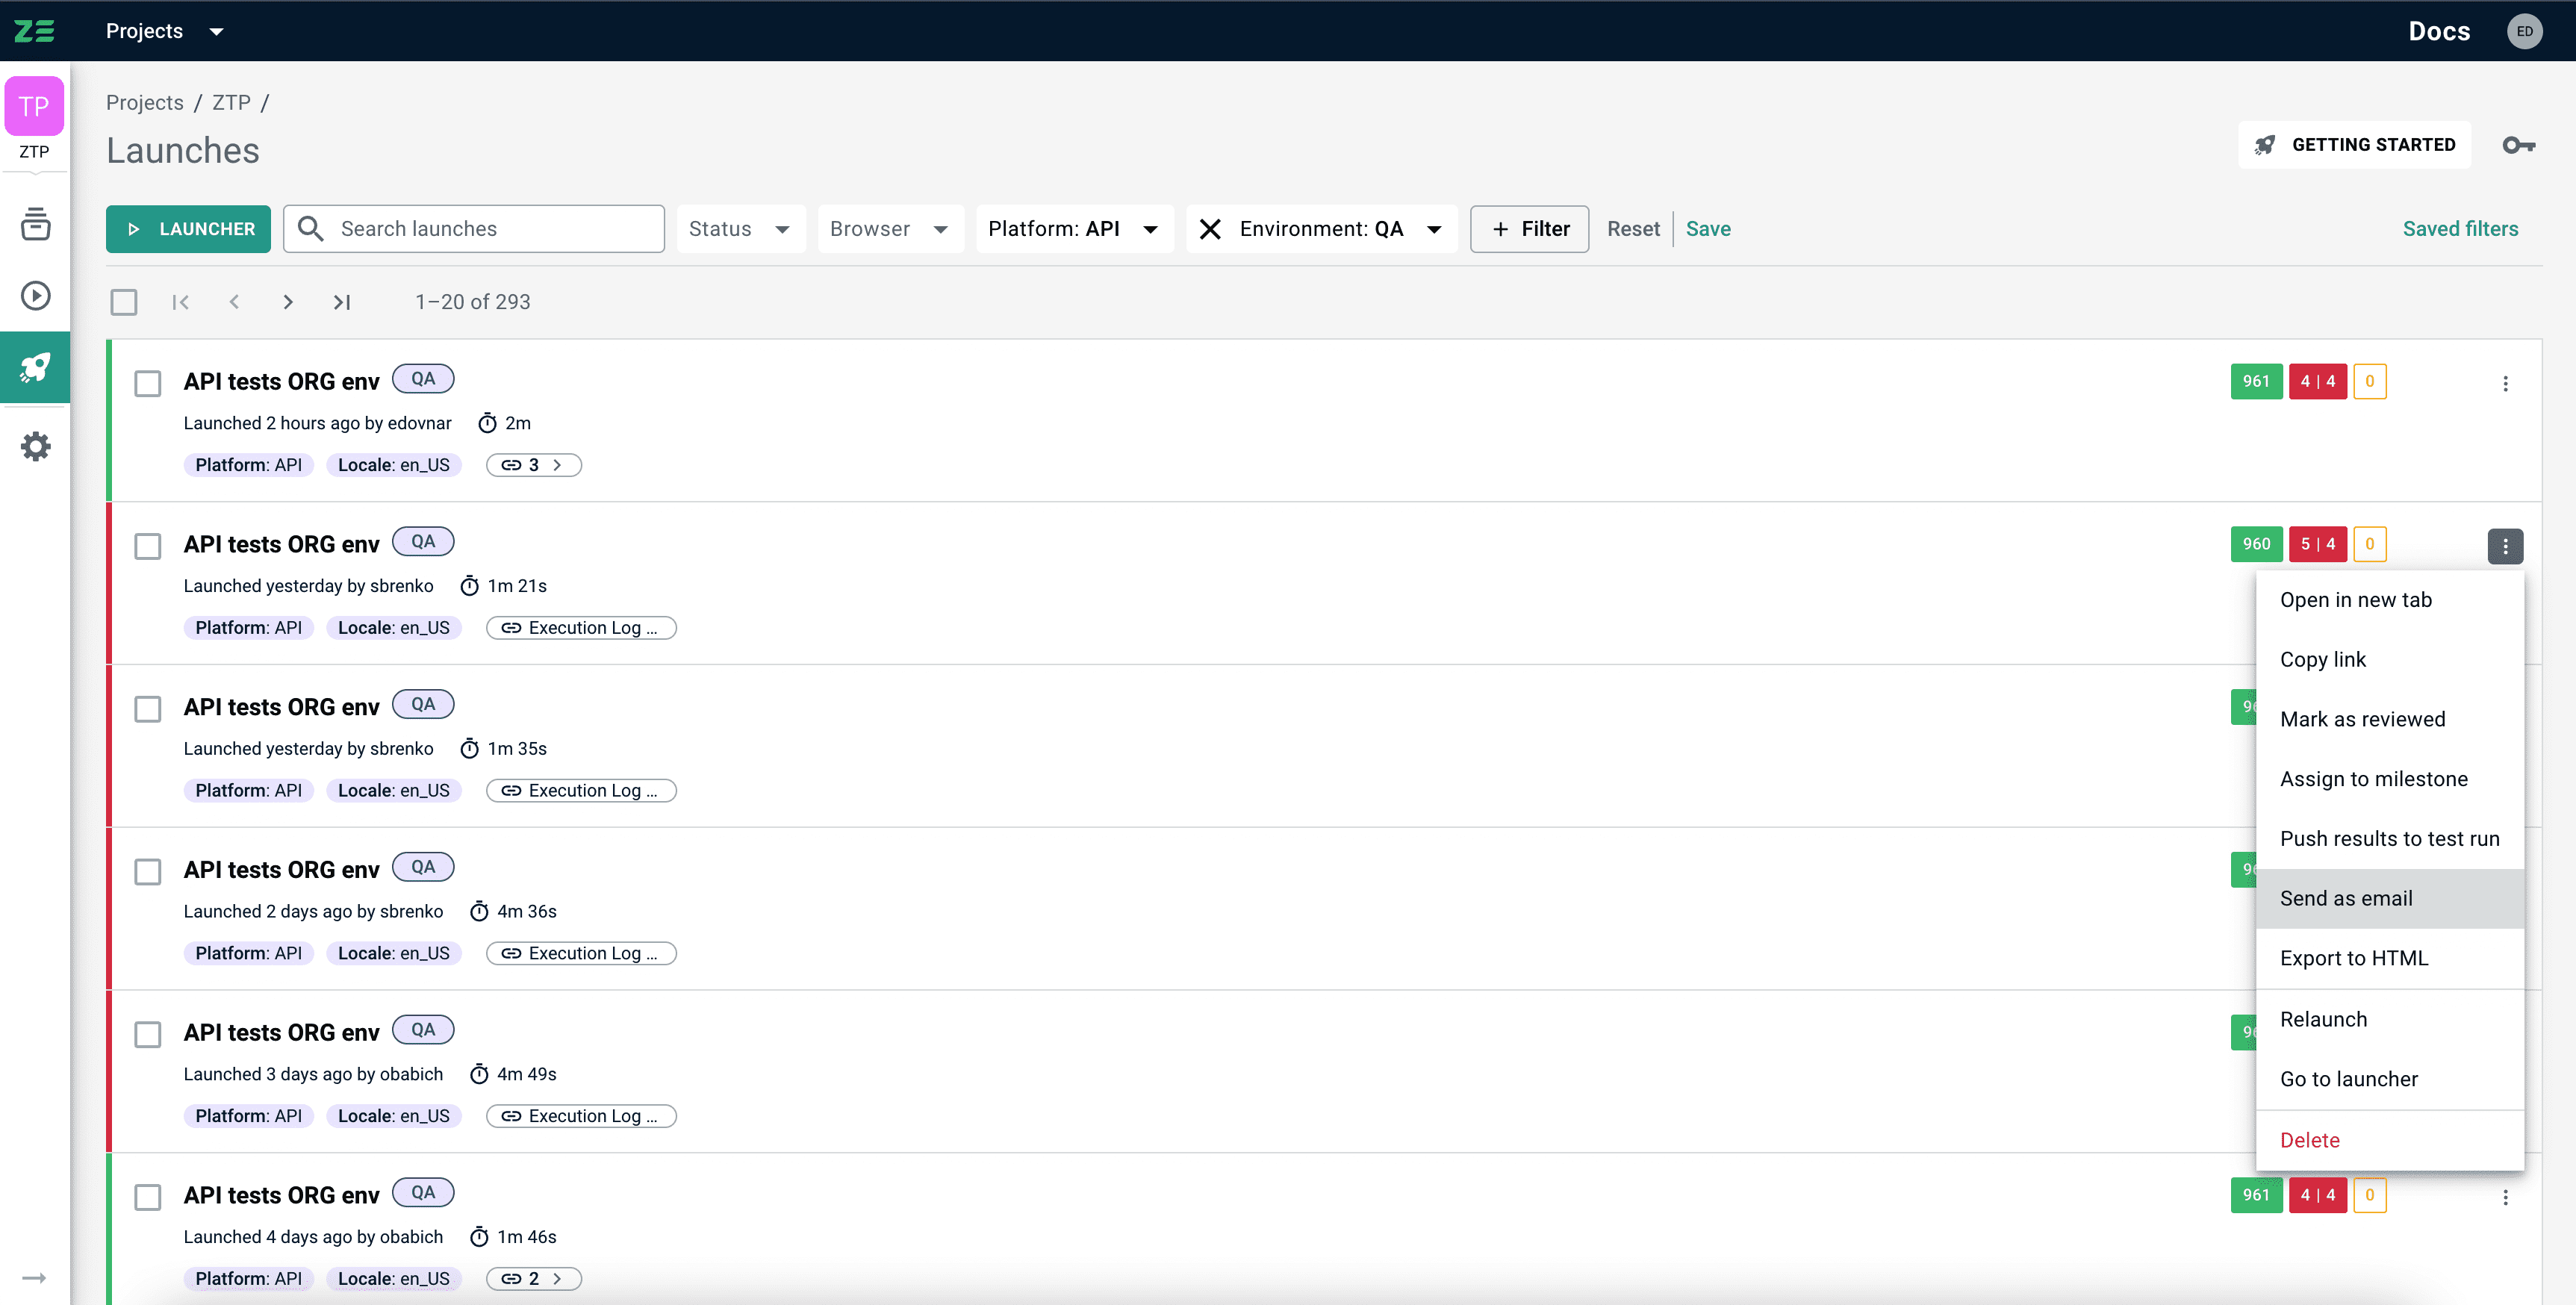
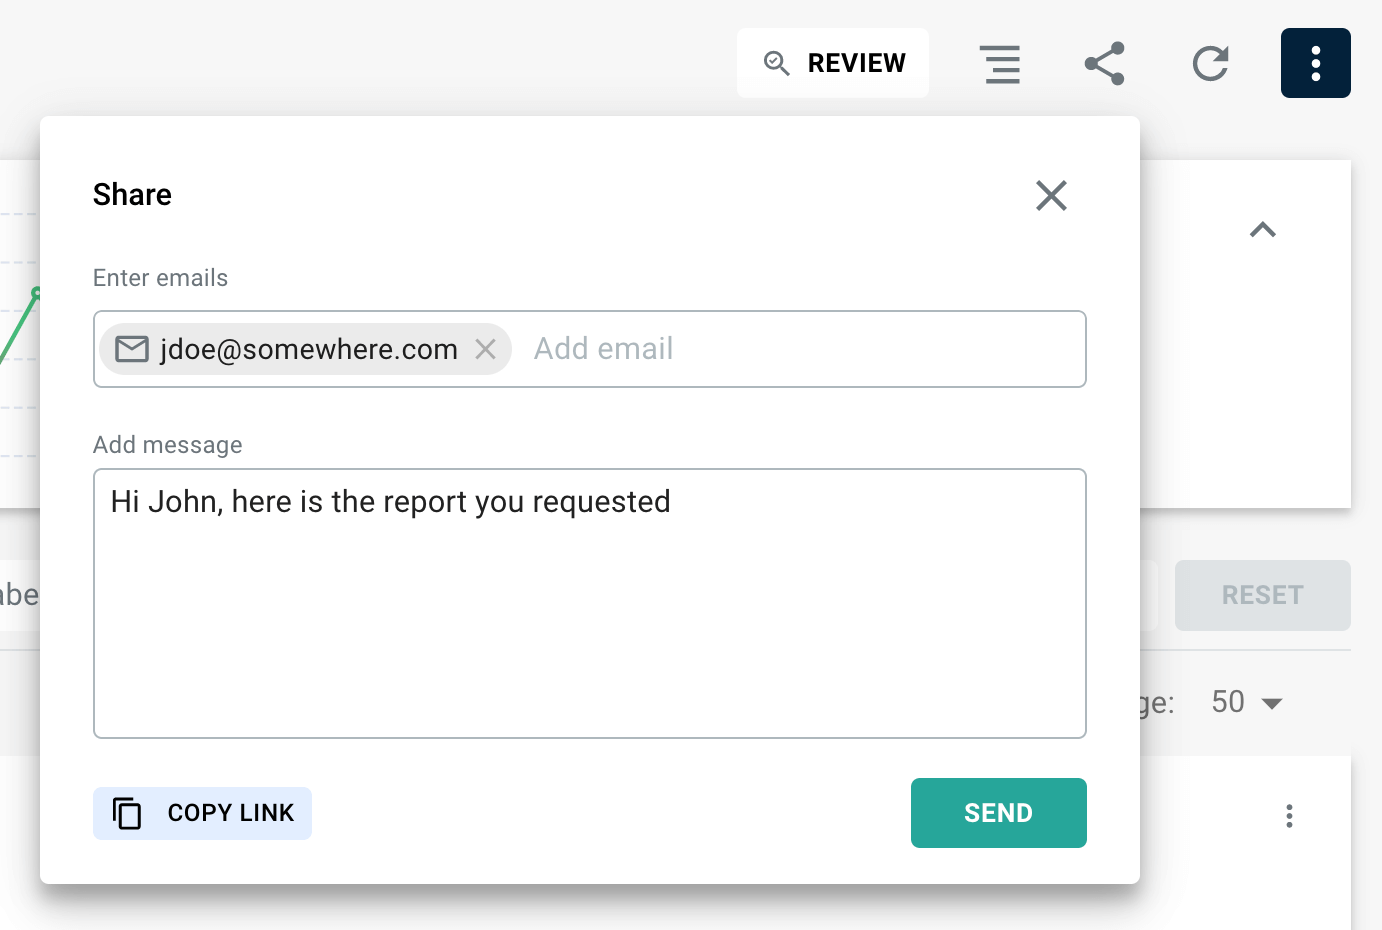
Sharing results via email allows you to send a compiled automation launch results report to anyone, not only your workspace user.
To send test results via email, perform the following steps:
- On the Automation launches grid, pick a launch and go to More Options on the right
- Click Send as email. The sharing dialogue will appear
- Enter recipient's emails (you can enter multiple at once)
- Click Send
Alternatively, sharing can be performed from the Automation launch view (test results) by clicking Share in the top right corner, entering recipient's emails and providing an optional message:
via export to HTML#
Sharing results via export allows you to send a compiled HTML automation launch results report to anyone, not only your workspace user.
To export an HTML report, perform the following steps:
- On the Automation launches grid, pick a launch and go to More Options on the right
- Click Export to HTML
The report will be generated, and downloading to your machine will start automatically.
Alternatively, export can be performed from the Automation launch view (test results) by clicking More Options → Export to HTML.