Test repository#
Test repository acts as a storage of test documentation and is bound to a particular project.
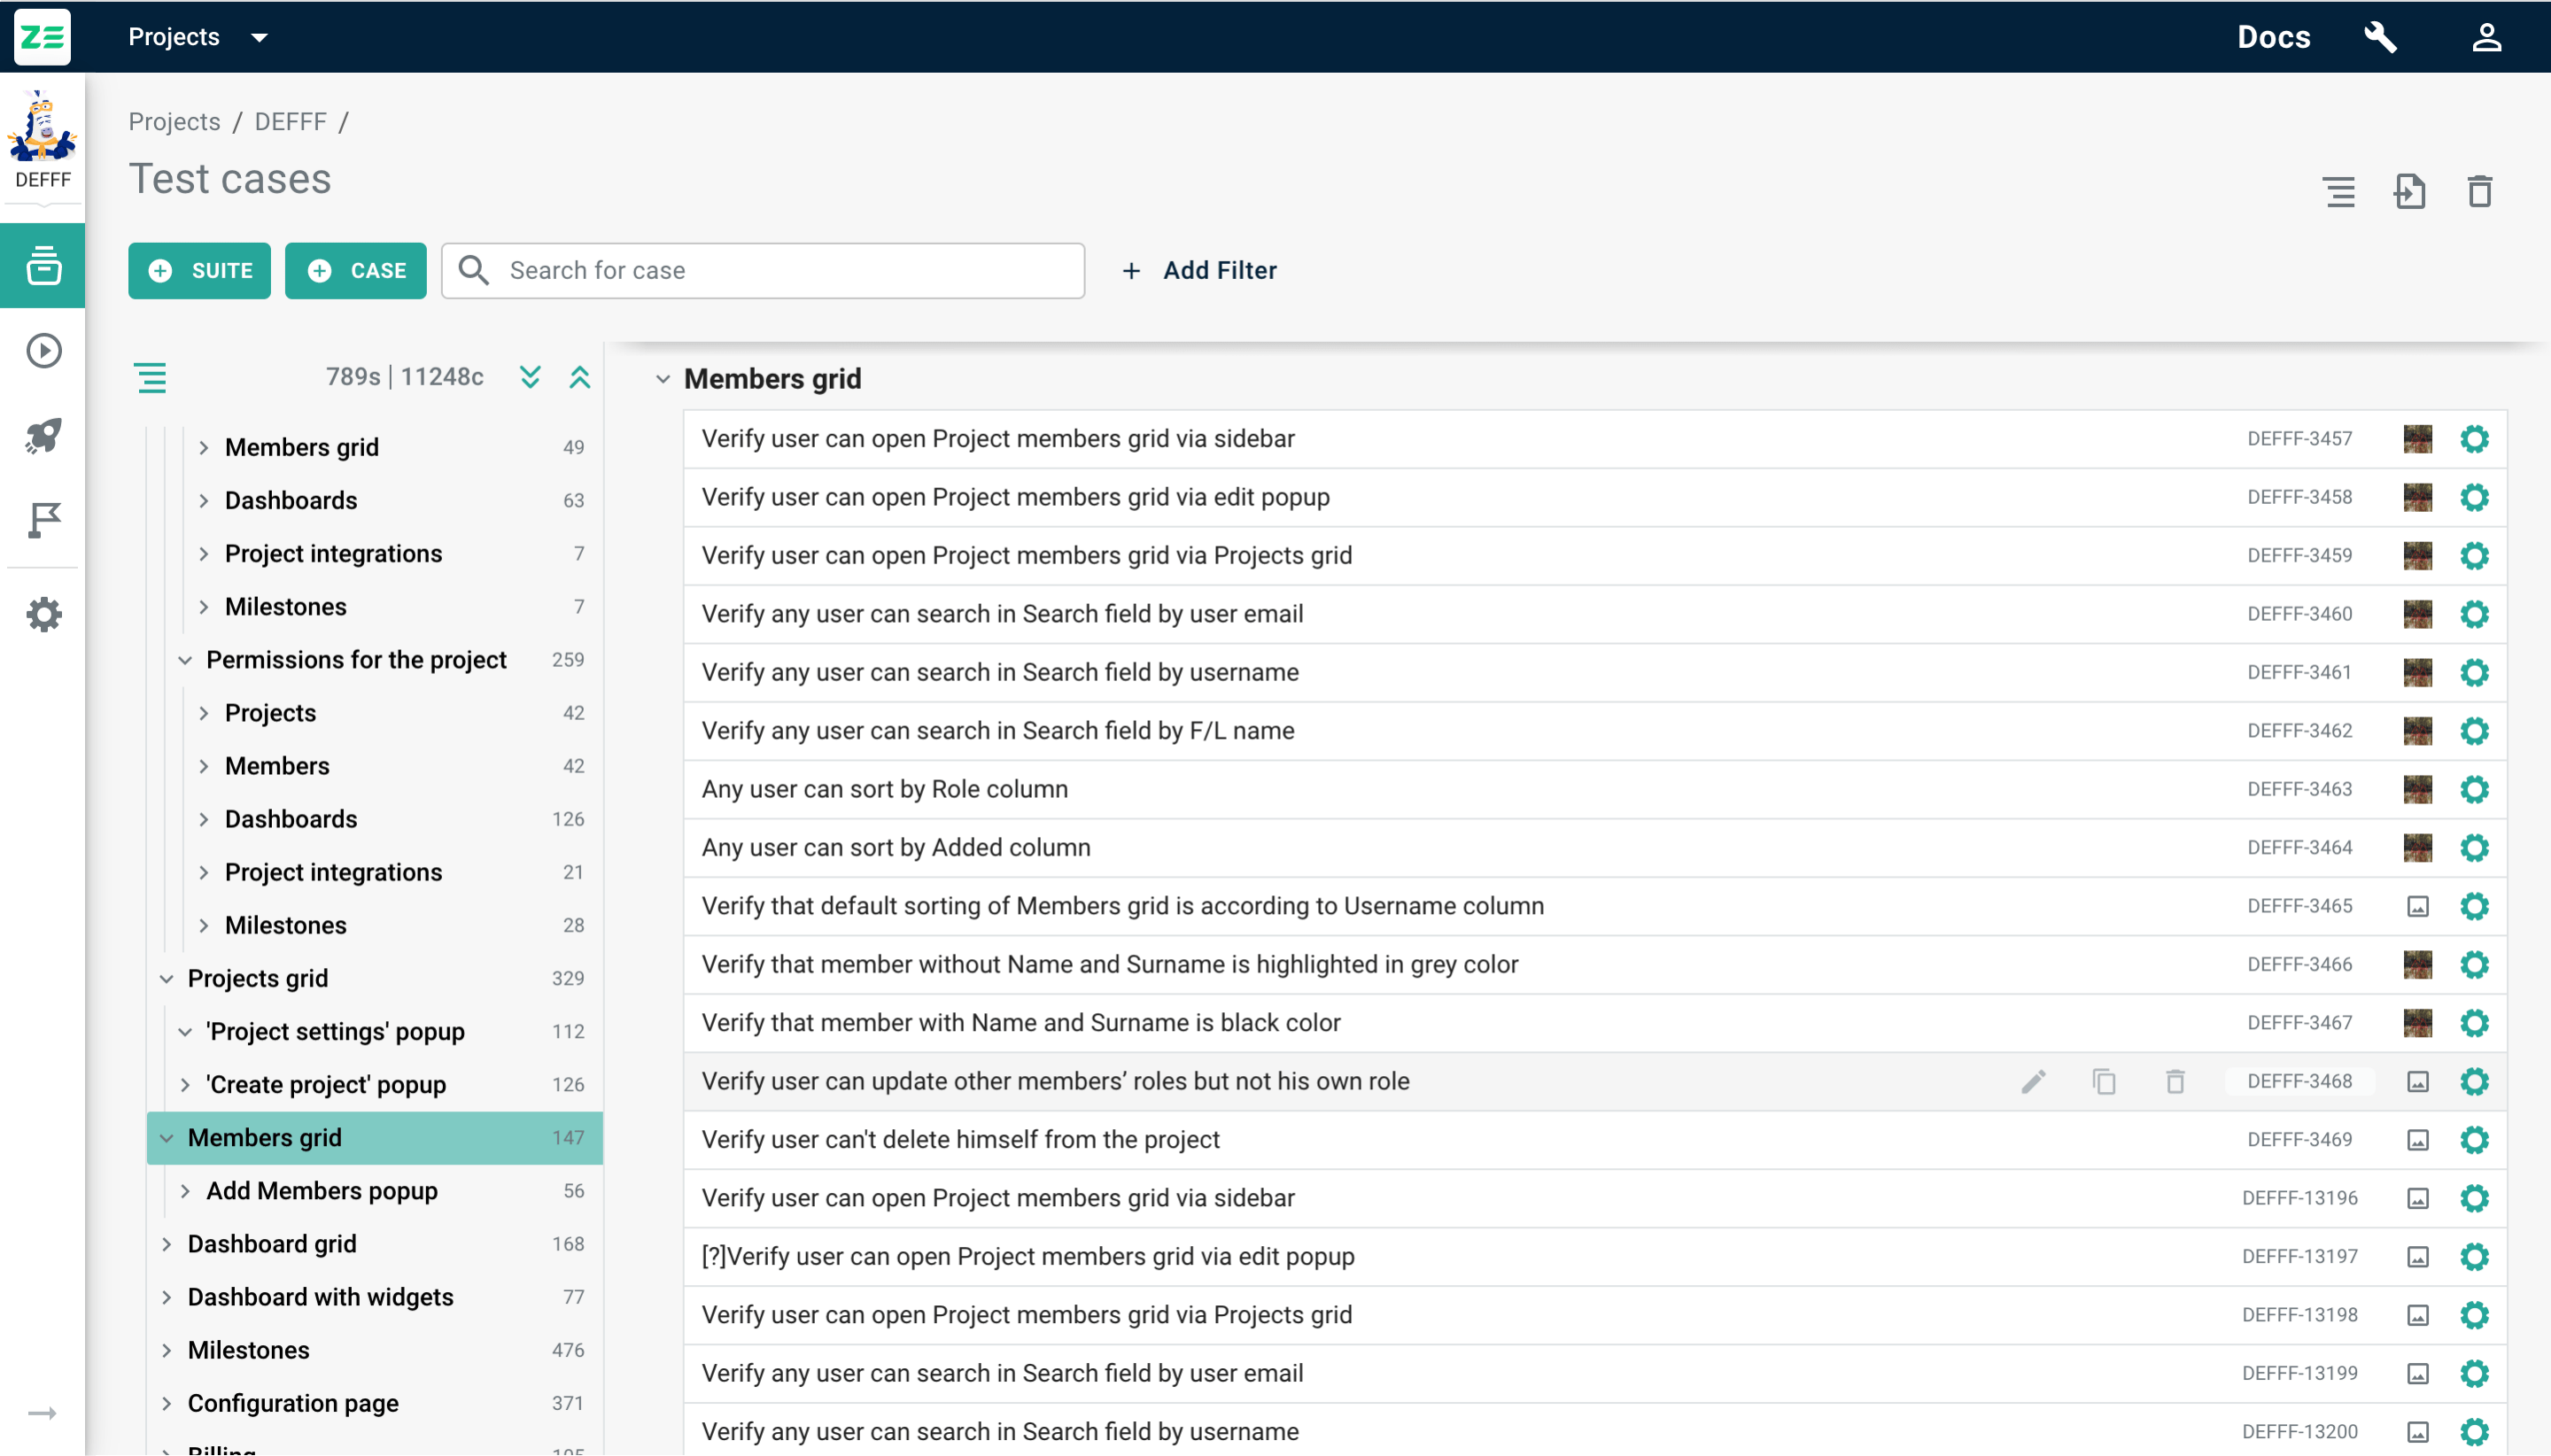
Repository contains a collection of test cases, logically grouped into (mapped to) test suites. Suites and cases can be browsed via test cases view (Test repository → Test cases).
Test cases view combines three horizontal columns: test suites tree, test cases list and test case preview (displayed after clicking on a particular test case).
Shared steps are also part of the repository and can be accessed via a dedicated view (Test repository → Shared steps).
Working with test suites#
Test suite is a collection of test cases logically grouped by certain criteria (e.g. belonging to the same functional modules/areas of the application under test).
Info
Zebrunner supports nested suites allowing to store test documentation in a tree-like structure. You can put a suite into another suite either while creating and editing it, or by using the drag-n-drop functionality on a test cases view.
In this section, you'll find the information on how to create, update and delete test suites.
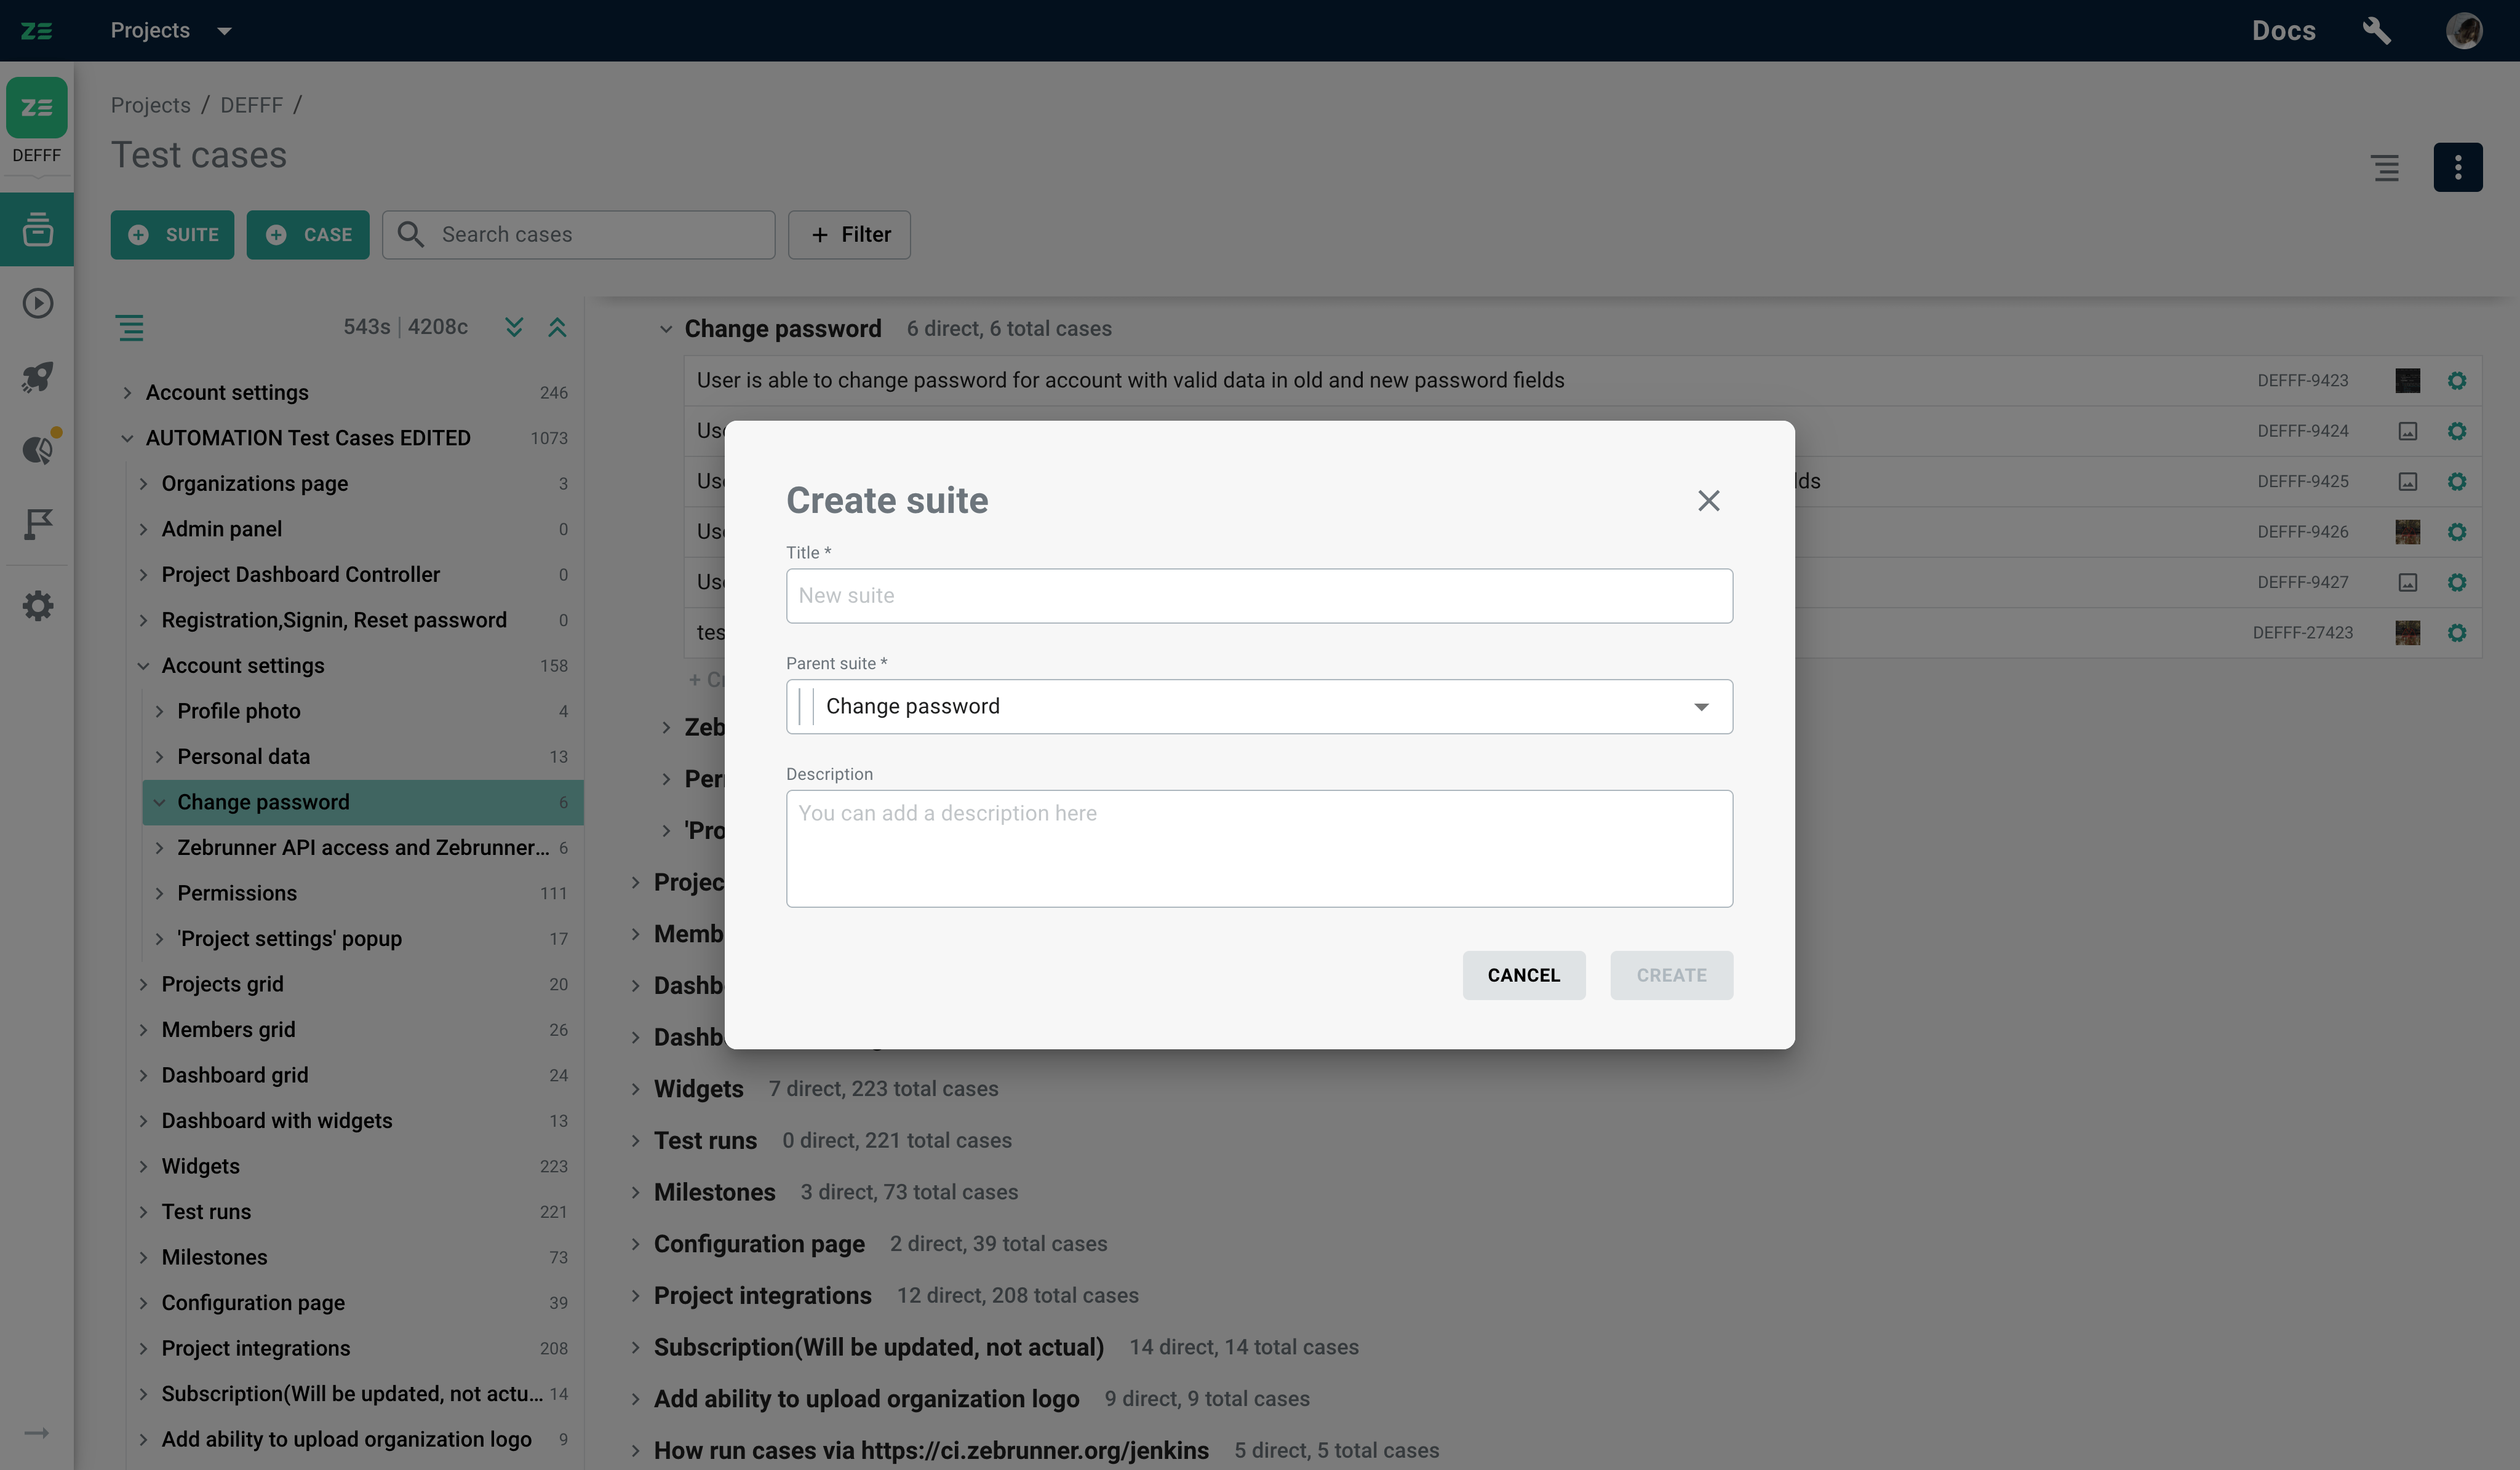
Creating a test suite#
To create a new test suite, go to the Test repository → Test cases grid and perform the following steps:
- Click +Suite
- Enter the suite details and select a parent suite
- Click Create
The new test suite will appear on the Test repository → Test cases grid. You can now add new test cases to it.
Currently active test suite will be pre-selected as the parent suite
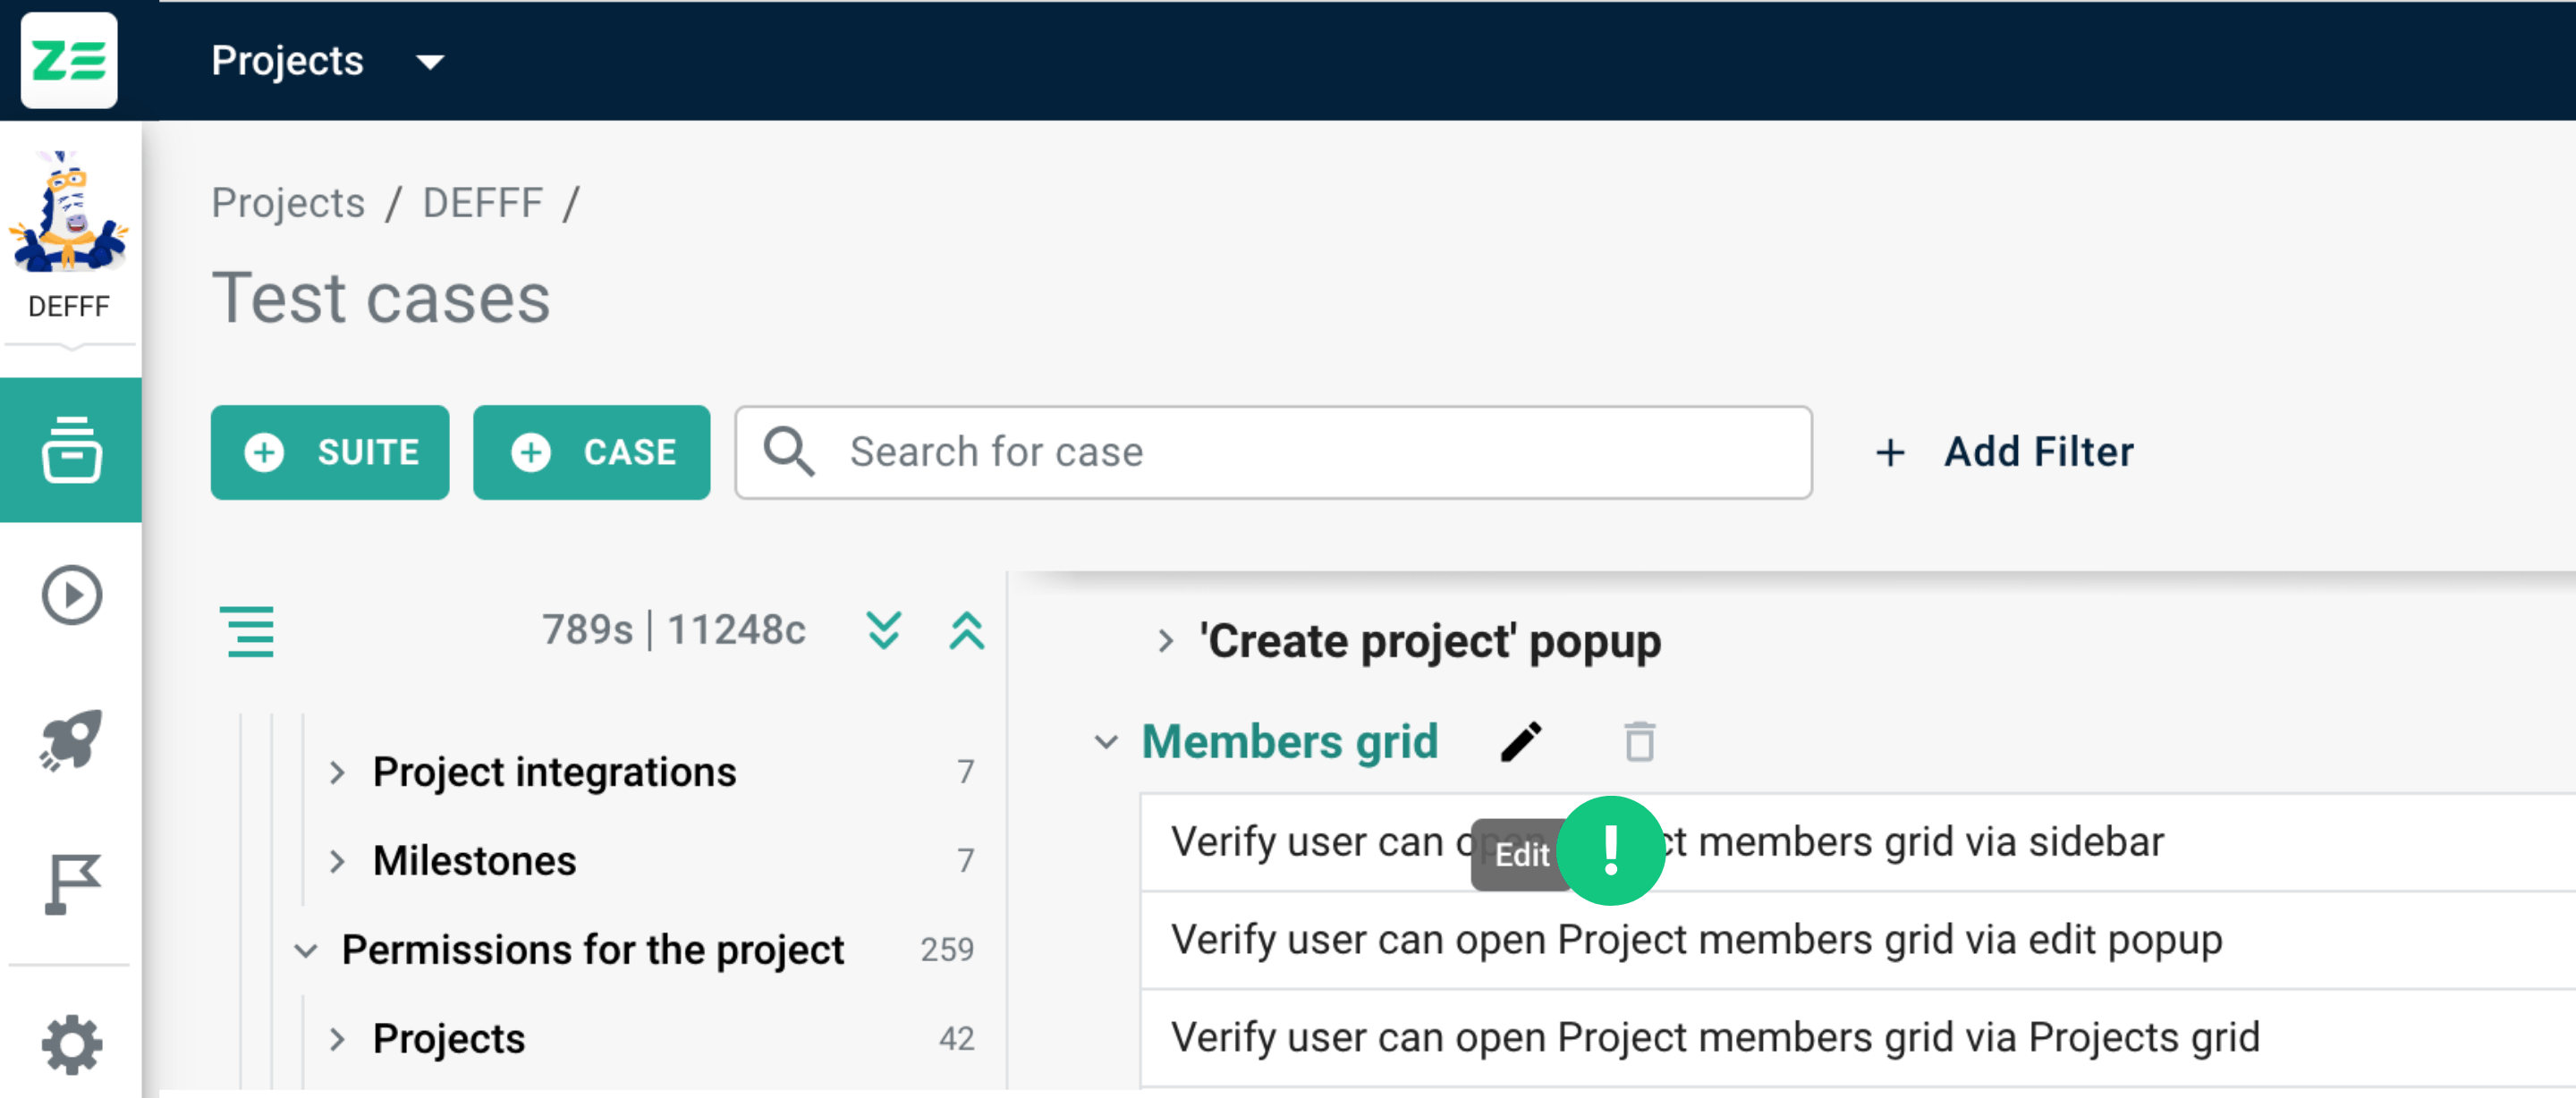
Editing a test suite#
To edit an existing test suite, go to the Test repository → Test cases grid and perform the following steps:
- Hover over the test suite and click the Edit
- Make the necessary changes to the test suite fields
- Click Save
The updates will be applied to the test suite.
Deleting a test suite#
To delete a test suite, go to the Test repository → Test cases grid and perform the following steps:
- In the test cases column, hover over the test suite and click the Delete . The deleting dialogue will appear on the screen
- Click Delete
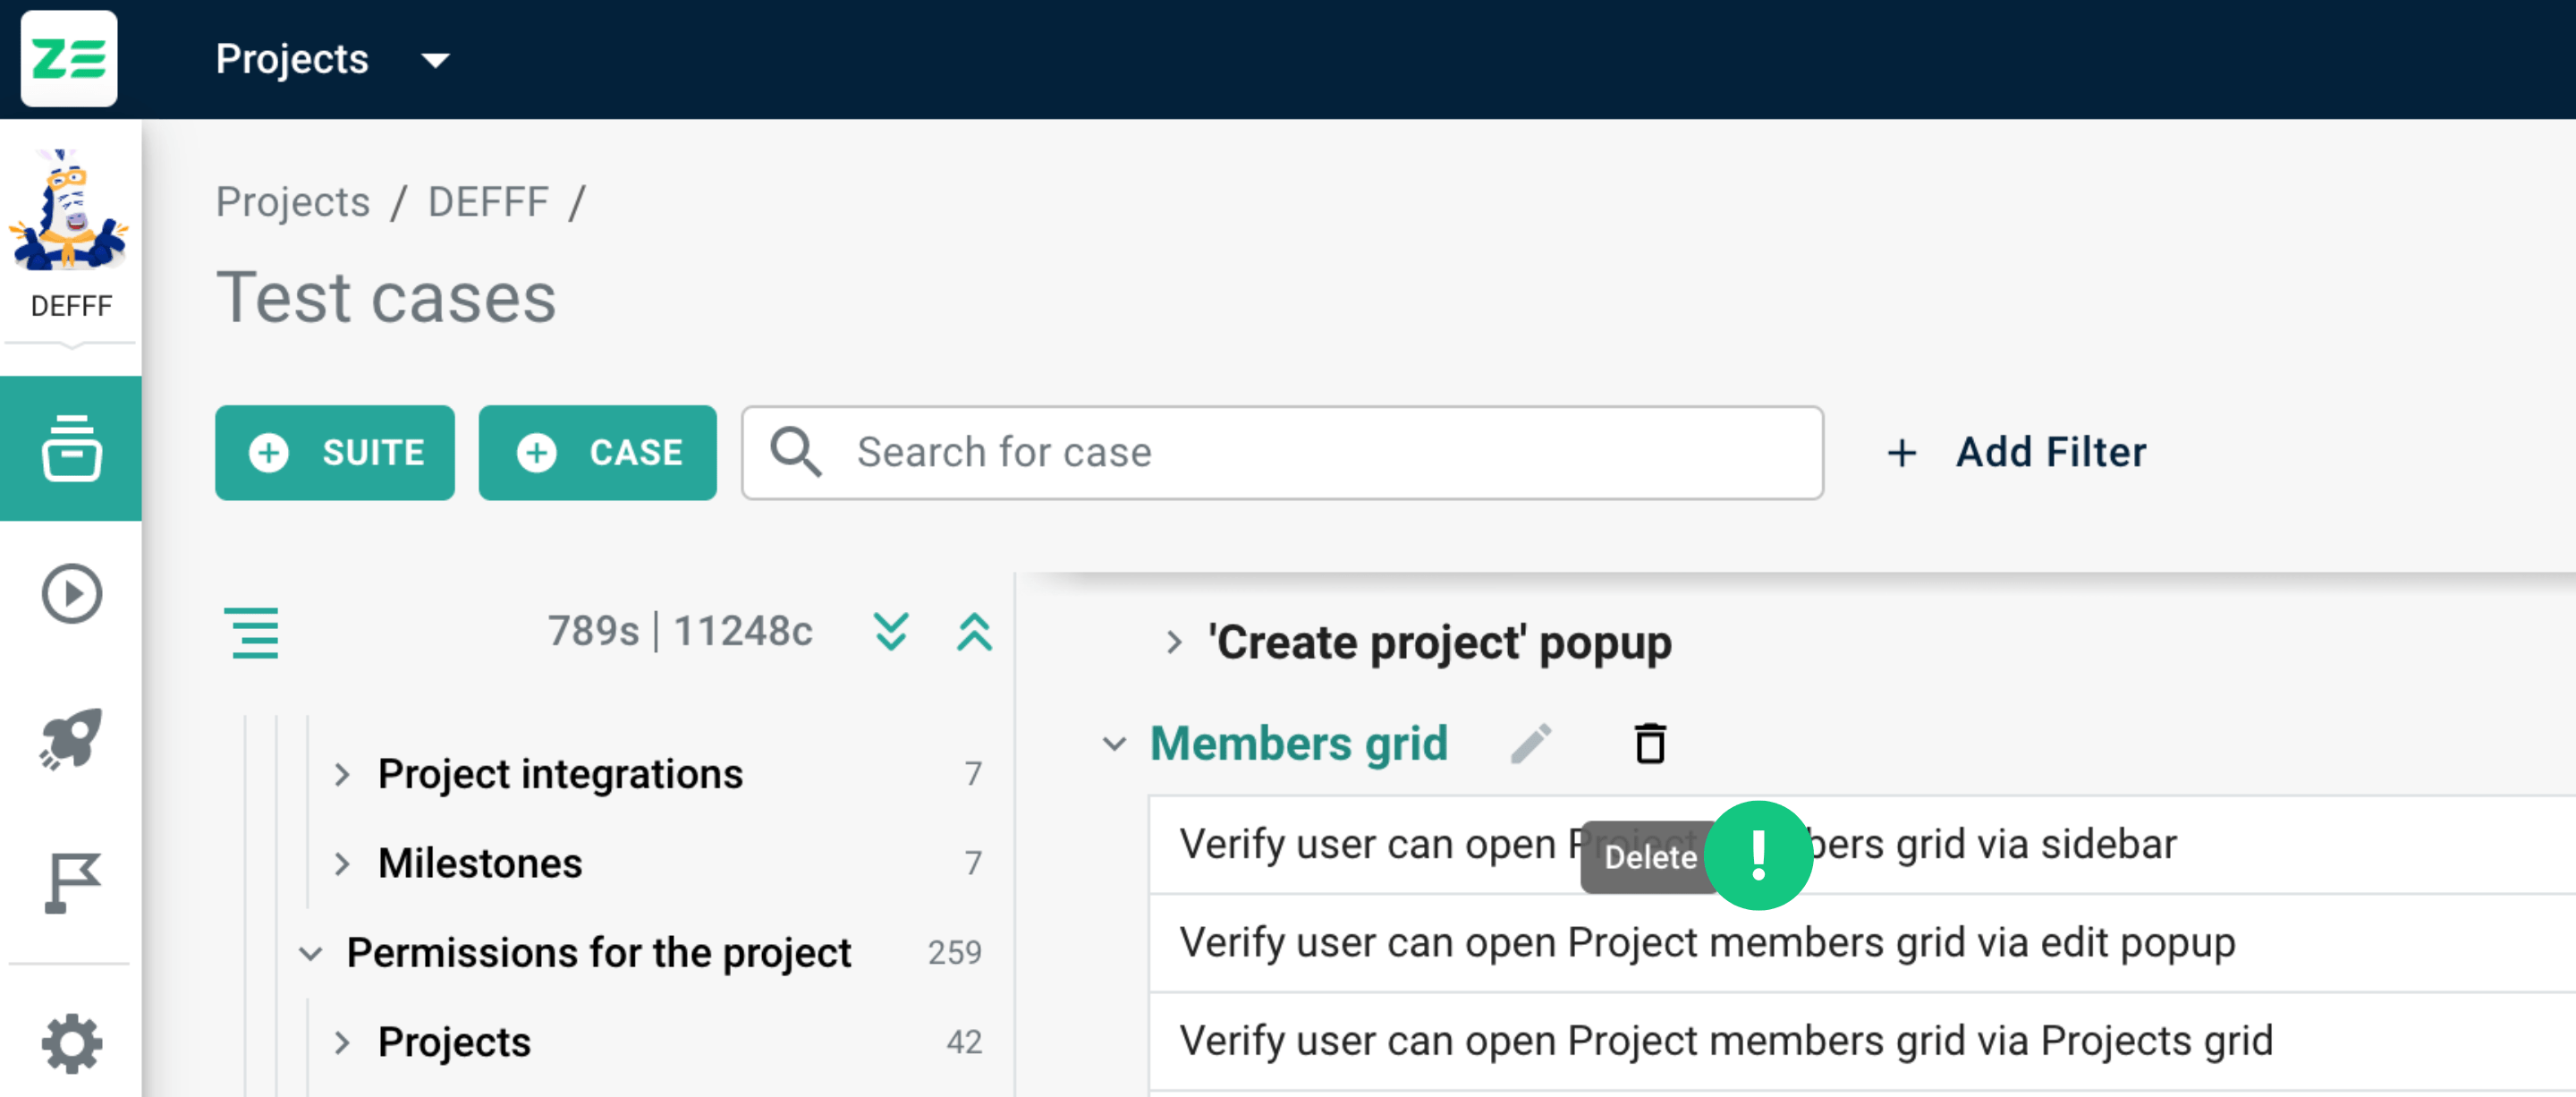
Info
Deleting a suite will permanently delete the suite itself and all its test cases.
Info
Professional and Enterprise plans at Zebrunner Test Case Management also include a trash bin, enabling soft deletion of test cases. For more info on the trash bin, please refer to the corresponding section of the documentation.
Working with test cases#
Test case is a sequence of steps describing how to validate a particular test objective.
In this section, you'll get an overview of test cases management in Zebrunner.
Test case view#
There are two ways users can view test cases in the test repository:
Sidebar view: In this view, test case data is displayed as a third column in the test repository next to the test case list. This view is convenient for quick view and is optimal for simple test cases.
Modal view: In this view, test case data is displayed in an expanded view fitting more data. This view is recommended for large and complex test cases. To make the process of navigating between test cases within the suite easier, we have included navigation controls within the modal window.
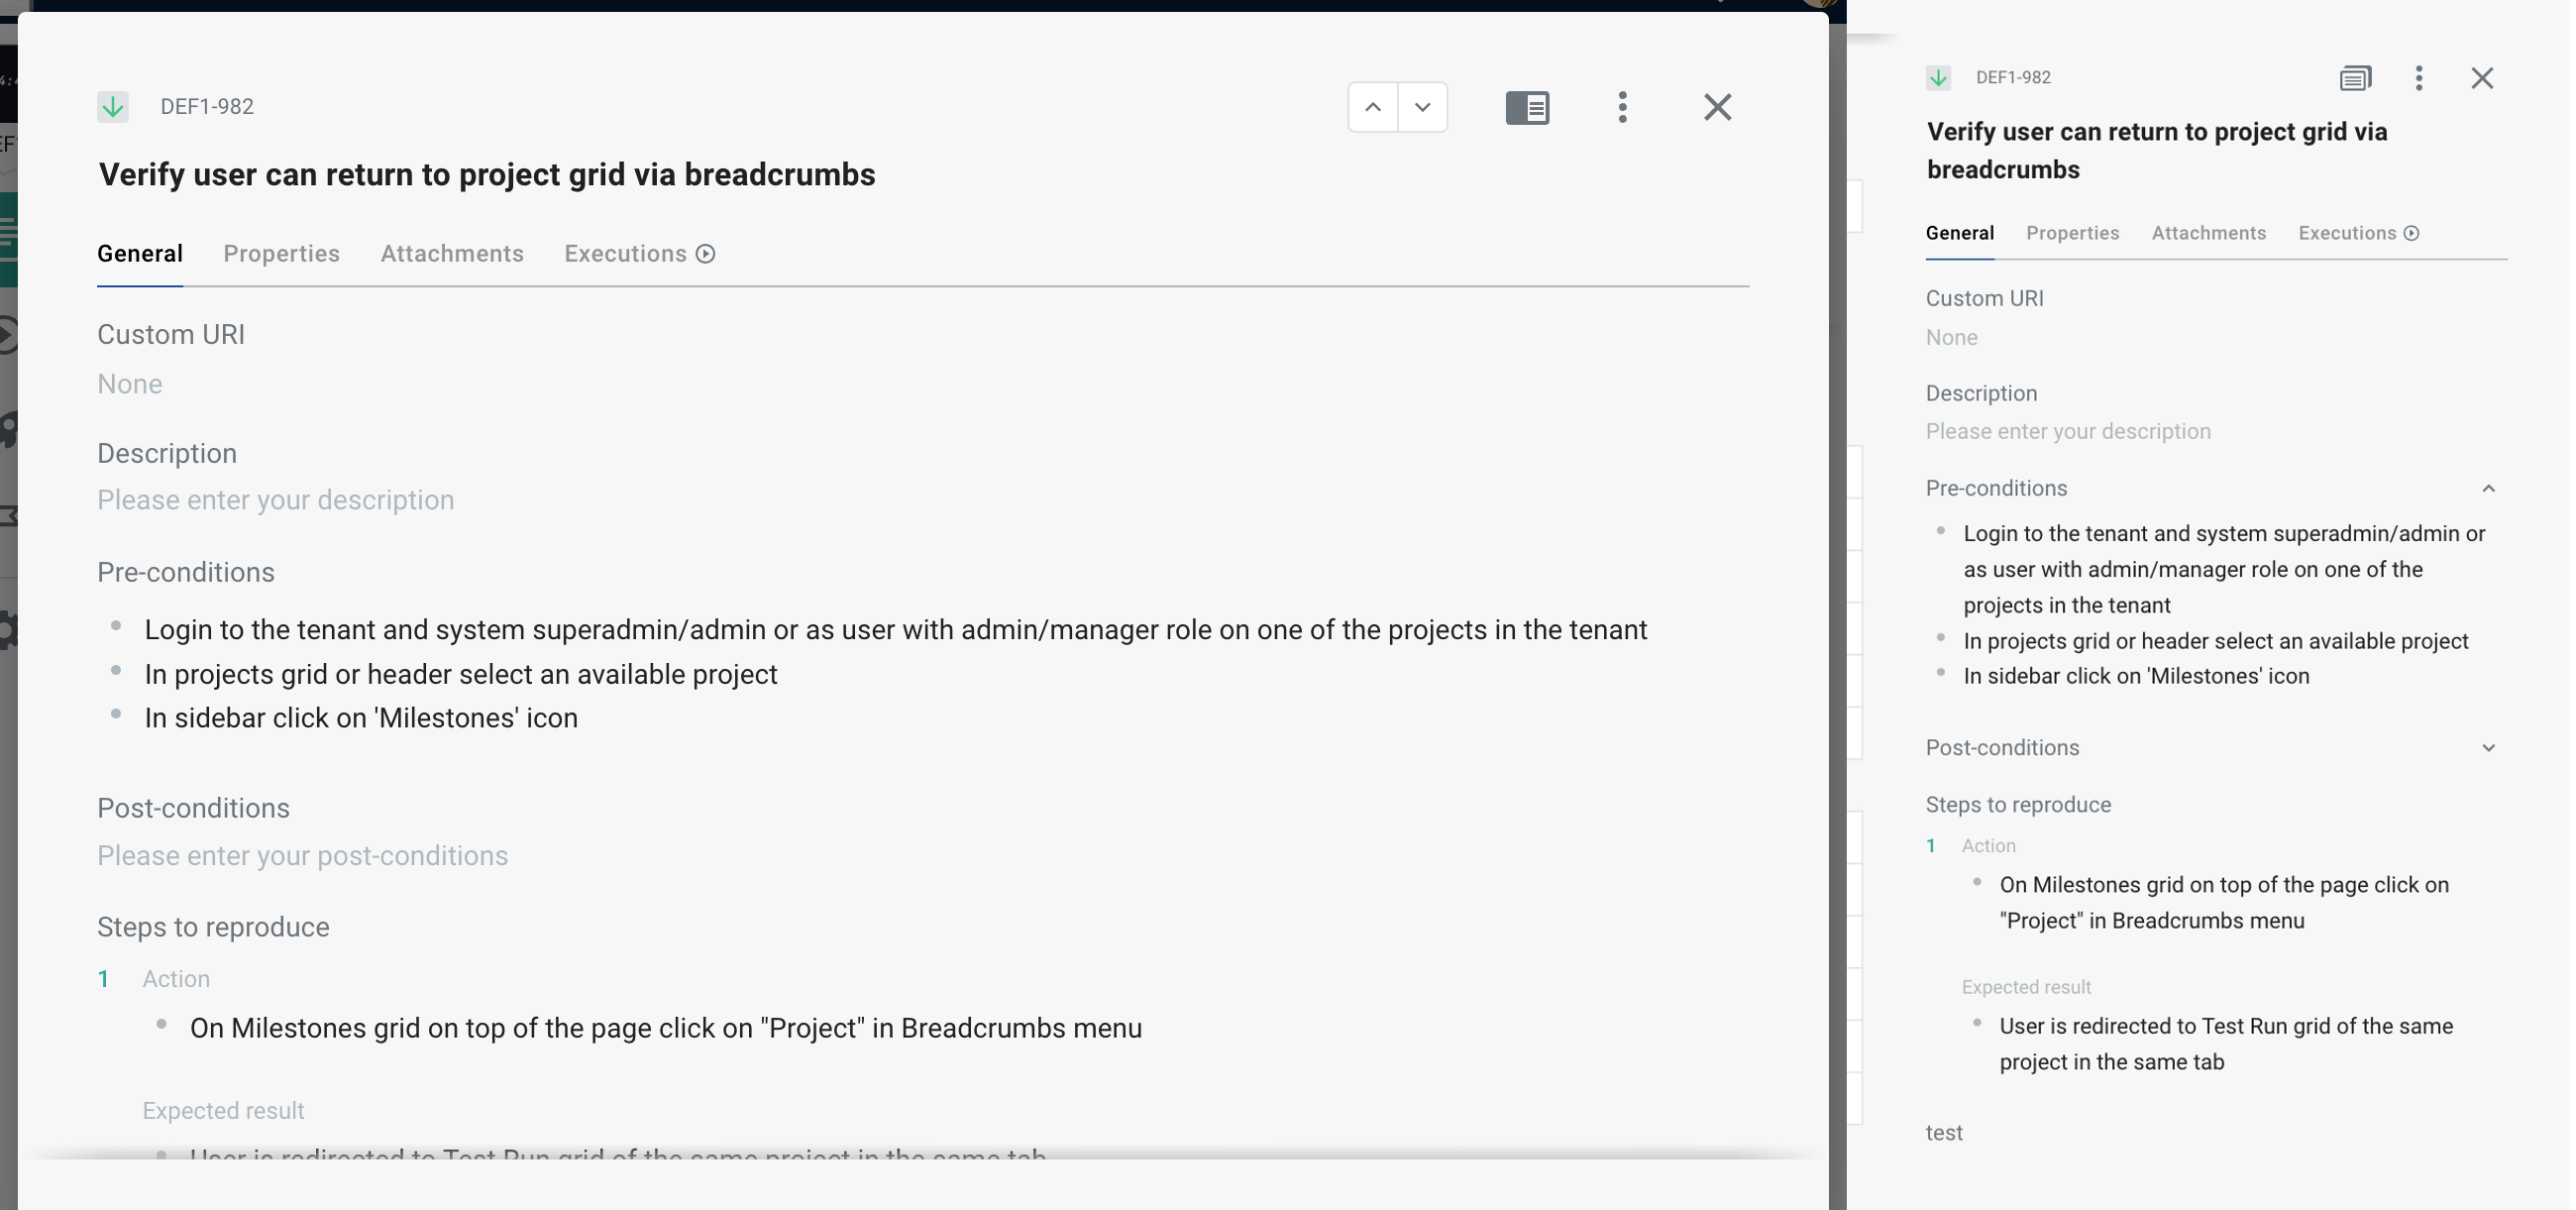
You can change the way your test cases are displayed on the grid by clicking the Switch to sidebar view / Switch to modal view icon in the top right corner of a test case.
Additionally, you can open a test case on the Test case details view page by clicking the test case key in the top-left corner of the sidebar or modal view.
These views display data in sections:
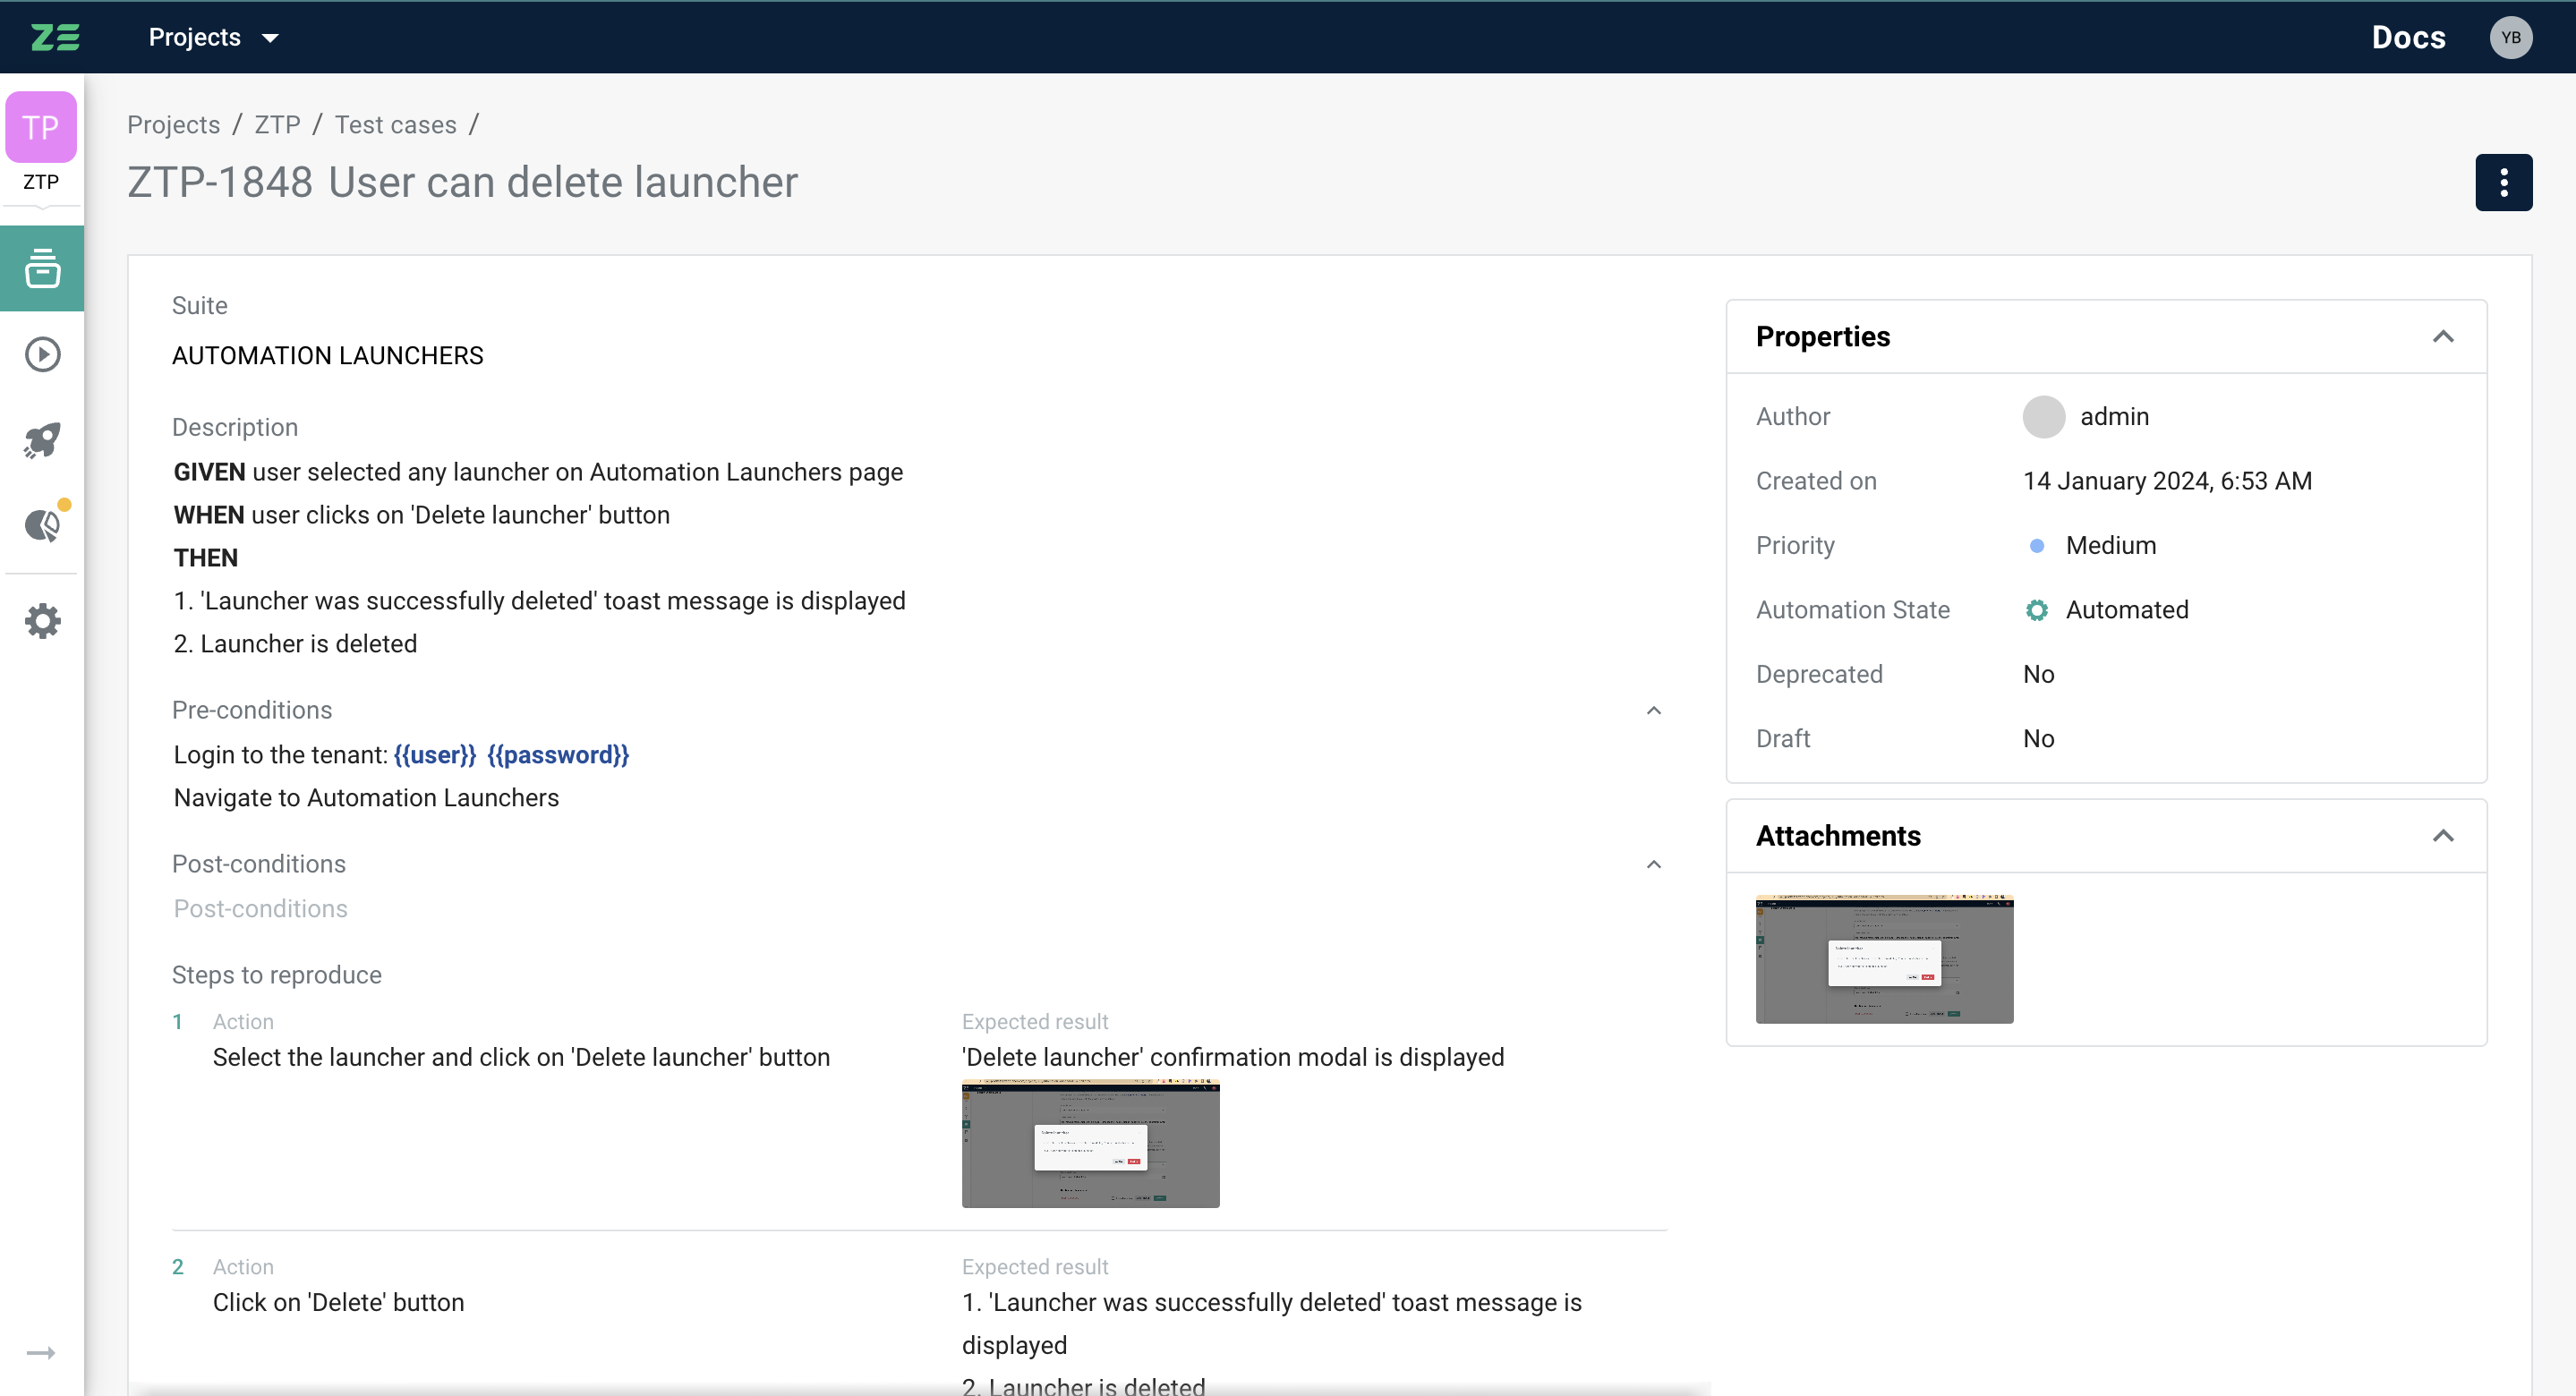
- General tab contains core test case fields (such as description, steps, pre- and post-conditions)
- Properties tab contains important flags and attributes, such as priority, author, automation state, etc.
- Attachments tab contains files linked to the test cases (e.g. images)
- Executions tab contains the last 10 test case executions (both manual and automated; ordered from latest to oldest) with test configuration details.
- Change log tab lists all updates, made to test case fields, its location and layout.
Creating a case#
To create a new test case, go to the Test repository → Test cases grid and perform the following steps:
- Click +Case
- Fill in mandatory fields and select a parent suite
- Click Create
Info
Test case must always belong to a particular test suite, so make sure that there is at least one suite created for this project.
Once created, the test case will appear in the specified test suite.
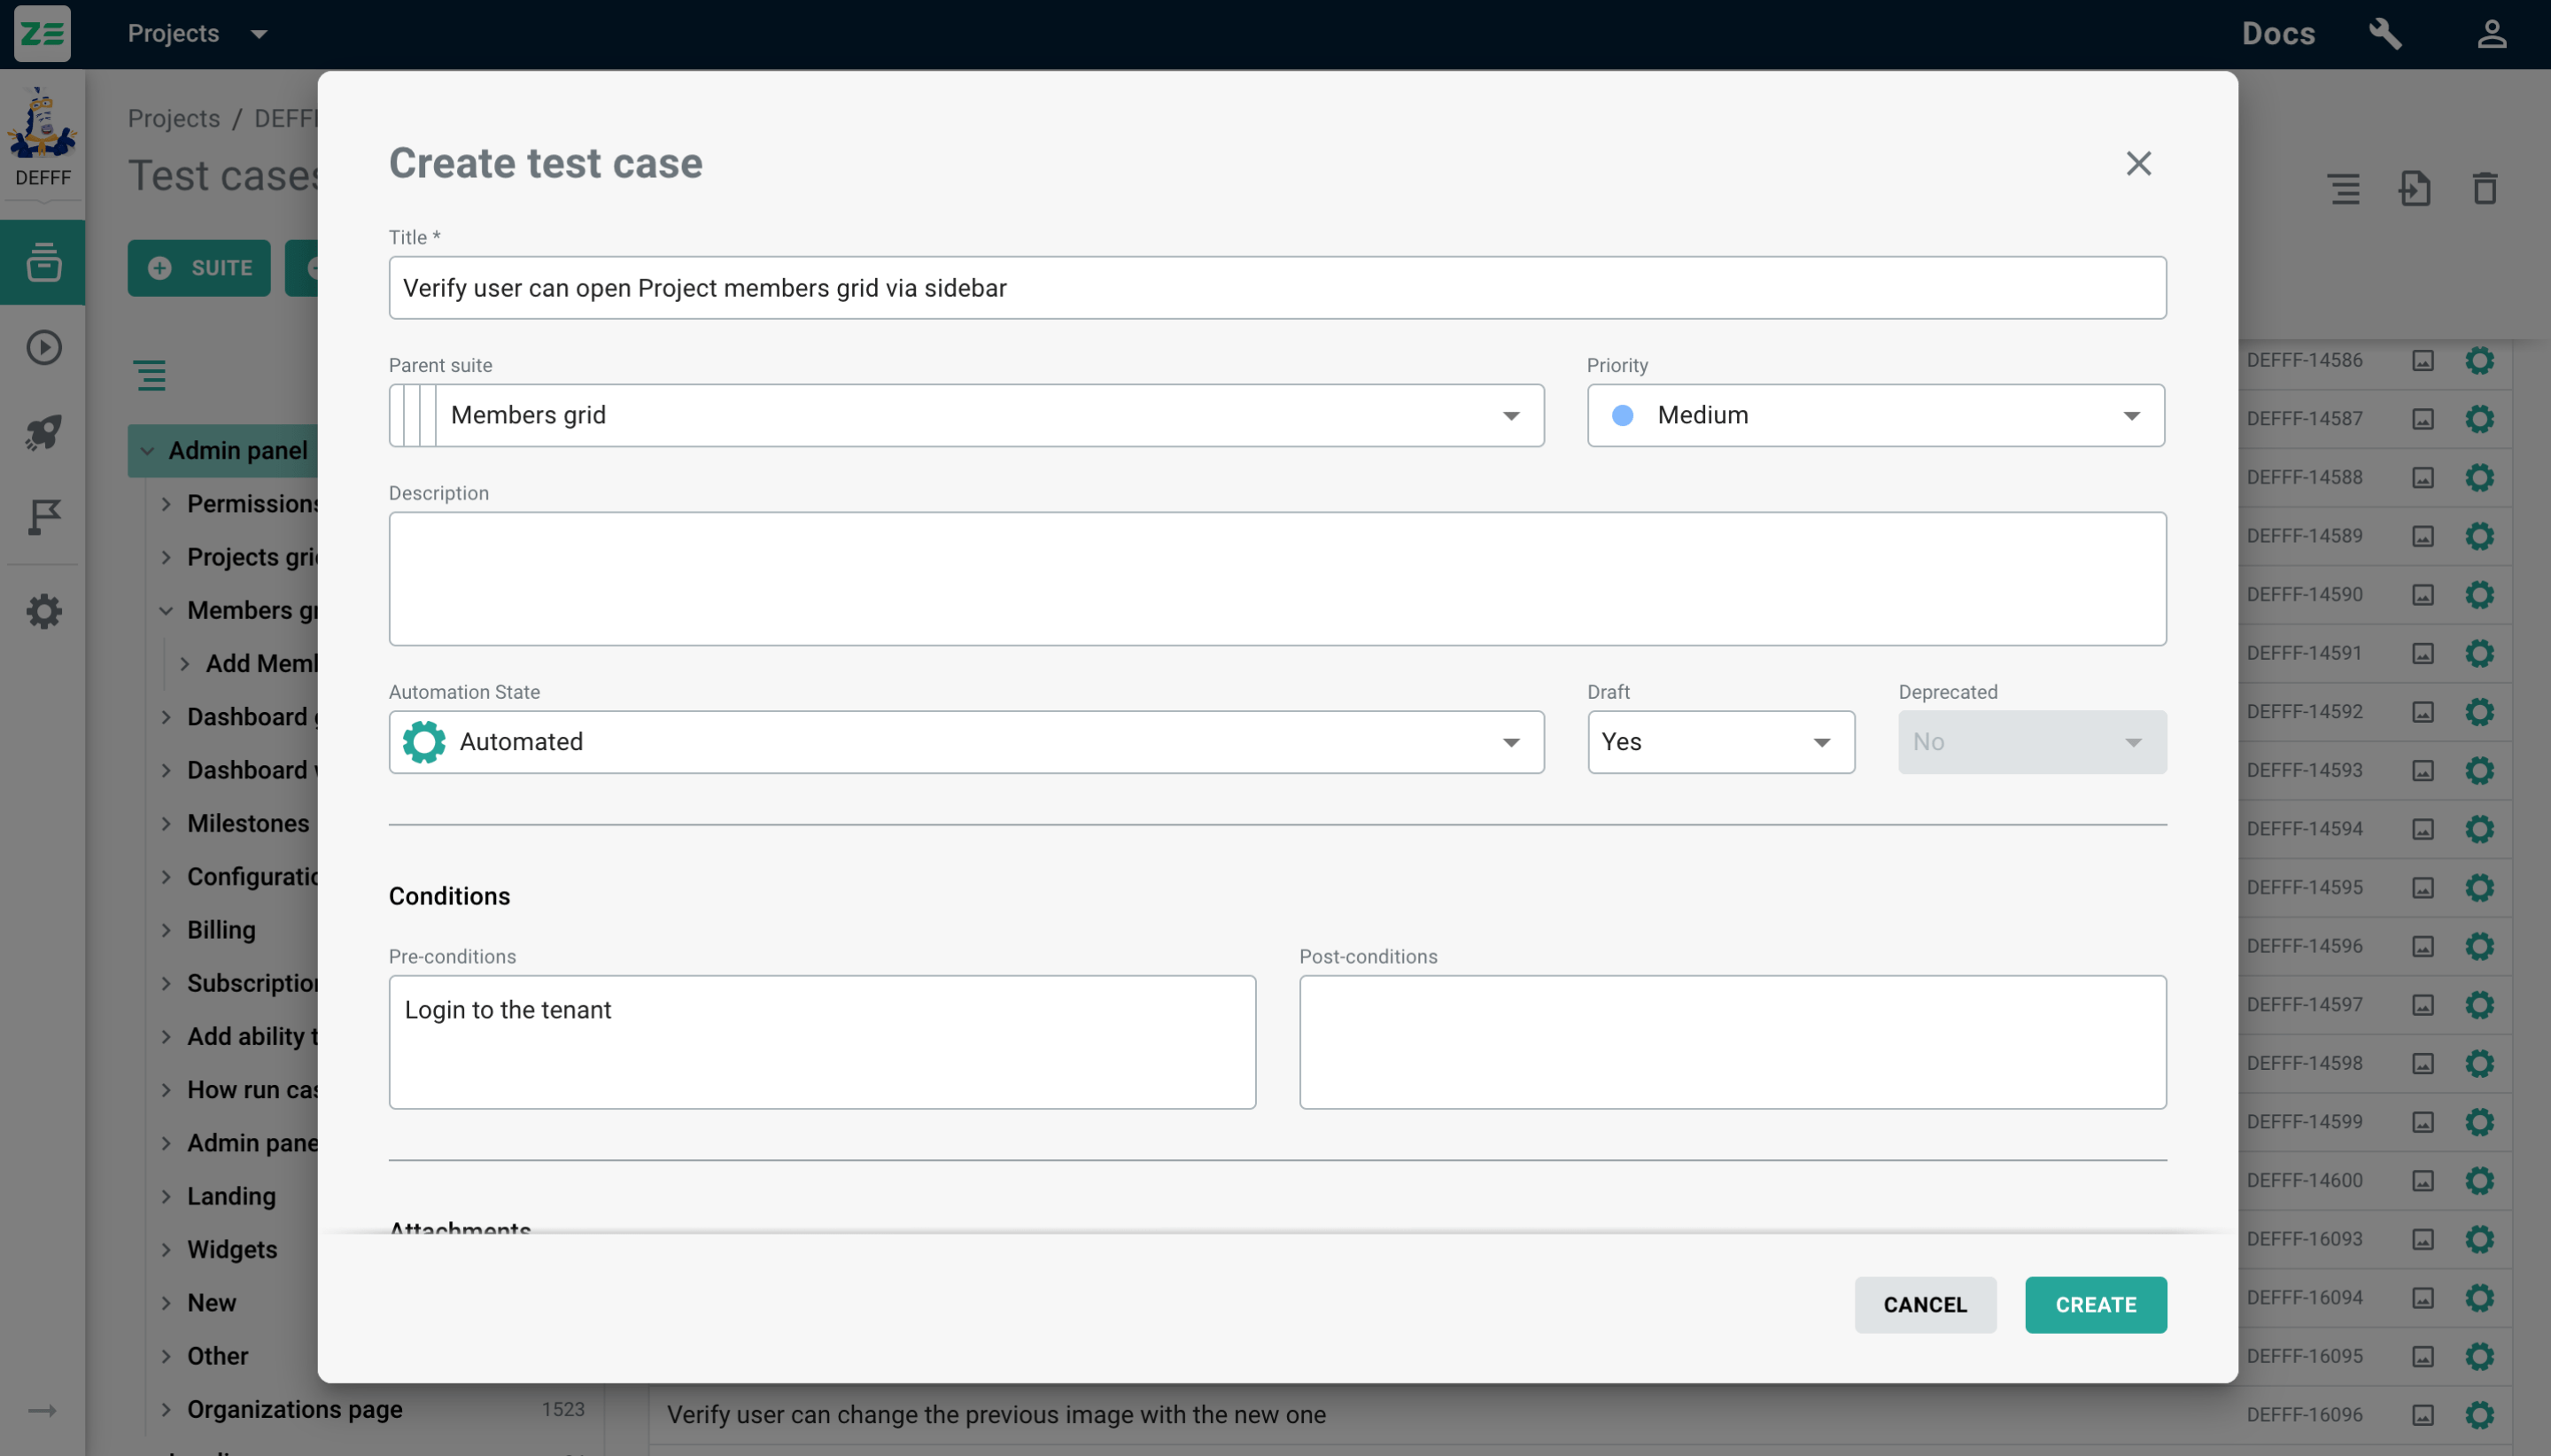
Tip
You can also quickly add new test cases via the +Create quick case by only specifying the title (remaining fields will be set to defaults). It may be handy for drafting large amounts of new test cases before proper detalization.
Editing a case#
To edit a test case, go to the Test repository → Test cases grid and perform the following steps:
- Hover over the test case to edit and click the Edit to the right of the case title
- Make the necessary changes to the test case fields
- Click Save
The updates will be applied to the test case.
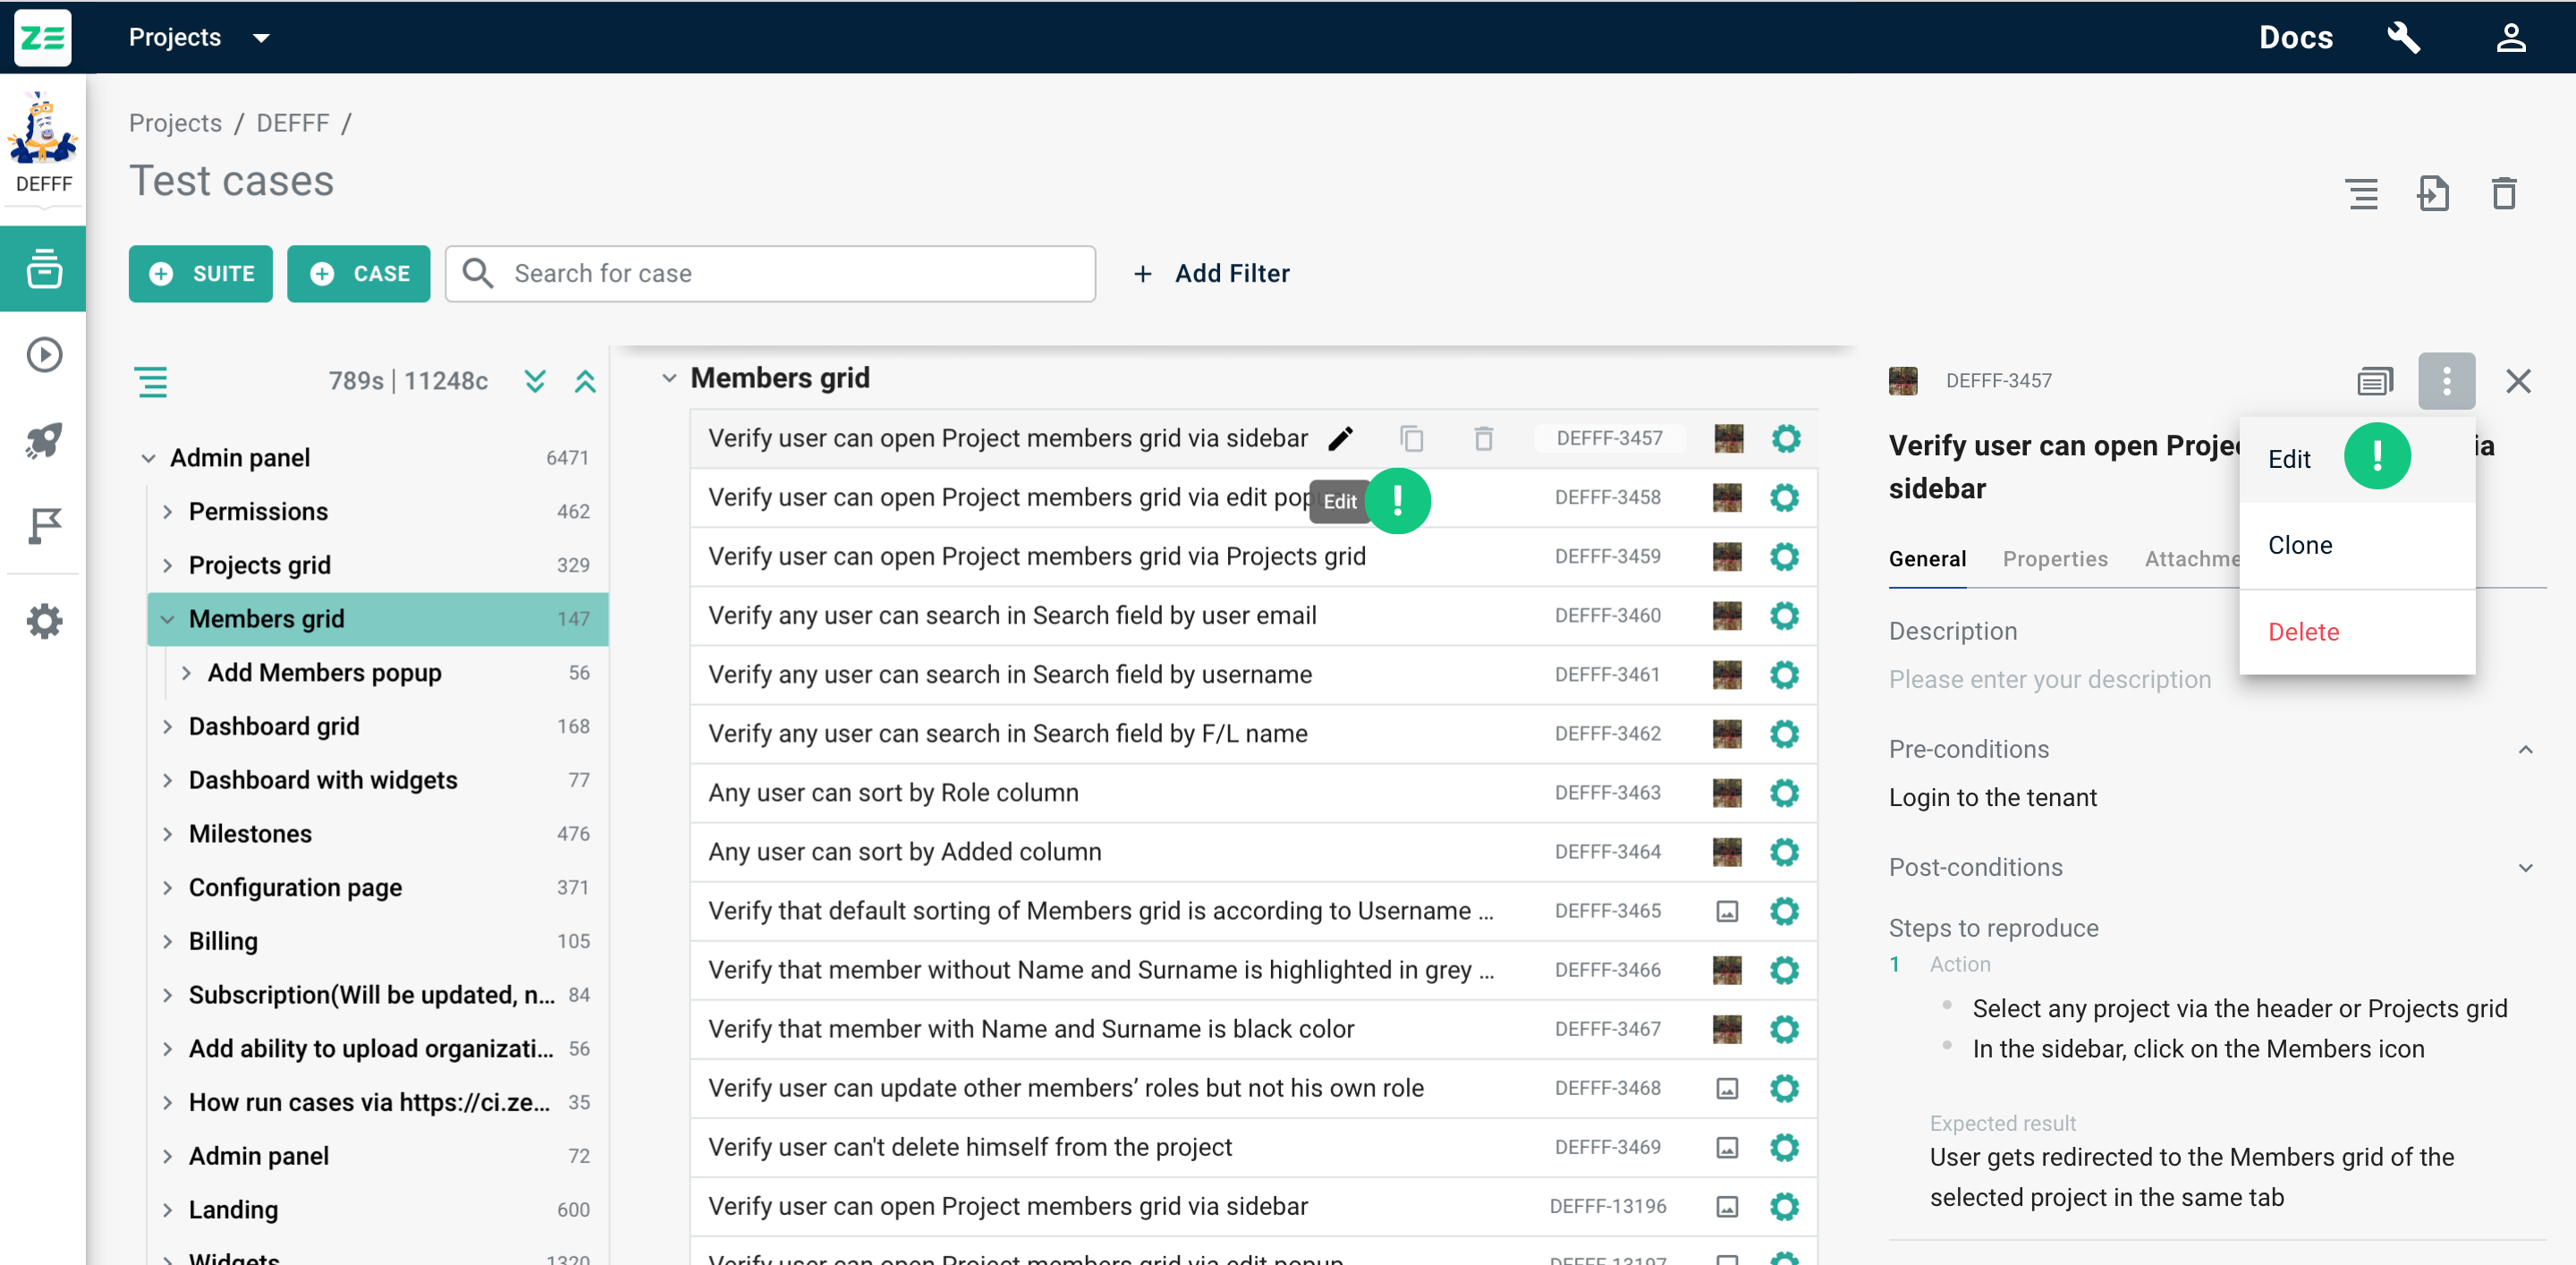
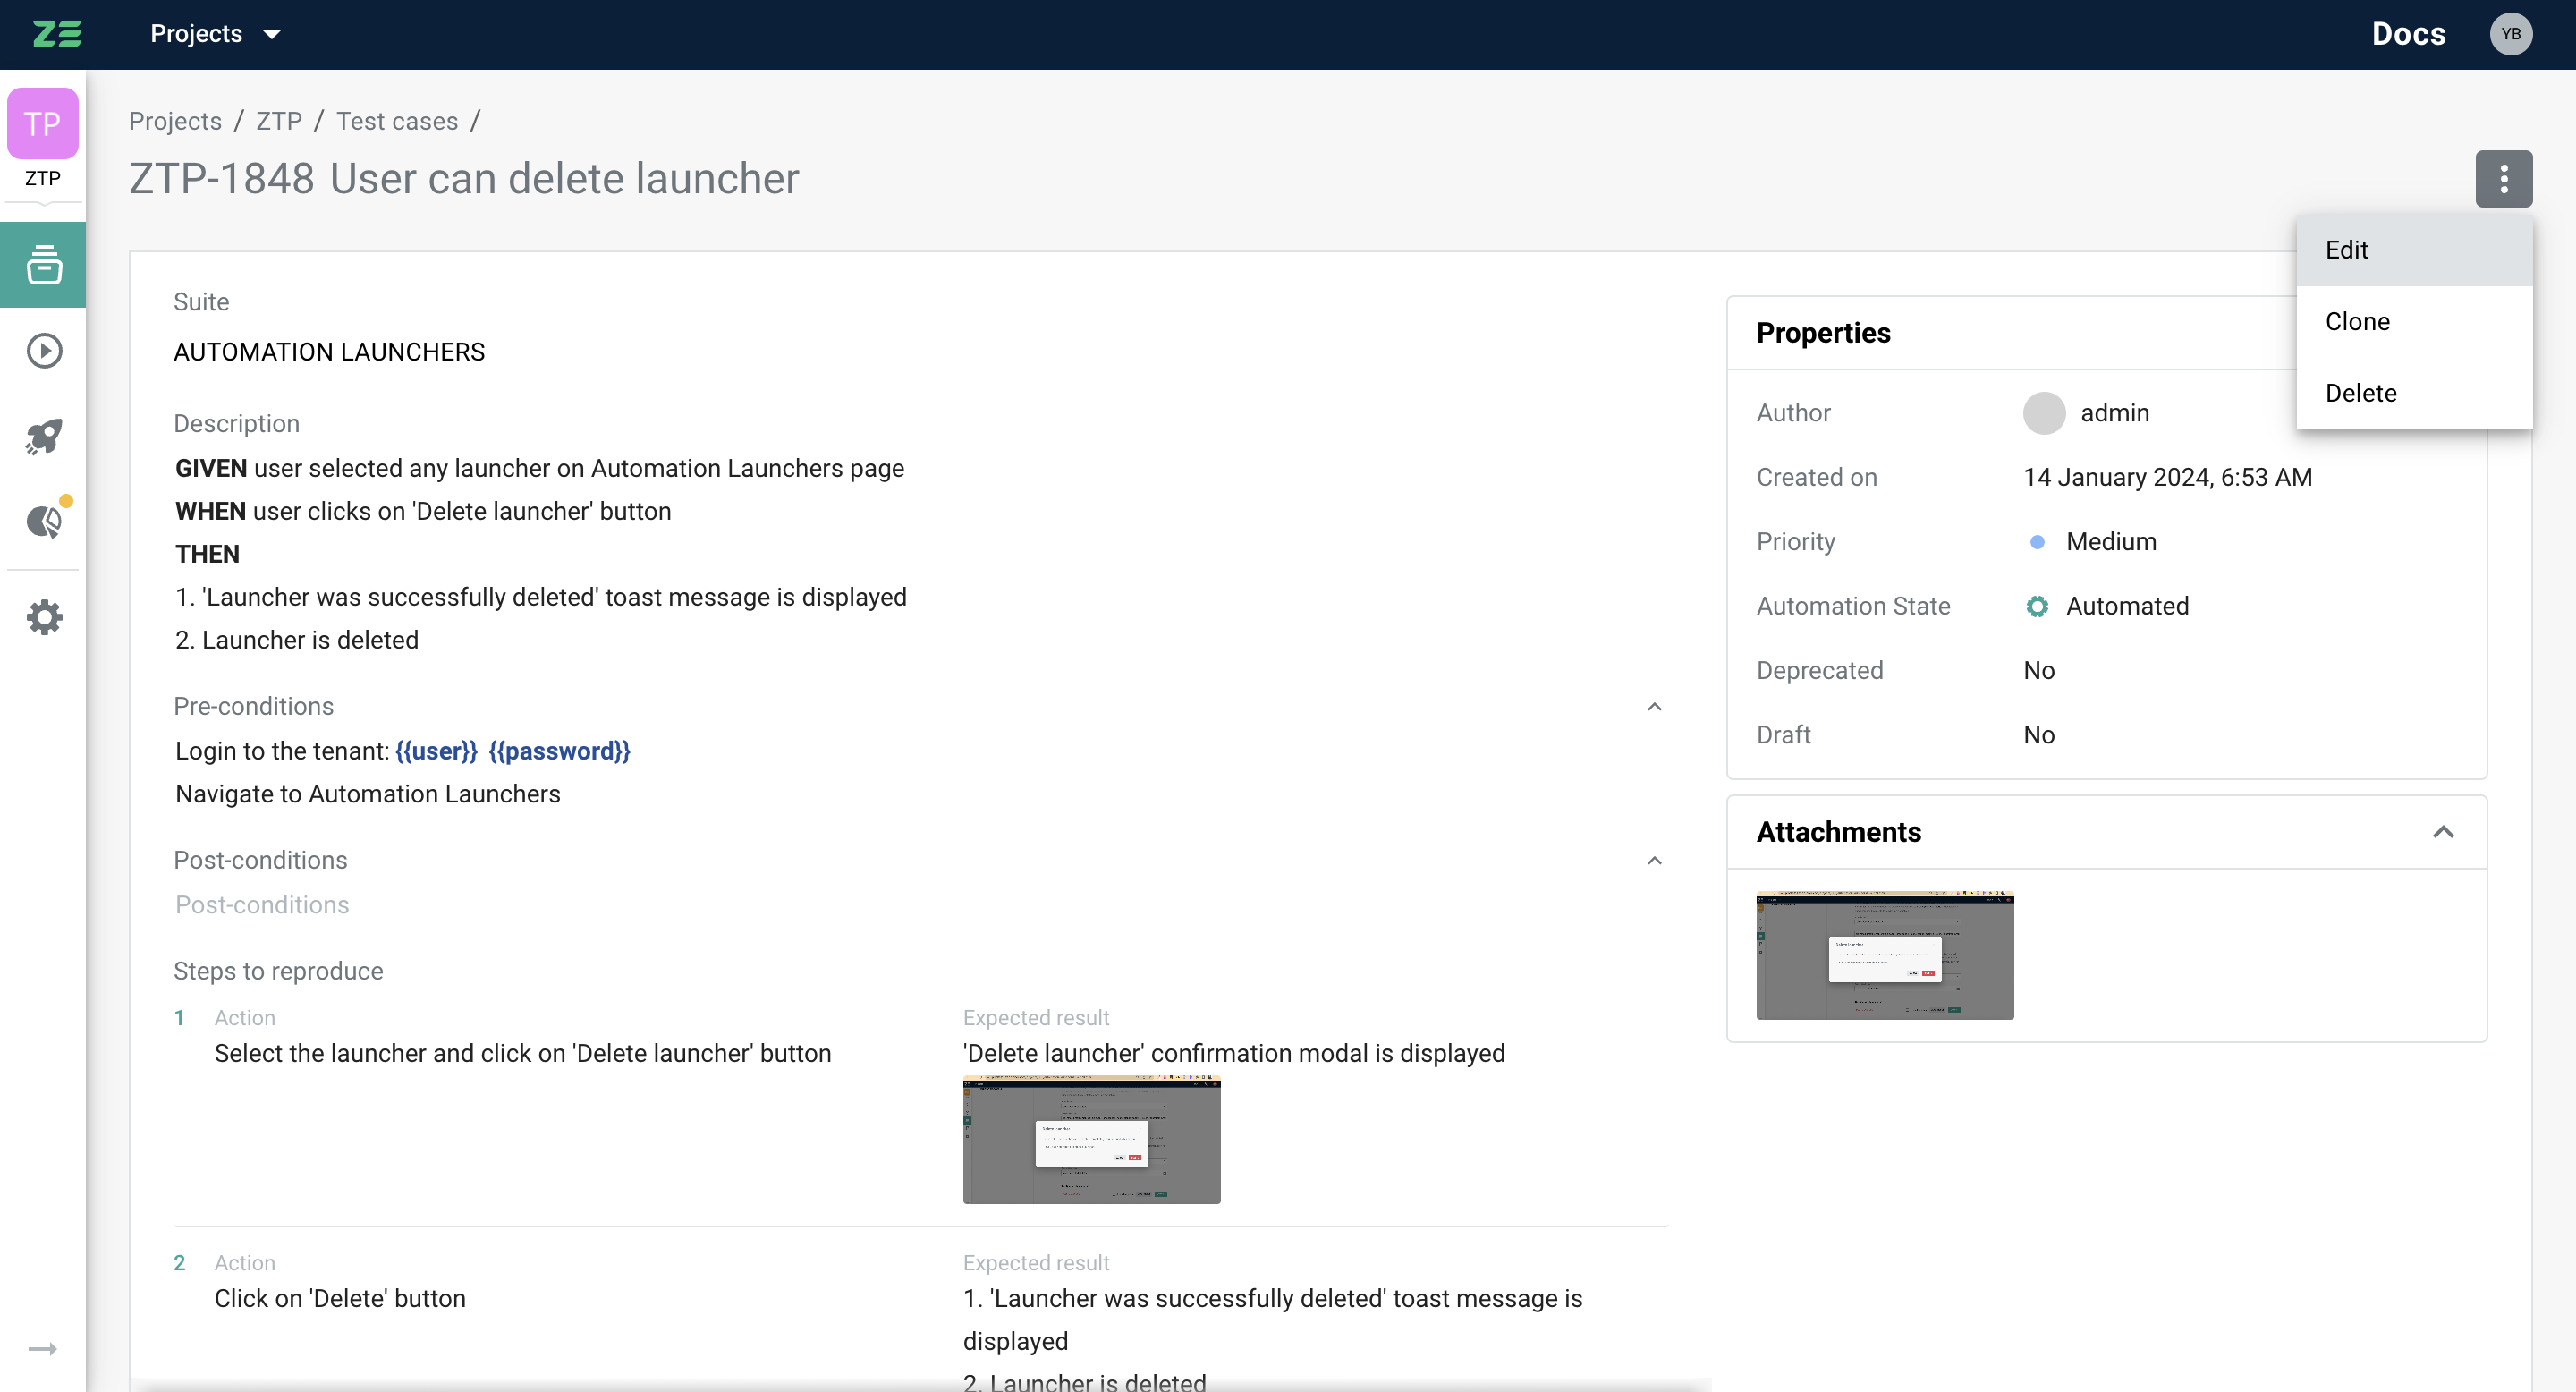
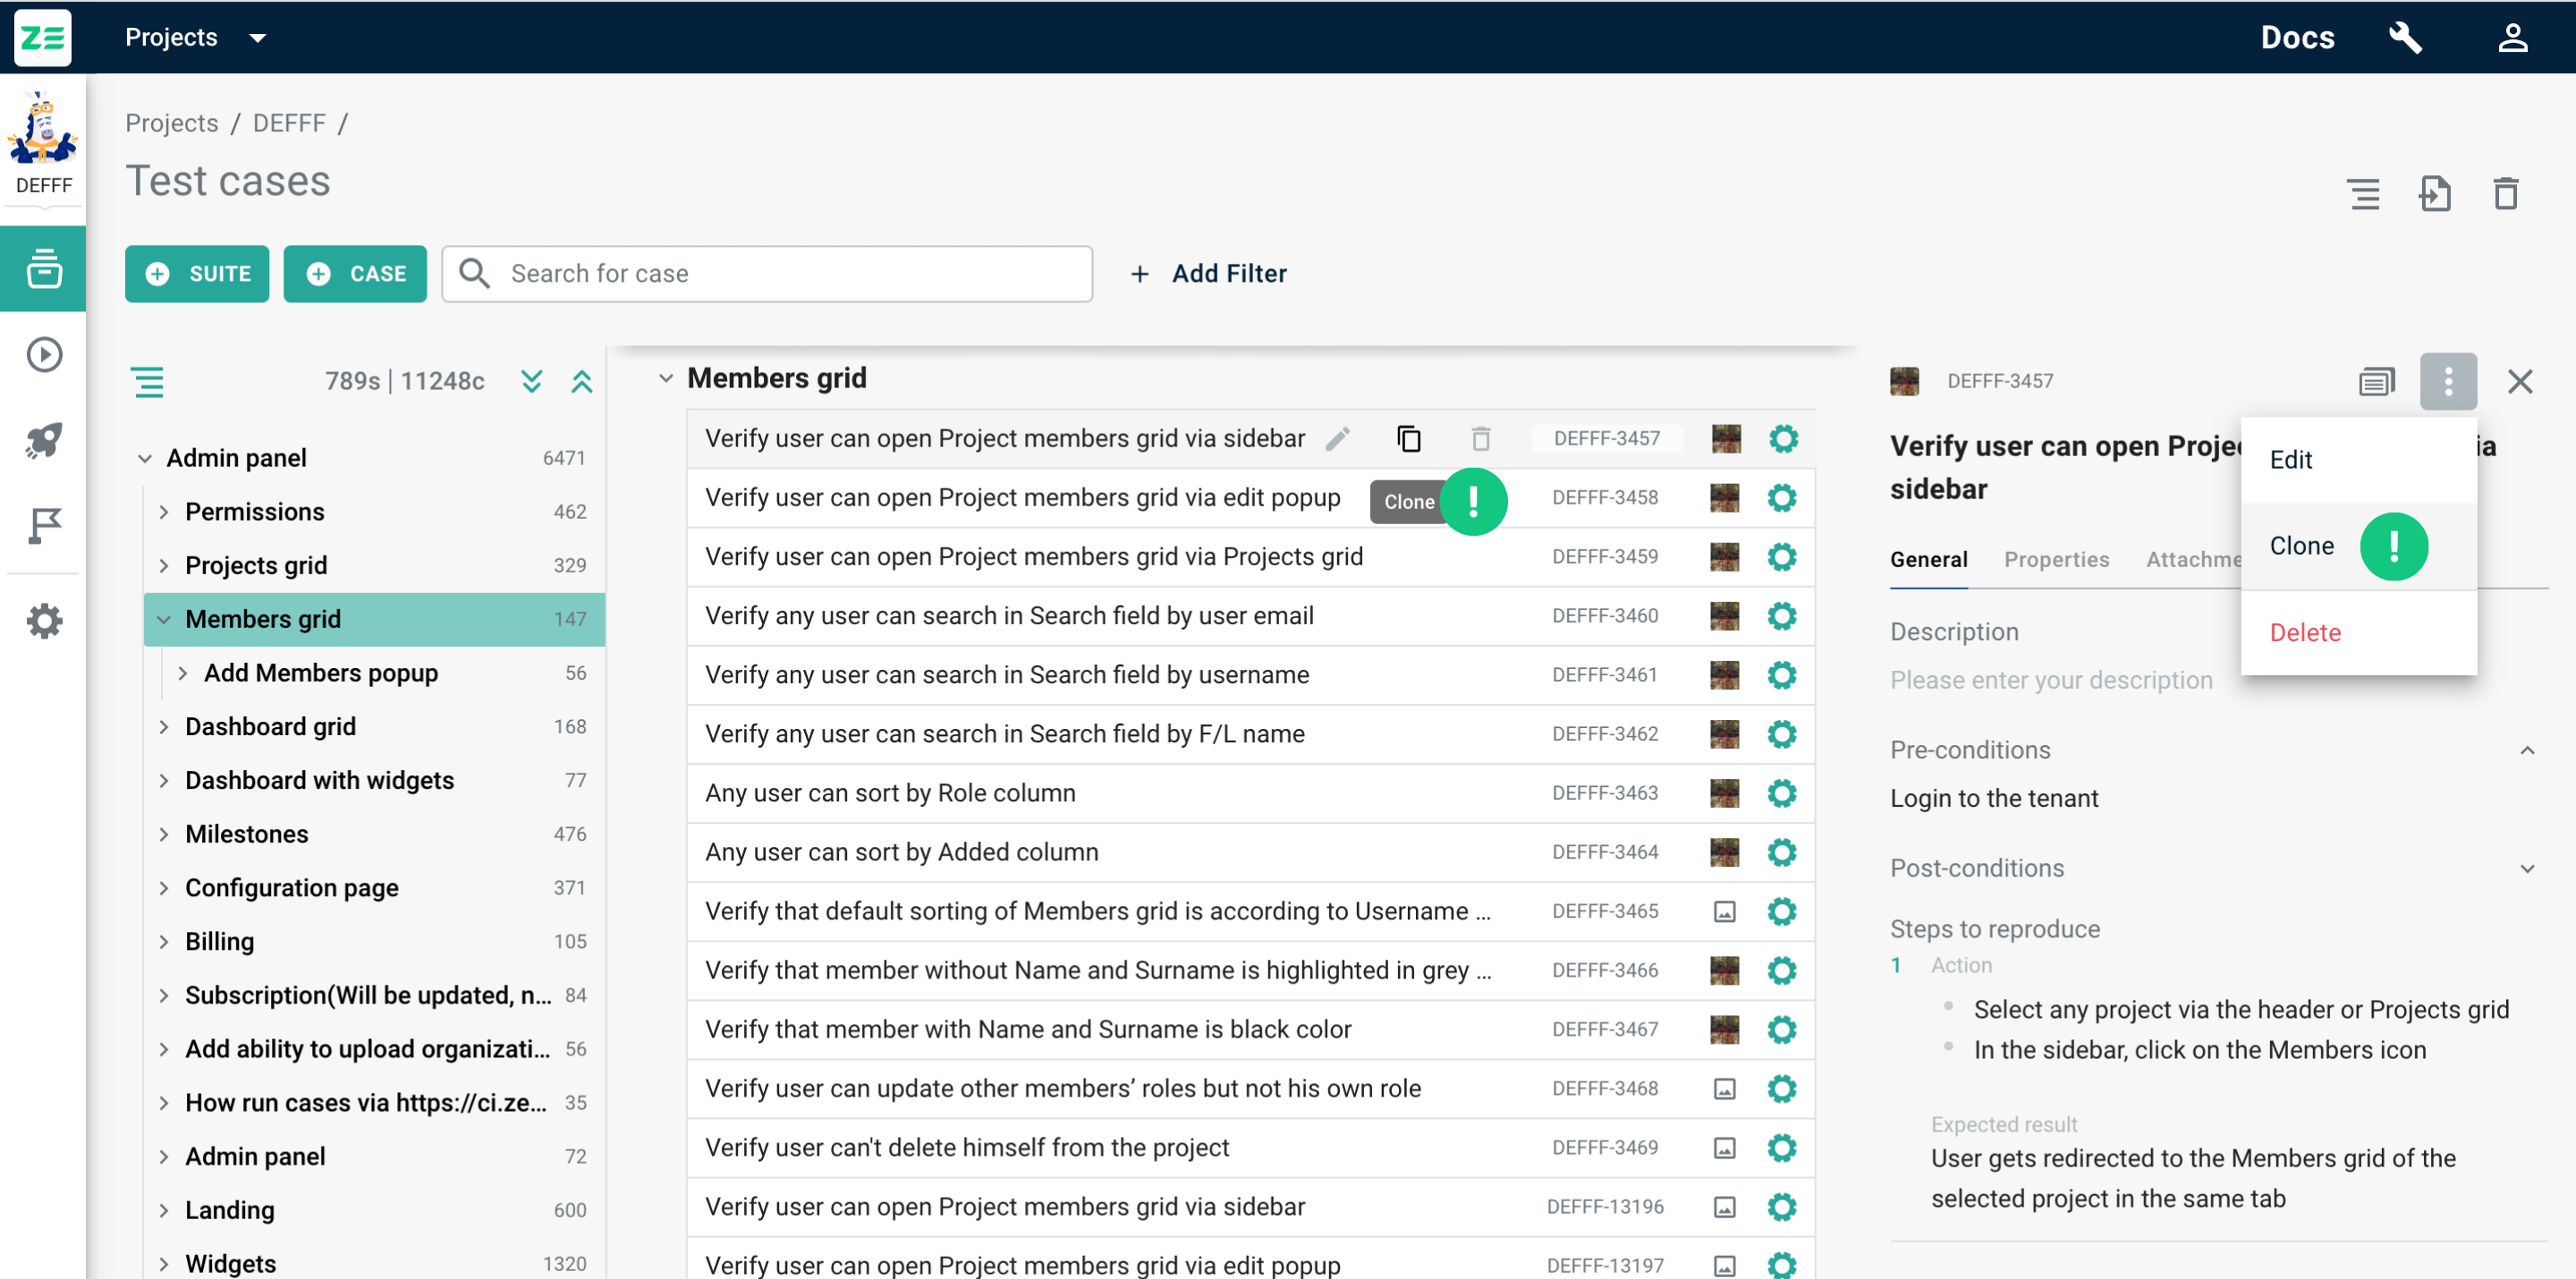
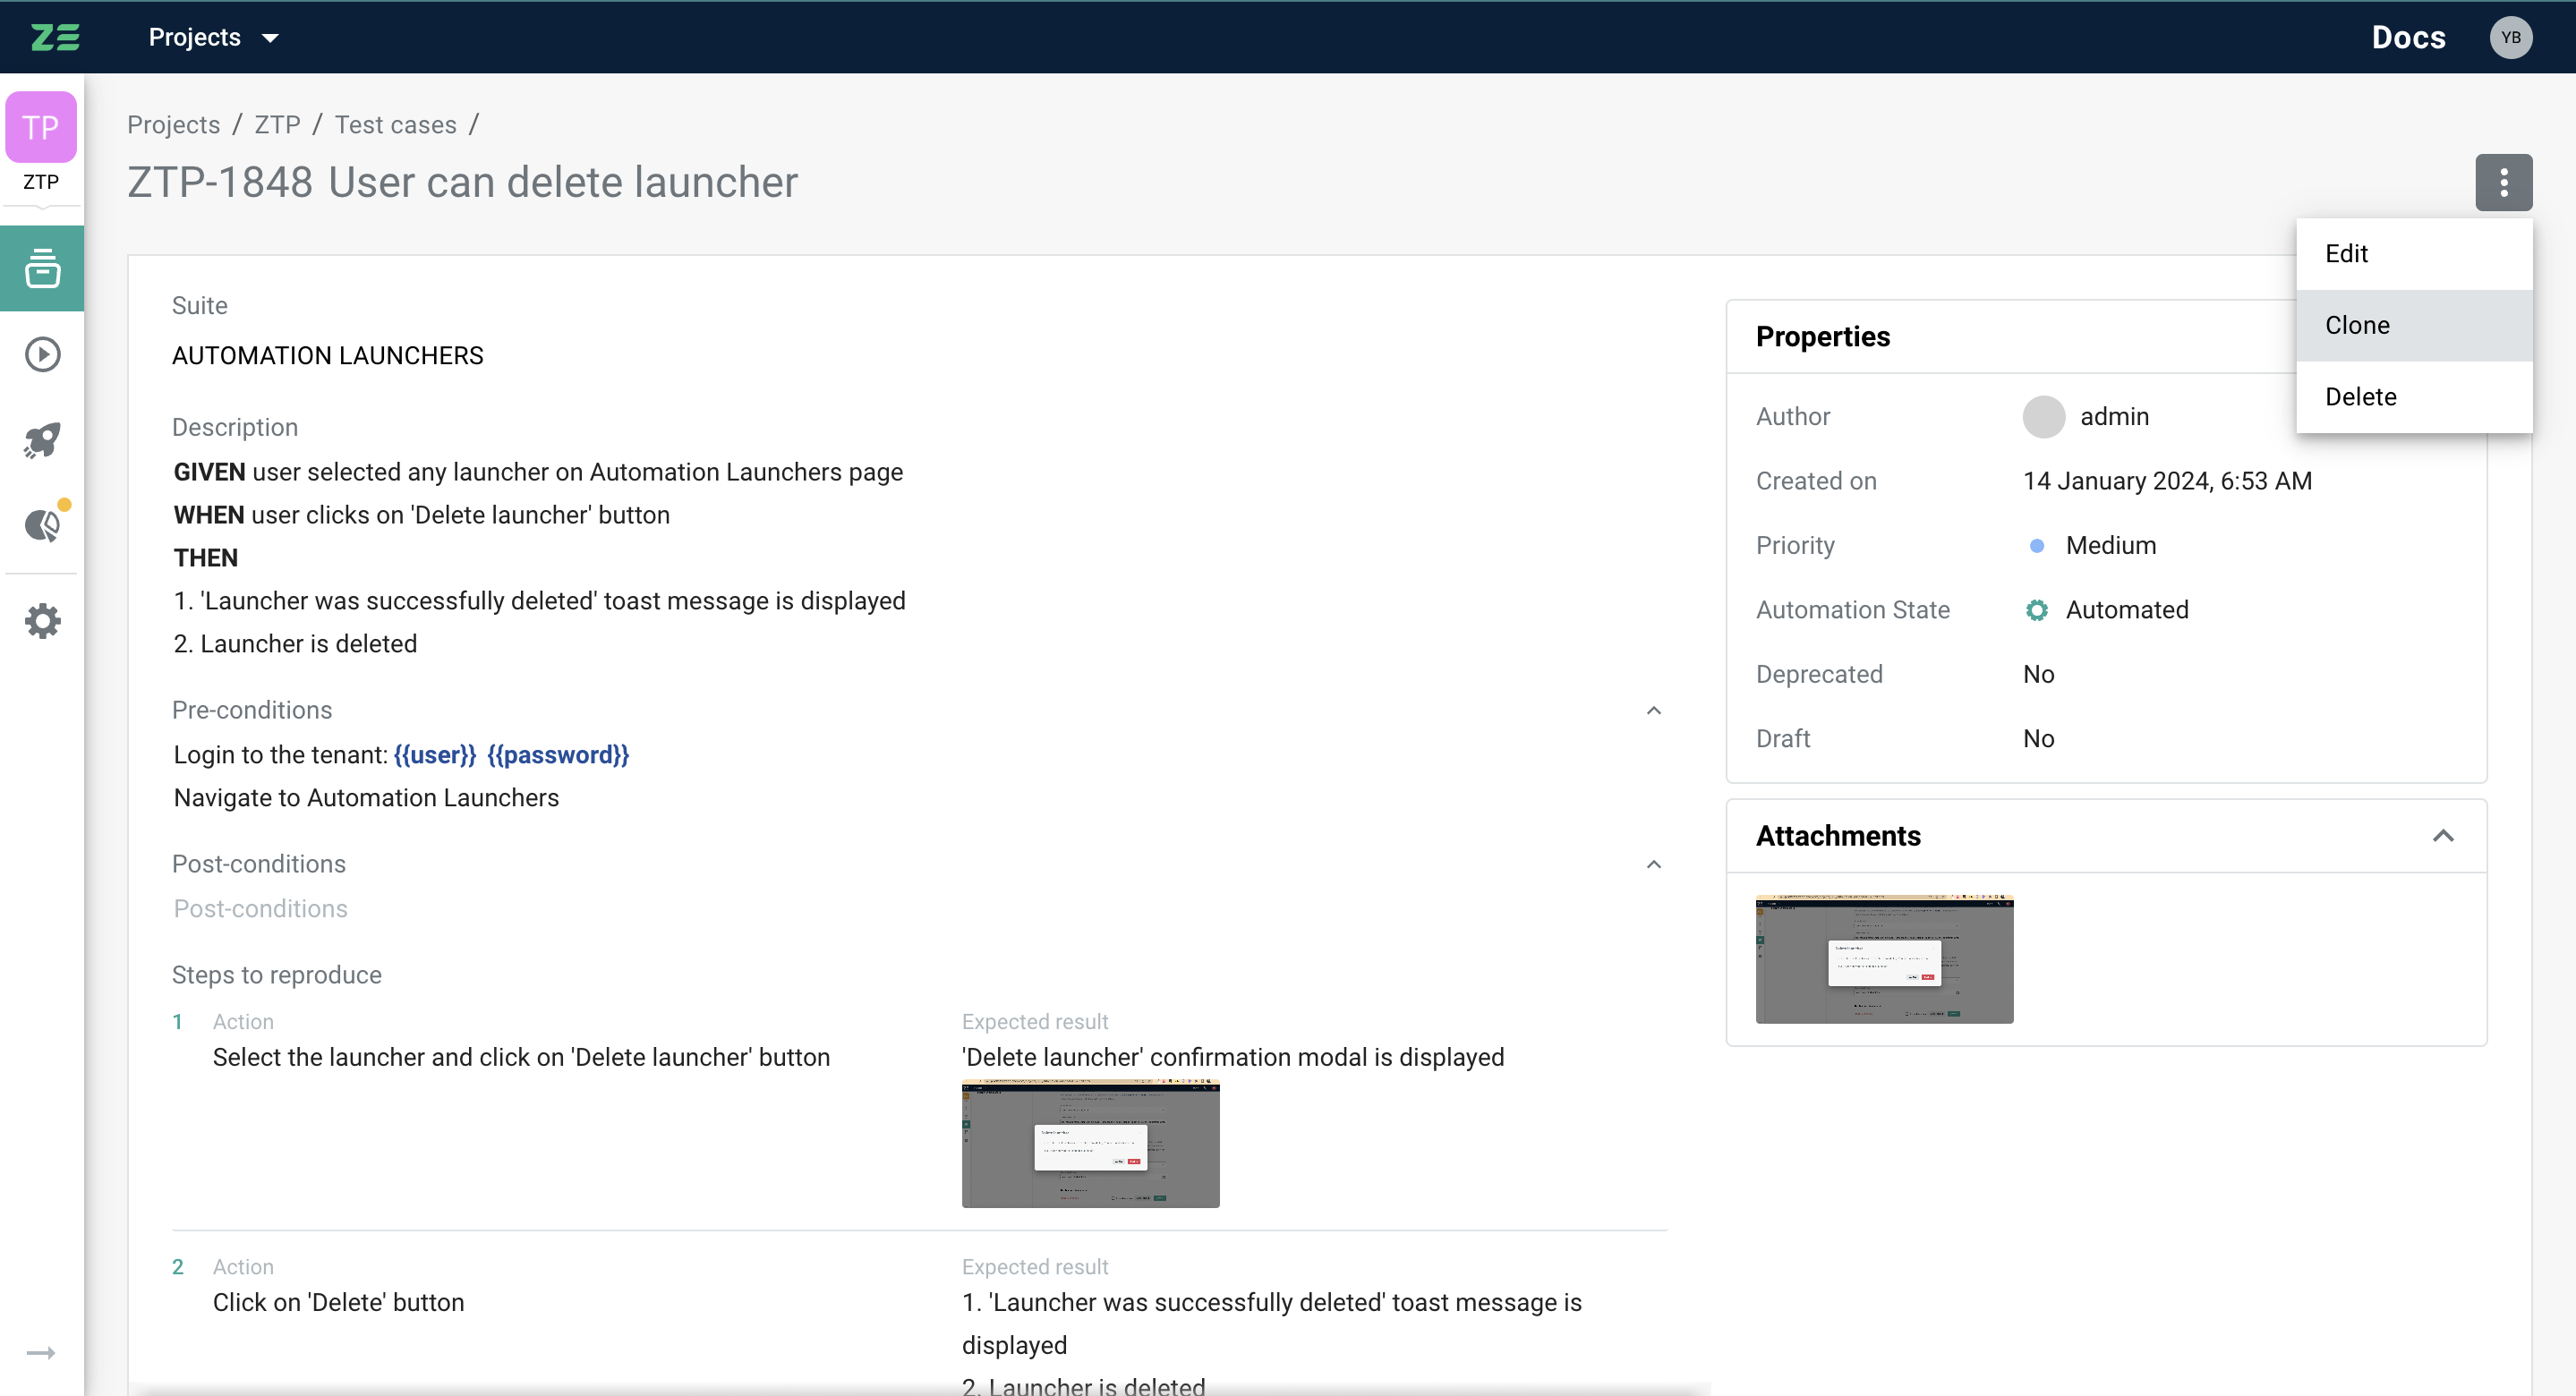
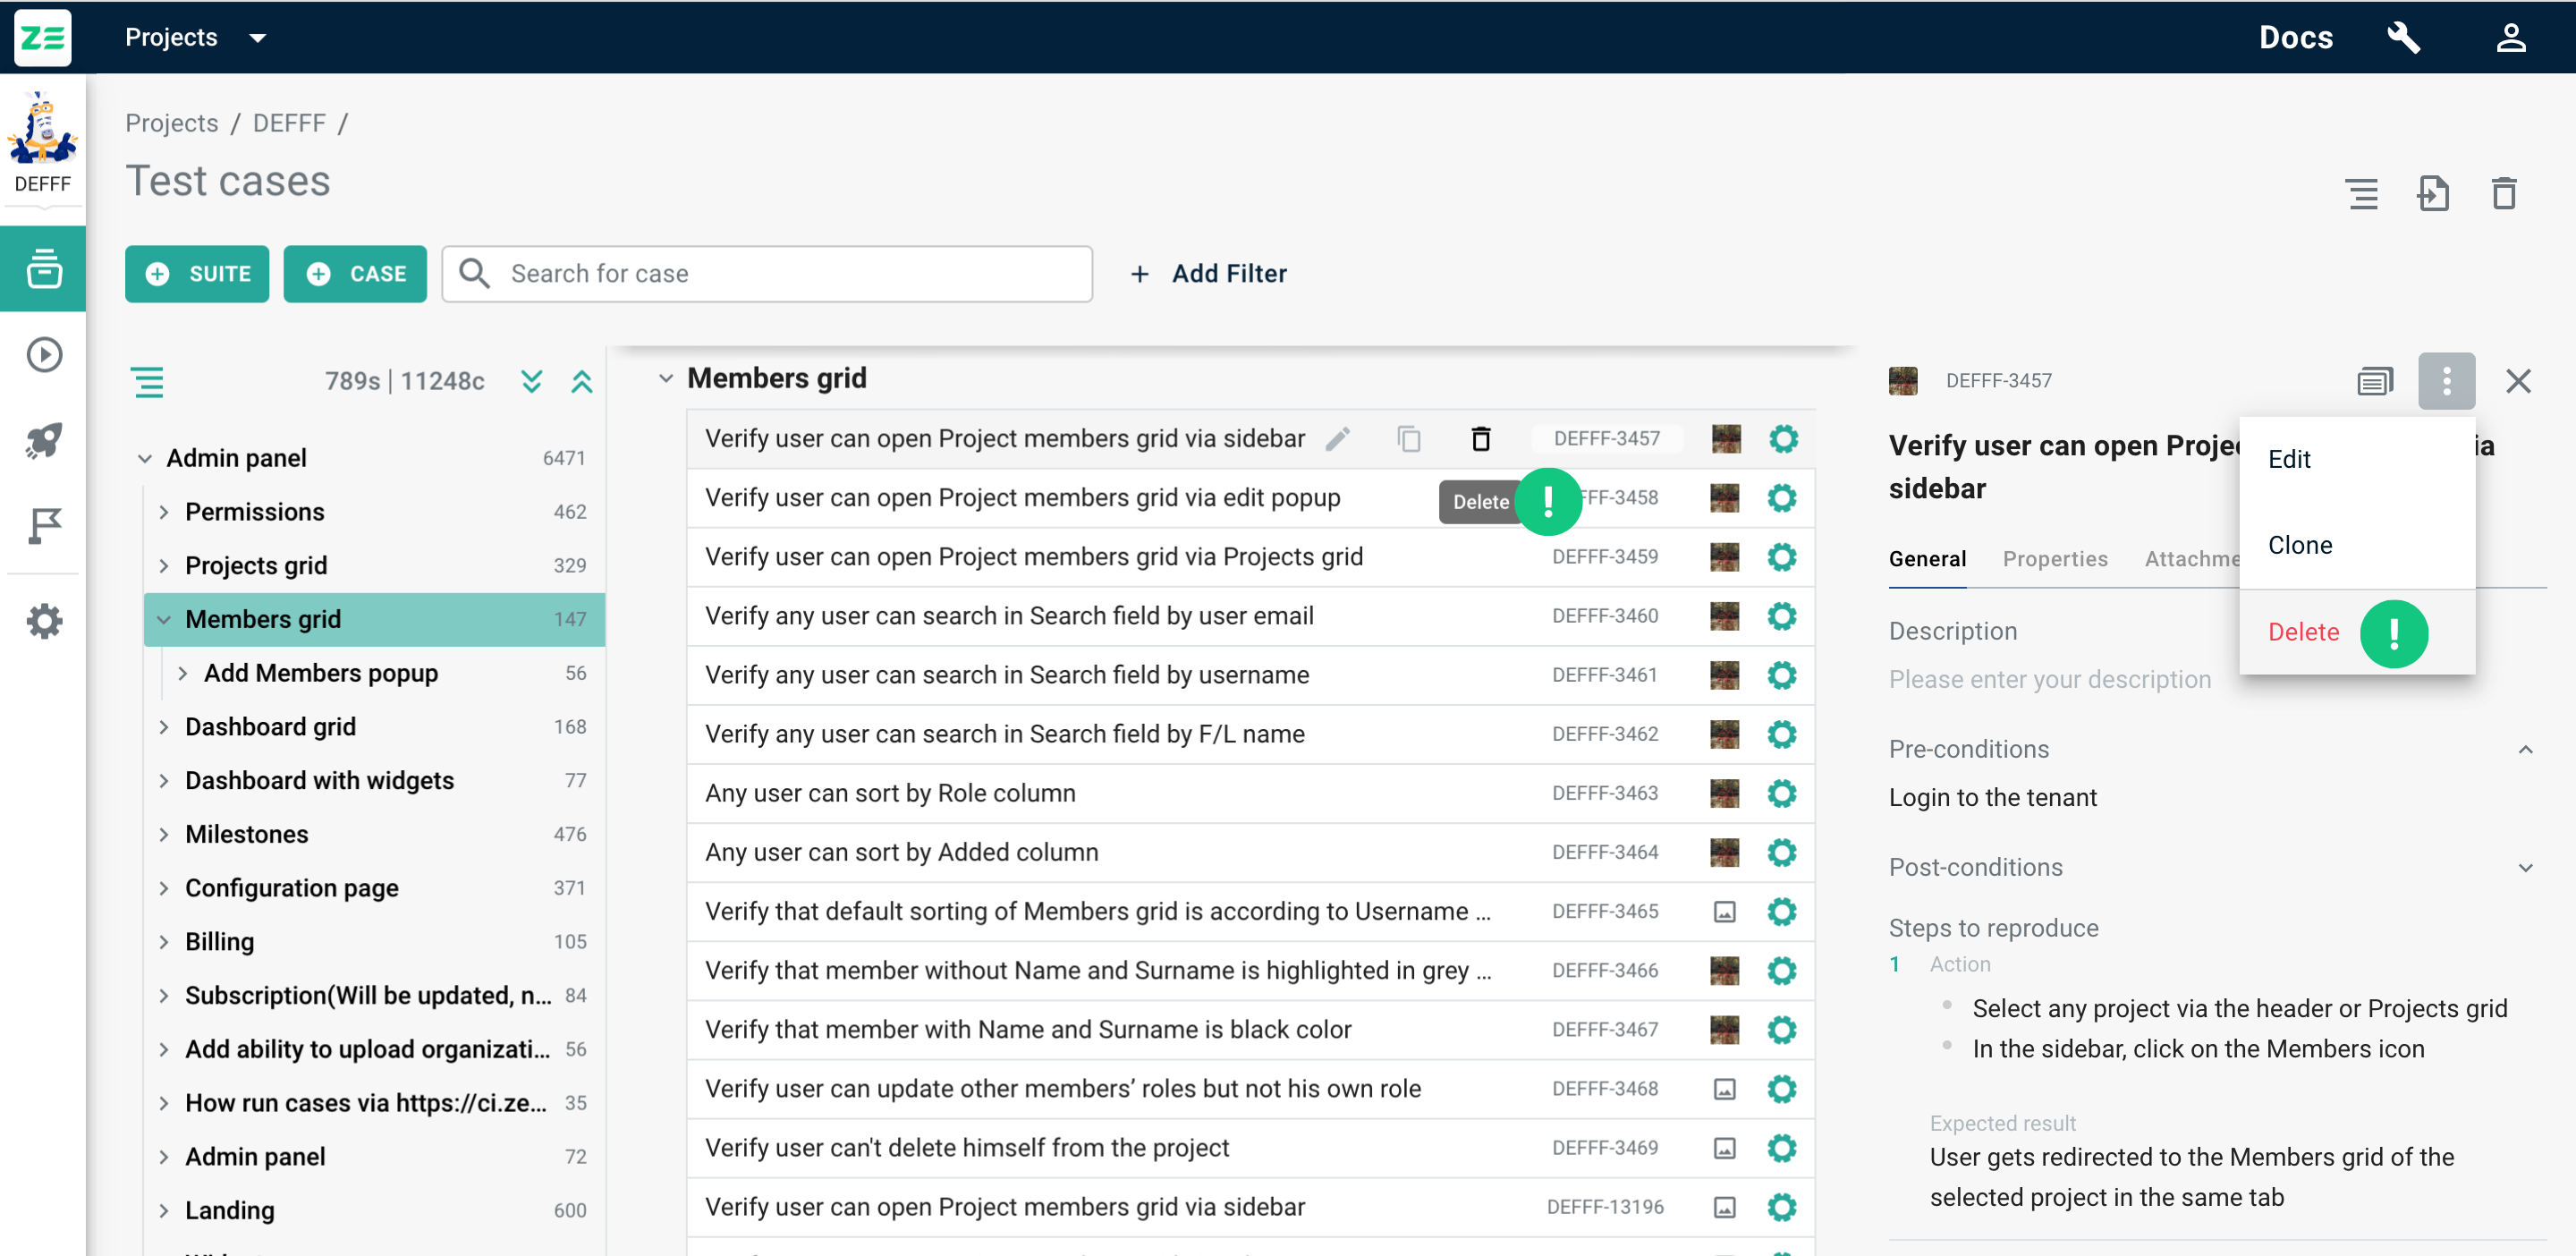
Alternatively, a test case can be edited from a test case view or test case page by clicking ⋮ → Edit.
Moving test cases within test repository#
To move one or multiple test cases within test repository, follow these steps:
Select test case(s)
- If you want to move a single test case, simply click and hold on the test case card.
- If you wish to move multiple test cases, enable Test Repository's selection mode and choose the test cases you wish to move.
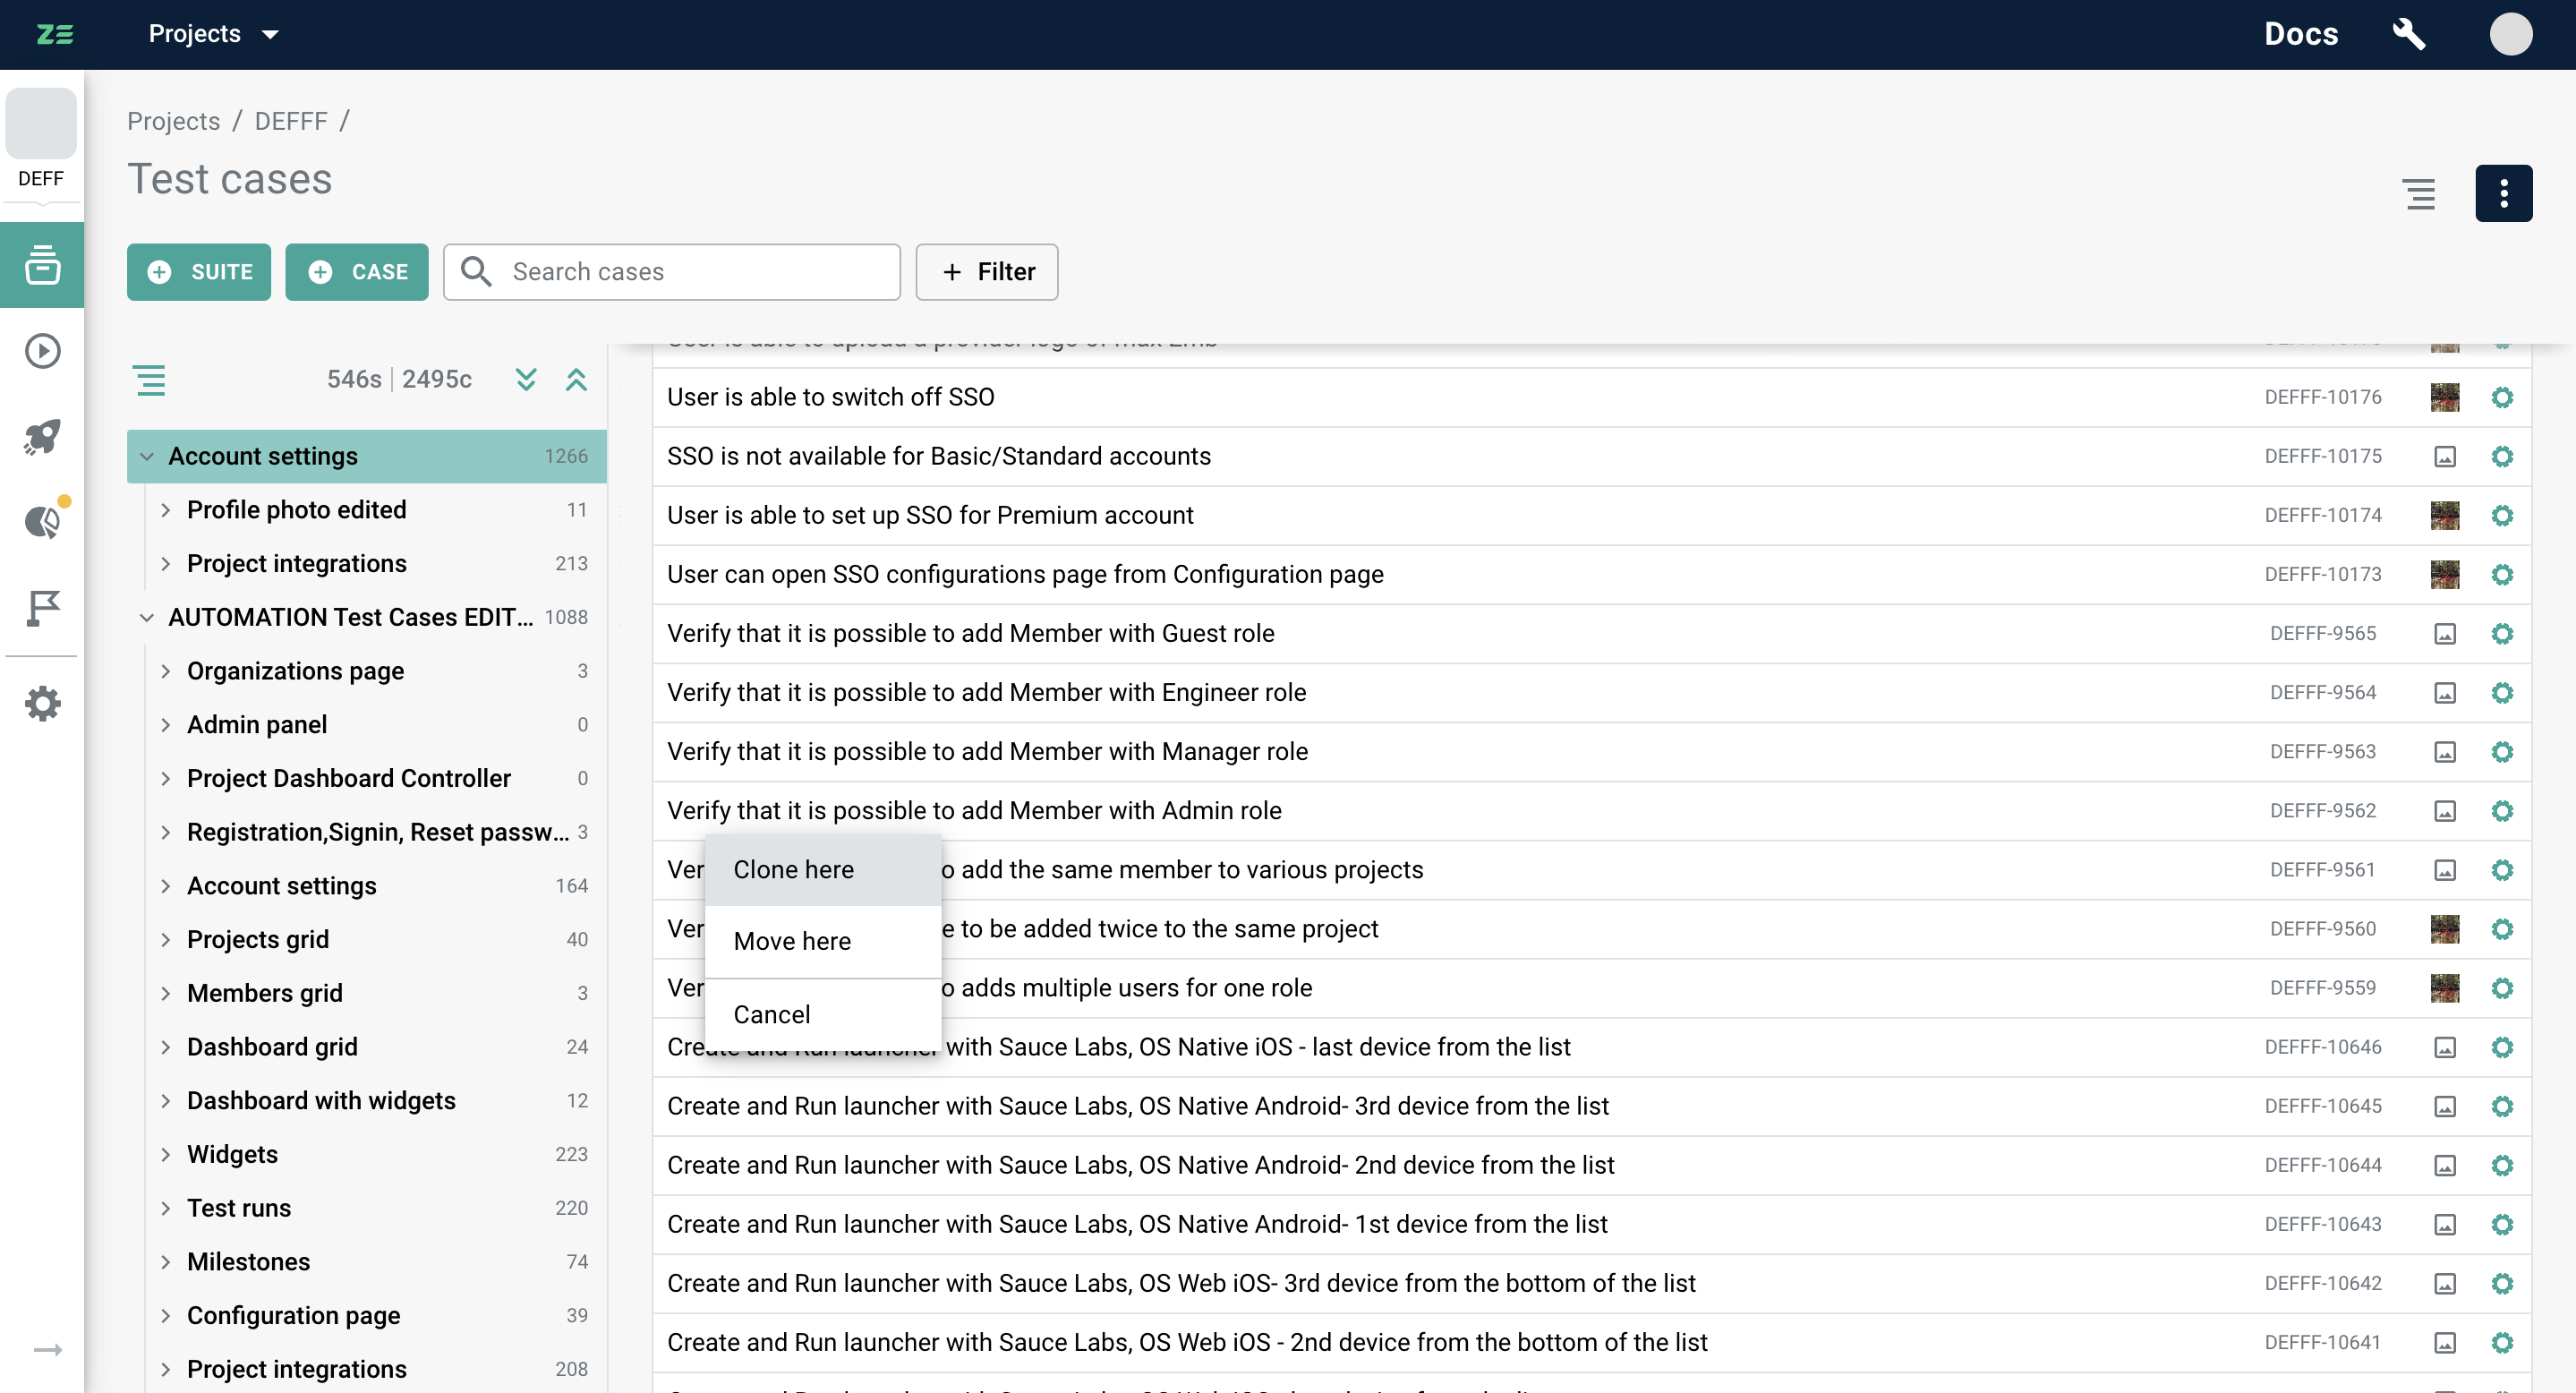
Drag and Drop
- Click and hold on one of the selected test cases.
- Drag the test case(s) to the desired position within the test suites hierarchy.
- Release the mouse button to drop the test case(s) into the new position.
Confirmation menu
- After dropping the test case(s) into the new position, a menu will appear.
- This menu presents options such as "Clone here", "Move here", and "Cancel".
- Select the "Move here" option to confirm the moving of the test case(s).
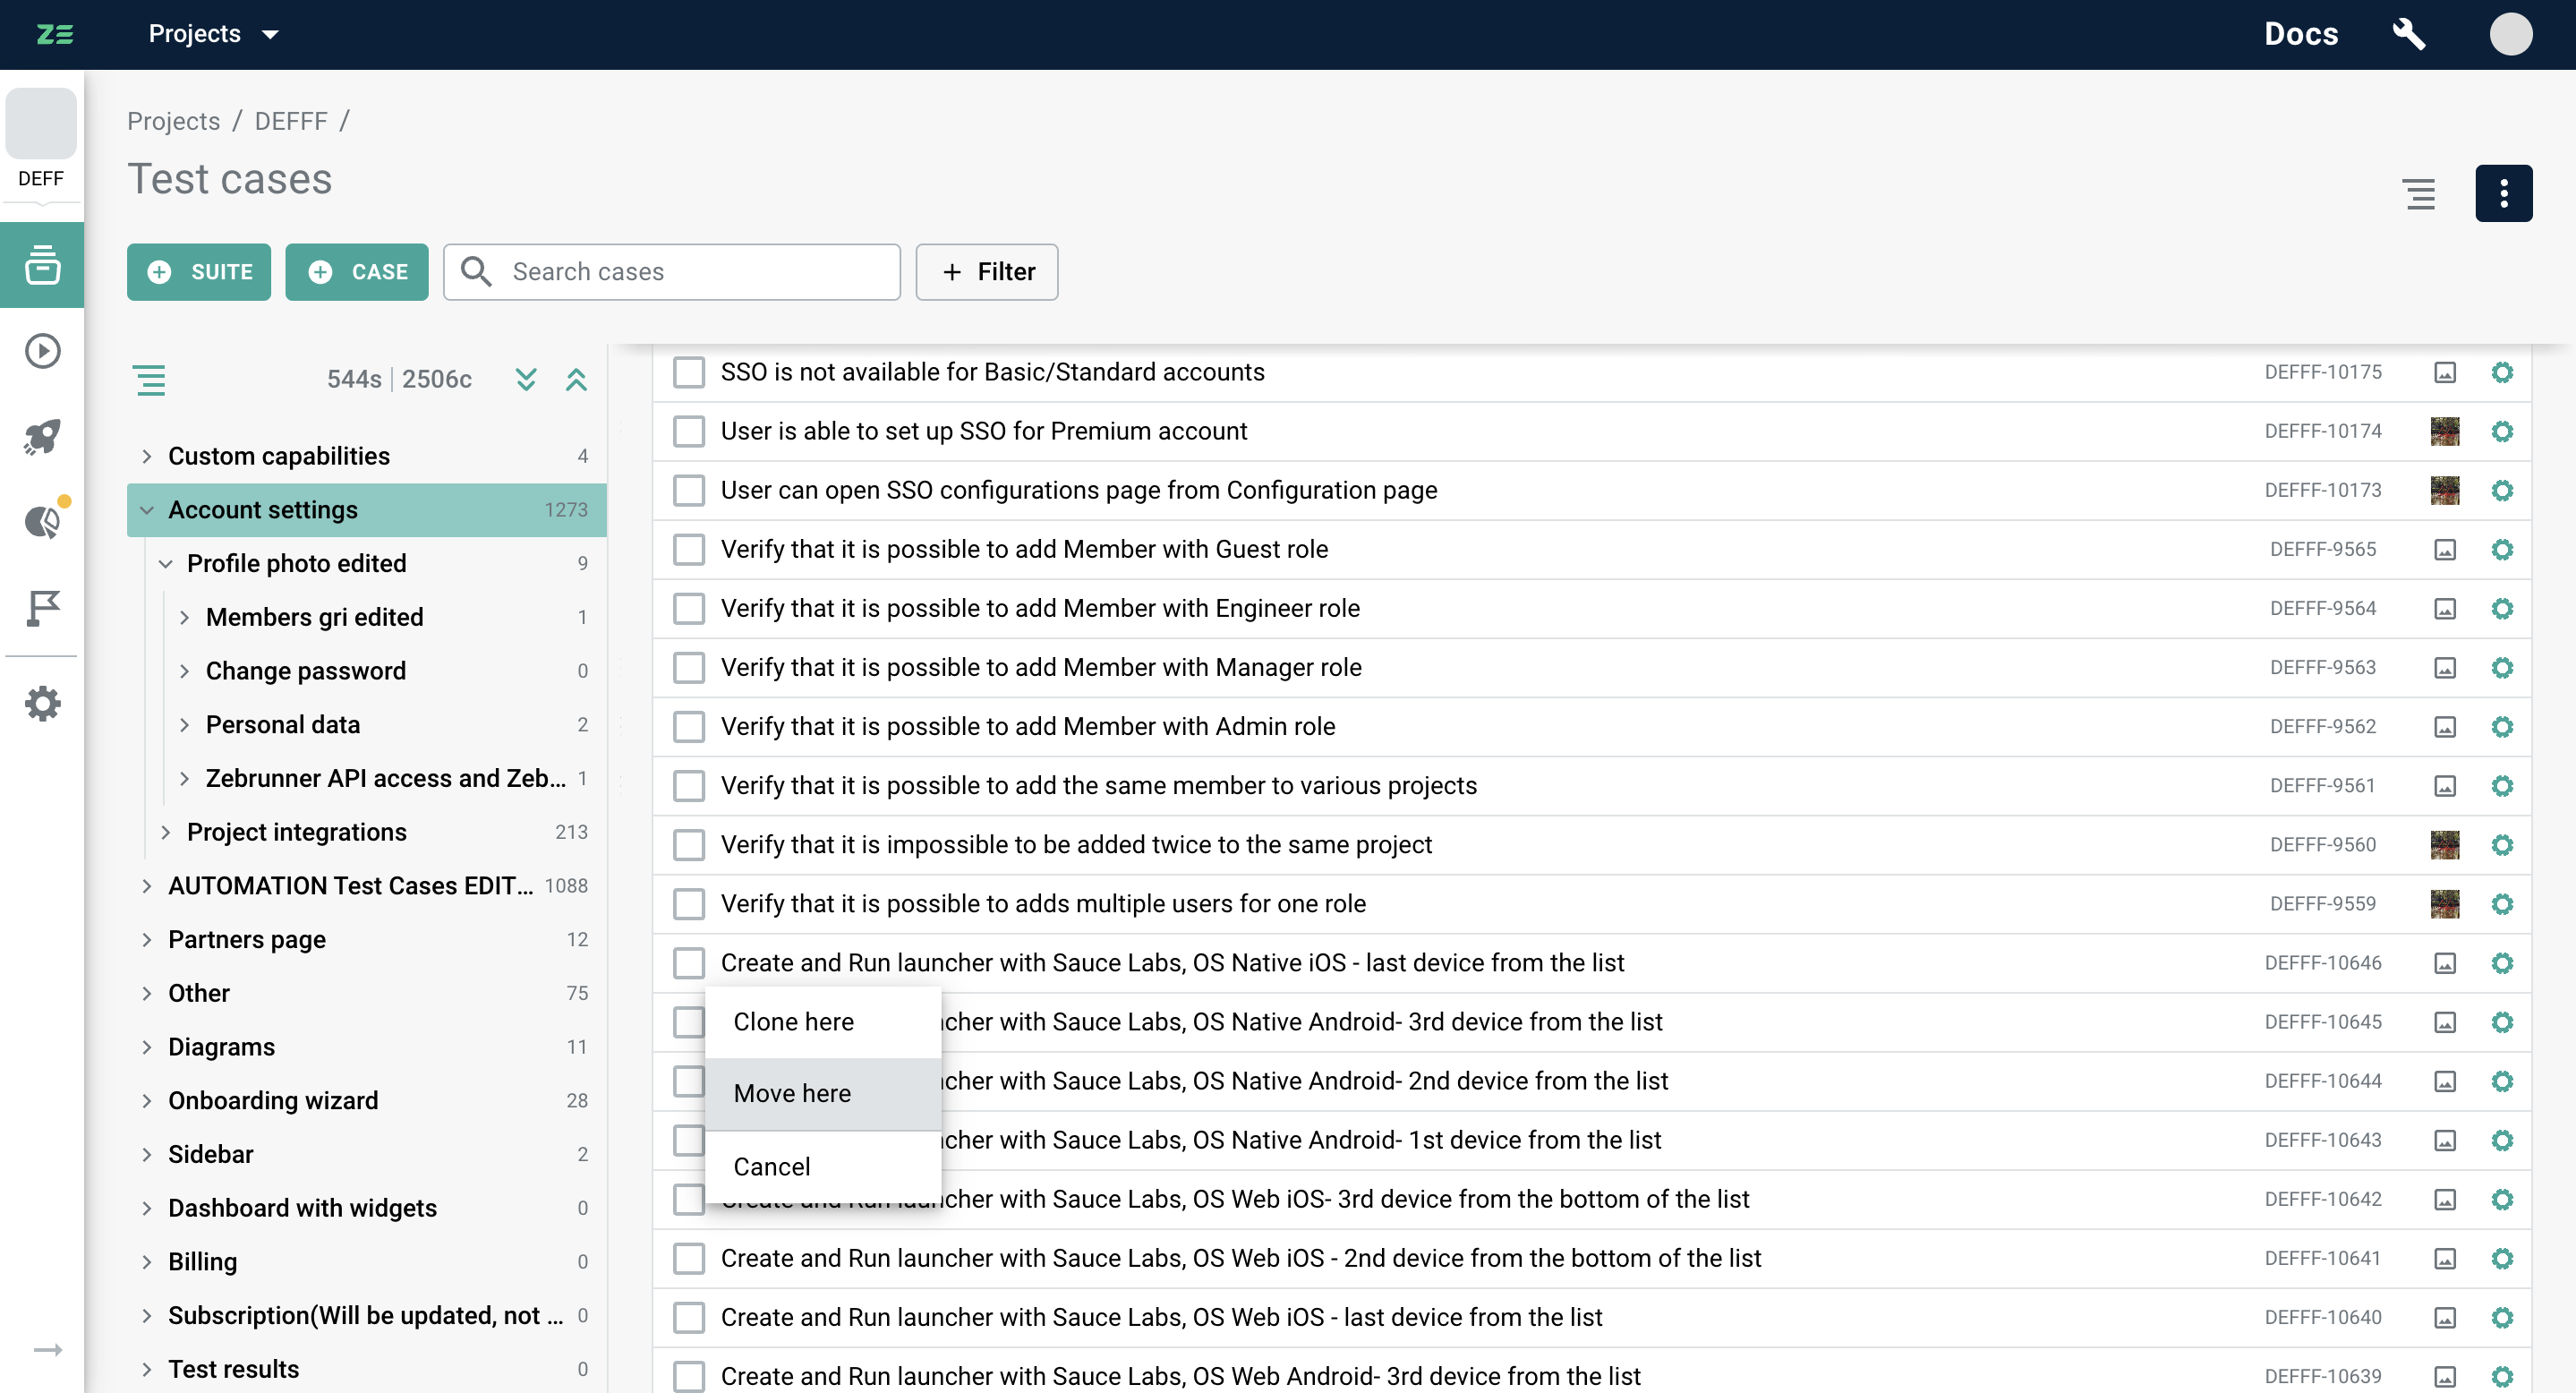
By following these steps, you can efficiently move one or multiple test cases within test repository using drag and drop functionality. The confirmation menu ensures accurate placement of test cases, while the ability to select multiple test cases simplifies batch movements for improved test management.
Cloning test cases within test repository#
In order to reduce time spent on creating similar test cases, you can clone them and later update according to your needs.
To clone a test case, go to the Test repository → Test cases and perform the following steps:
- Hover over the test case and click the Clone icon to the right of the case title
- In cloning dialogue, select the parent suite and change the title if needed
- Click Clone
The cloned test case will be added to the parent suite as the last one in the list, together with all the info inside it except for the execution history.
Alternatively, a test case can be cloned:
- from a test case view or test case page by clicking ⋮ → Clone.
- by using the drag-n-drop functionality as described in Moving test cases section
Deleting a case#
To delete a test case, go to the Test repository → Test cases grid and perform the following steps:
- Hover over the test case to and click the Delete to the right of the case title
- Confirm the action by clicking Delete in the dialogue
The test case will be permanently removed.
Alternatively, a test case can be deleted from a test case view or test case page by clicking ⋮ → Delete.

Searching and filtering cases#
Users can search for test cases by entering the query into the corresponding input field on the Test repository → Test cases grid. It's possible to search by phrases from the case title, individual words or symbols within the case title, and by the case key. Please note that using double quotes is not supported as they are considered special characters.
Note
Search is case-insensitive.
The search query supports two wildcard operators:
?- matches any single character. For example, theste?lquery matches eitherstealorsteelin the title, but notstillorstel. Thest??lquery matchessteal,steelandstill.*- matches zero or more characters, including an empty one. For example, thepr*equery matches all words starting withprand ending withe, such aspre,price,prize,prince,propose.
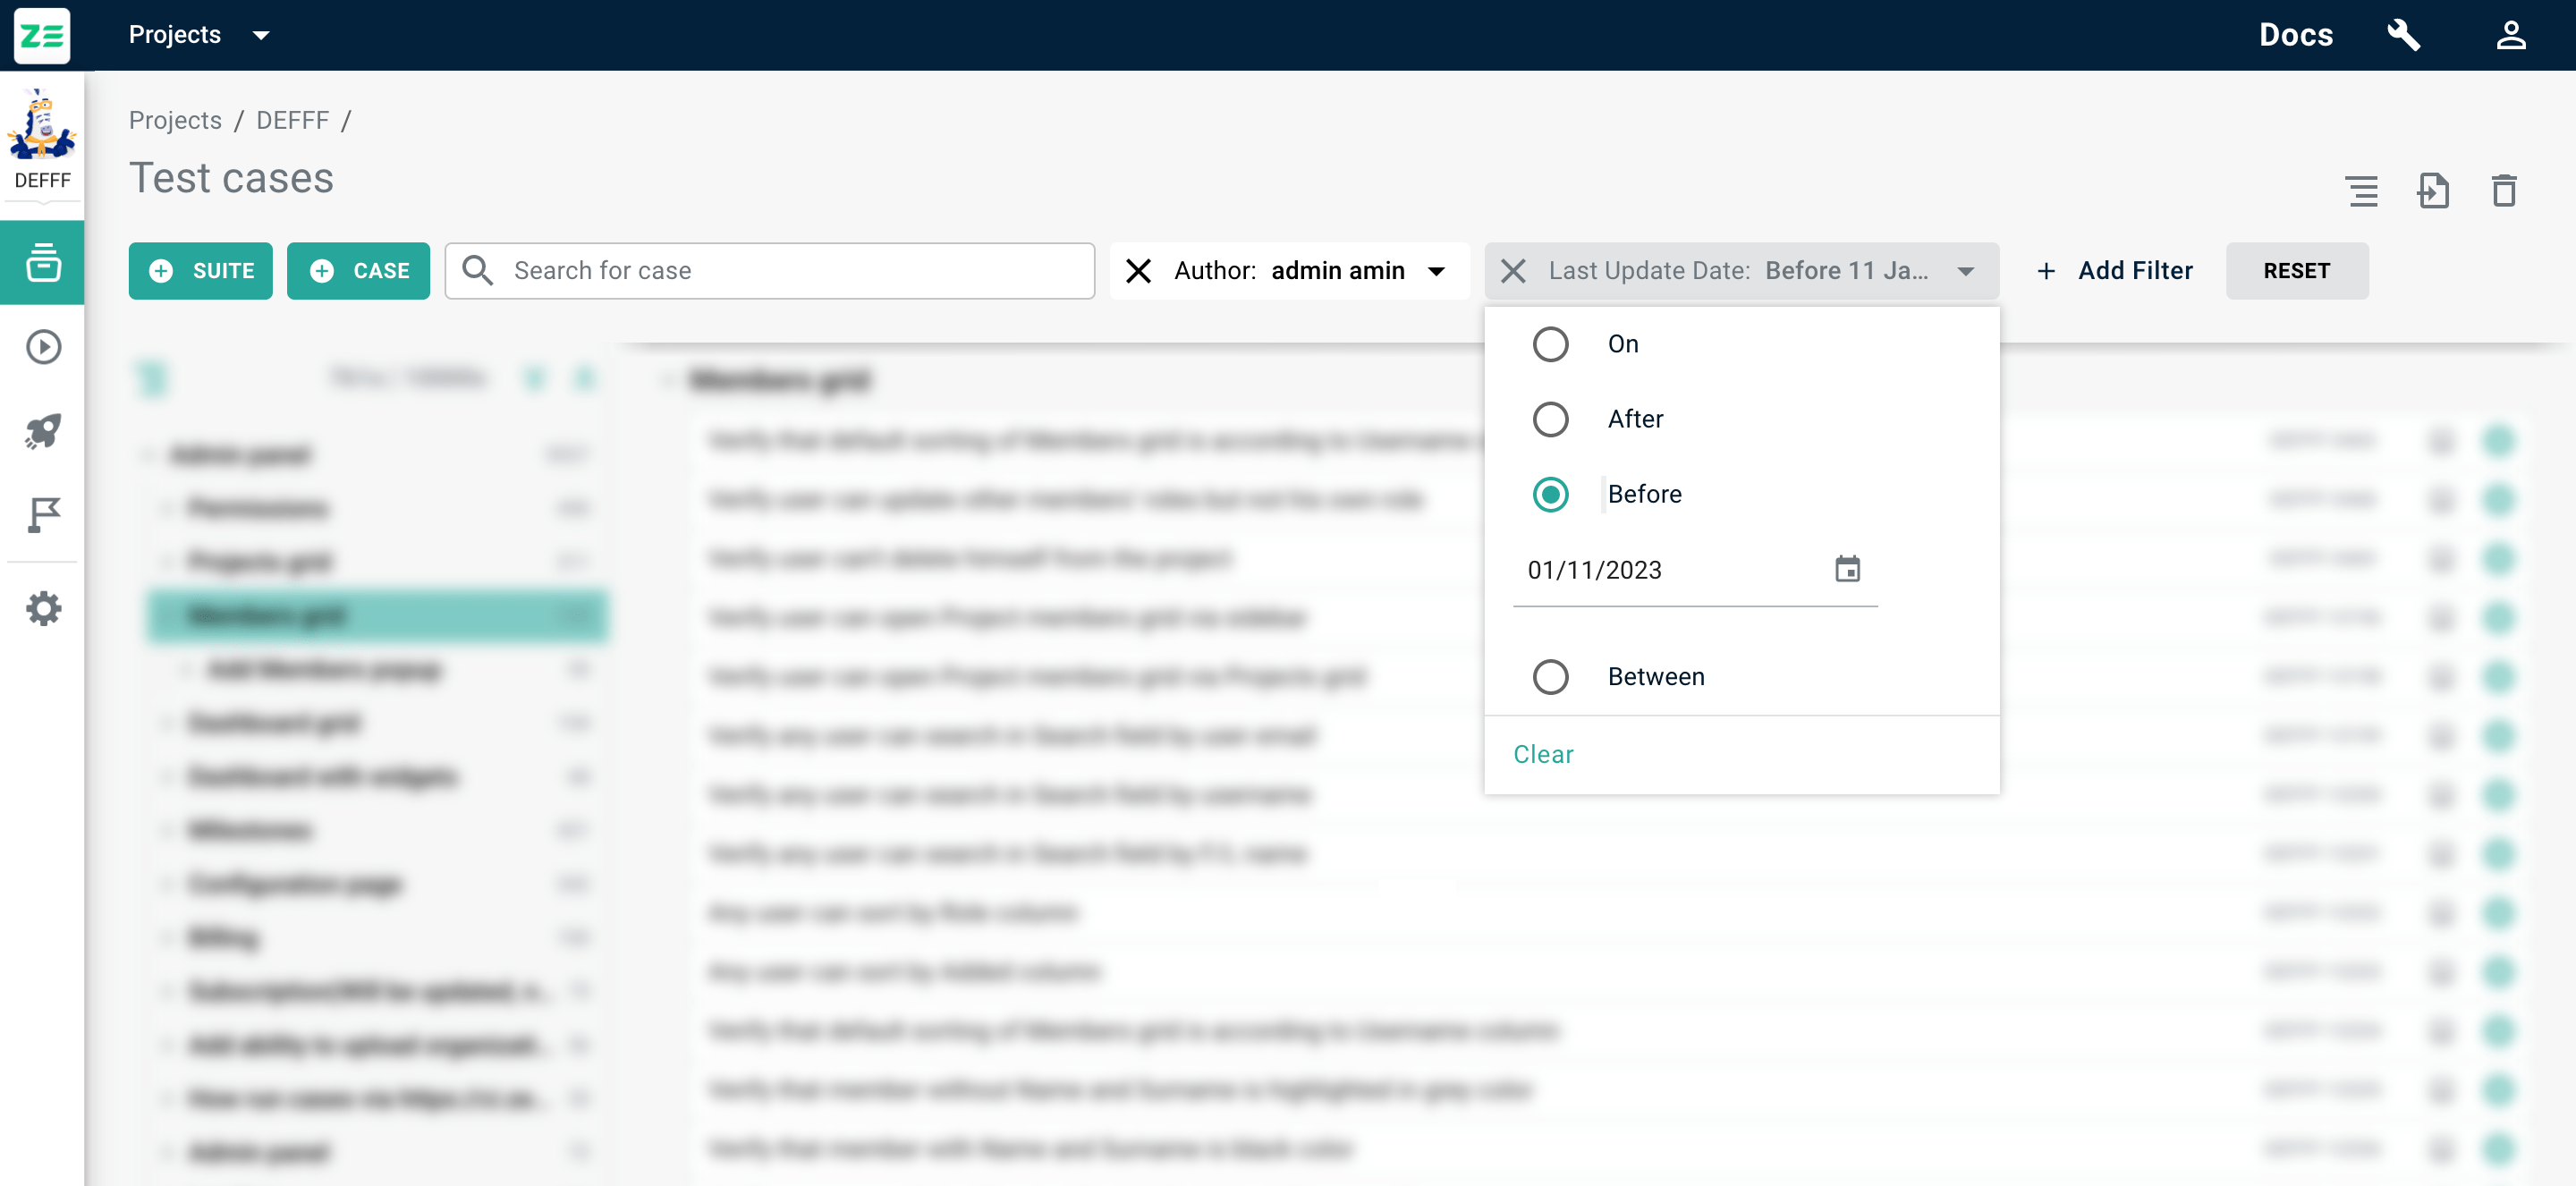
Filtering is supported for both system and custom test case fields - corresponding controls can be selected by clicking +Add filter button. In addition, a special attribute called “Last update date” allows users to define date ranges for any update made to the test case.
Depending on the field type, it is possible to apply exact match predicates (combining multiple for the same attribute with a logical OR condition), ranges (in case of dates), substrings (works in the same way as searching but for specific custom field of type String or Text). All the applied filters will be combined with a logical AND.
How Zebrunner handles searching and filtering under the hood
Step 1: Zebrunner splits an entered query (if present) by space character into a set of search tokens. The search tokens will be used to search in the case titles. If you need to search cases by phrase (a few words in specific order), escape the phrase in double-quotes. All the double-quotes in the middle of a resulted token will be ommited.
Step 2: Search tokens (if any) are combined with a logical AND into a single search predicate for the test case title.
Step 3: All search token conforming the test case key format (XXX-123) are translated into a search predicate for the case key. Then they are added to search predicate from Step 2 with a logical OR. In addition, all search token representing integers (e.g. 3174) are considered as part of the case key and are also added to the predicate with a logical OR. At the end of this step we derive the filtering criteria for the search query.
Step 4: All specified filters (if any) are added to the filtering criteria from Step 3 (if any) with a logical AND.
Example 1: Search query is case 431, no filters provided. This will be translated into the following predicate: (title: *case* AND title: *431*) OR key: *-431. As a result, users will receive all test cases containing case and 431 in their title, or the case whose key ends with -431.
Example 2: Search query is API-431 API-572 API-881, no filters provided. This will be translated into the following predicate: (title: *API-431* AND title: *API-572* AND title: *API-881*) OR key: API-431 OR key: API-572 OR key: API-881.
Example 3: Search query is user API-2 572, filter is Priority: Critical. This will be translated into the following predicate: ((title: *user* AND title: *API-2* AND title: *572*) OR key: API-2 OR key: *-572) AND priority: Critical.
Example 4: Search query is "user management", filter is Priority: Critical. This will be translated into the following predicate: title: *user management* AND priority: Critical. As a result, users will receive all critical test cases containing user management in their title.
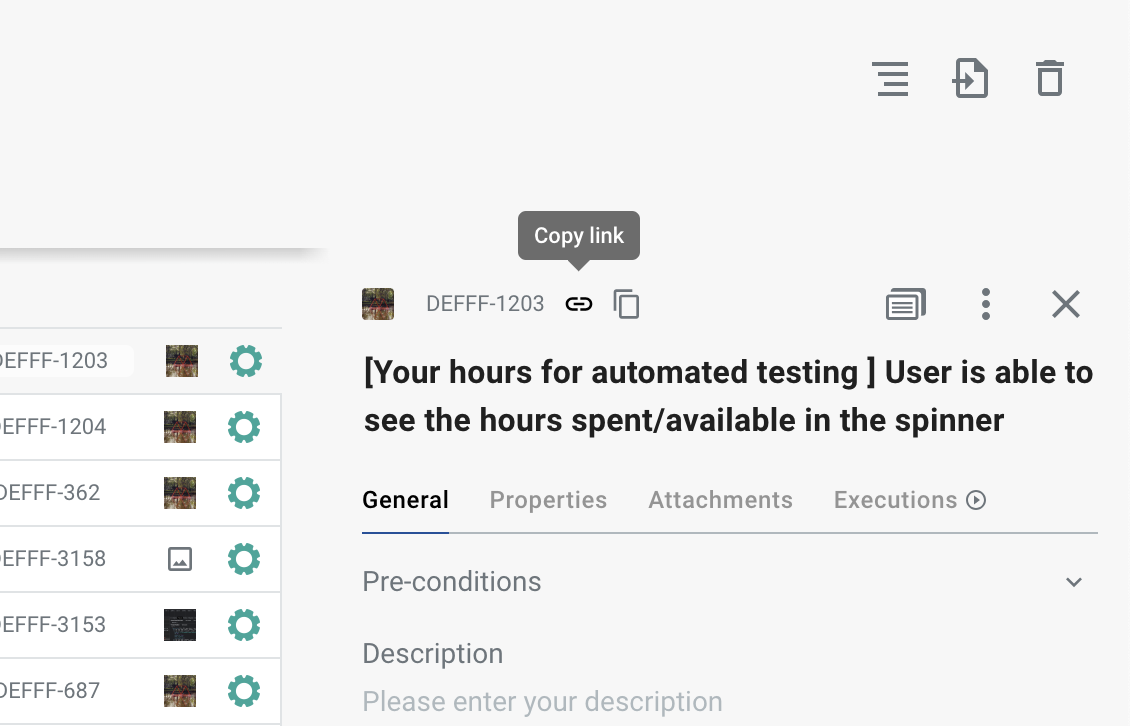
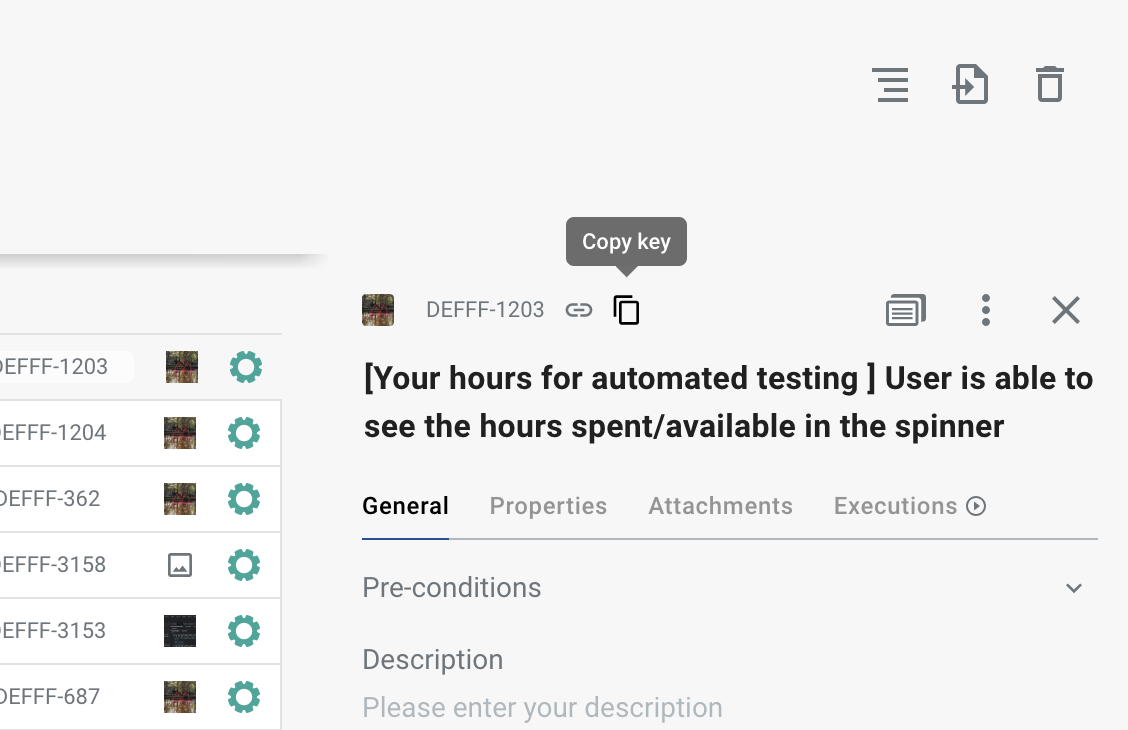
Sharing test case#
You can copy the link to a test case or test case ID. These buttons are designed to be visible only when the user hovers over the test case id. By simply hovering over it, the buttons will appear, allowing users to quickly copy the desired information to their clipboard for further use.
Copy Link to Test Case Button allows users to copy the link to a specific test case. This button is useful when users want to share the test case with others or refer to it later.
Copy Test Case ID Button enables users to copy the unique identifier of a test case. This ID can be helpful when referencing a test case within your project or when communicating with other team members.
Viewing a test case change log#
The test case change log allows you to keep track of all the modifications made to individual test cases, their fields, and their location in the test repository. Each entry in the change log contains detailed information about the change, the exact time of the modification, and the user responsible for making the change.
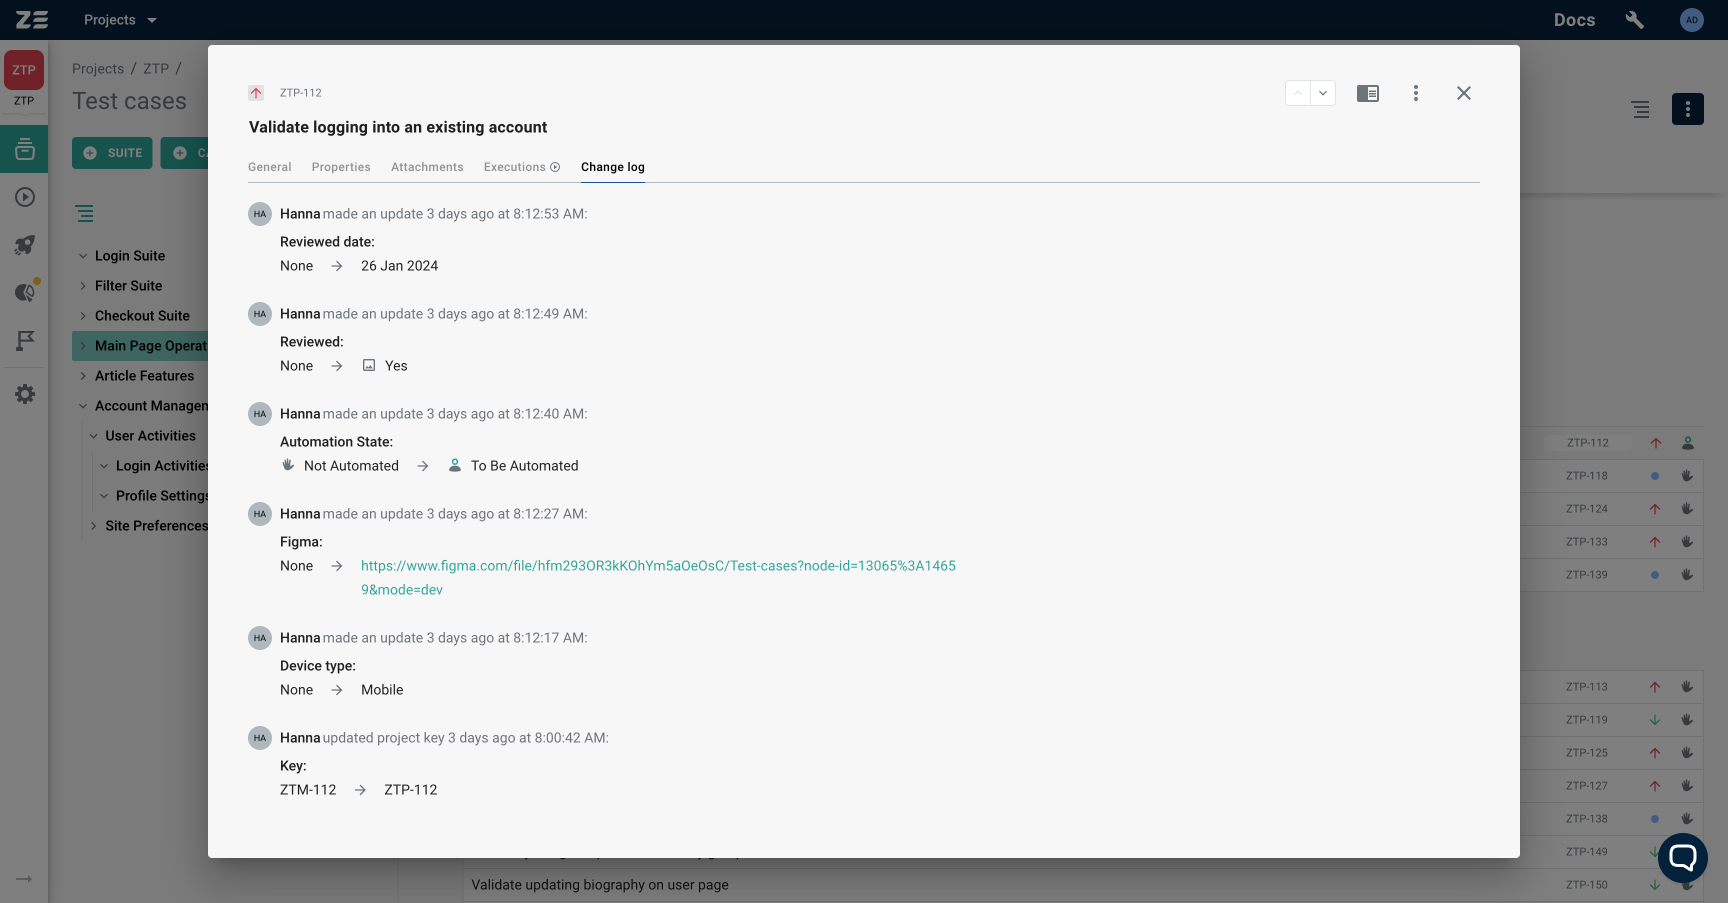
Types of captured modifications:
- Updates made to the test case field values.
- Updates made to the test case fields themselves, such as enabling, disabling, renaming, and removing a field that is set to a value for the given test case.
- Updates made to the test case location within the test repository, such as changing the parent suite, updating the suite name, and moving the test case to the trash bin.
Test Case change log resides in the corresponding tab, which can be accessed from all available test case views.
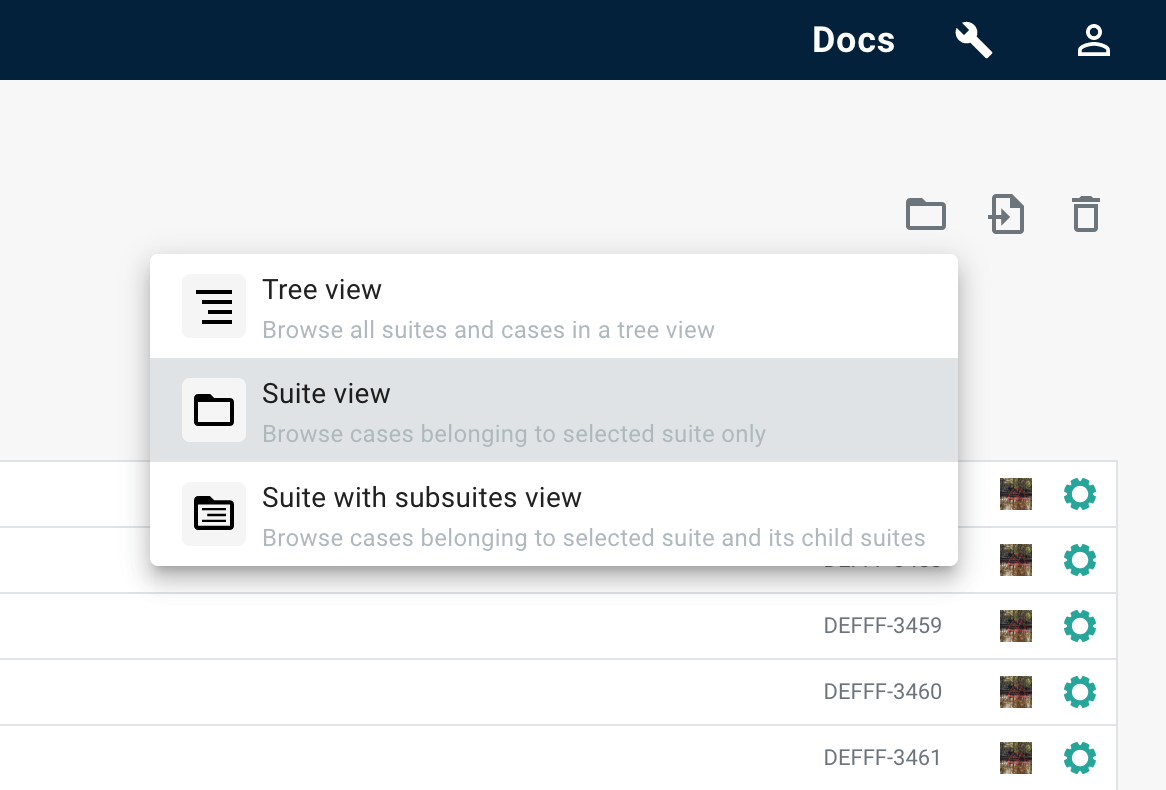
Switching repository view#
It is possible to switch between different repository views, allowing you to select the one that works best for you. In order to do that, you can use the switcher located in the top right corner of the Test repository → Test cases grid.
The following views are available:
Tree view: In this view, in the test cases panel of the repository you will see all your suites and cases as one large tree.
Suite view: In this view, in the test cases panel of the repository you will only see selected suite and cases that are immediate children of that suite.
Suite with a sub-suites view: In this view, in the test cases panel of the repository you will only see selected suite and cases, that are immediate children of that suite, together with all nested suites (sub-suites) and their test cases. Essentially, you will be seeing a sub-tree that starts from selected suite.
Bulk actions#
Zebrunner allows you to perform certain actions on test cases in bulk. Edit, Delete and Export actions are accessible within a project, while Move and Clone actions are available both within a project and across projects.
Selection mode#
The selection mode in the Test Repository enables you to perform bulk actions on test cases. This mode complements the 'Bulk Actions' functionality, accessible from the 3-dot menu in the top right corner on Test Cases page. Test cases can be individually selected by clicking their adjacent checkboxes or in batches by holding the Shift key. Additionally, you can select all test cases within a specific suite by clicking the checkbox preceding its name. Once at least one checkbox is selected, buttons corresponding to all available bulk actions will appear at the top of the screen.

Enabling selection mode#
Selection mode is disabled by default and thus needs to be enabled before use. There are three ways to enable it:
- By clicking Enable selection under the 3-dot menu in the top right corner.
- By using the Cmd+Shift+S keyboard shortcut for Mac, or Ctrl+Shift+S for Windows.
- By clicking on any test case in the repository while holding down the Cmd key for Mac or Ctrl for Windows.
Once you complete any of the actions described above, checkboxes will appear next to every suite and test case in the repository.
Editing test cases#
Editing test cases allows you to update multiple test case fields in one go. In order to be able to perform editing, users should have at least a role of Engineer.
In order to edit test cases, enter Test Repository's selection mode, choose the cases you wish to edit, click corresponding button on top of the screen and follow the prompts.
Alternatively, to edit test cases, follow these steps:
- Navigate to the Test repository.
- Click the three-dot menu and choose Bulk actions.
- In the appeared modal window, select the Edit option.
- Choose the test cases you wish to edit.
- Choose the test case fields you want to update and set the new values for them.
- Confirm the action in the presented modal.
Once you confirm, you will be redirected to a new modal where you can monitor the progress of the edit operation. Once the operation is completed, you can safely close the modal window.
Removing field value
In order to remove/unset value of selected fields, you should simply keep their new values blank (empty).
Moving test cases#
Moving cases between projects allows you to transfer test cases within a project or between different projects. In order to perform a move, you must have at least a role of Engineer in both source and target projects.
Test case layout mismatch
Test case fields in the source project without a match (based on both name and type) in the target project will not be transferred.
In order to move test cases, follow these steps:
- Navigate to the Test Cases page.
- Click the three-dot menu in the top right corner and choose Bulk actions.
- In the appeared window, select the Move option.
- Choose the test cases you wish to move.
- Choose an option for moving test cases:
- Cases only: This option will move only the selected test cases to the target project.
- Cases with their suite tree path: This option will move both the selected test cases and their parent suite tree path to the target project. If the target project is empty, the suite tree path will be cloned there. If the target project already has suites, the suite path will be merged by name, ensuring that the test cases are placed correctly within the existing suite structure.
- Select target project and suite to which the test cases will be moved.
- Confirm the action in the presented modal.
Alternatively, you can enable selection mode on Test Cases page, choose the test cases you wish to move, click corresponding button on top of the screen and follow the prompts.
Cloning test cases#
Cloning cases between projects allows you to duplicate test cases within current project or between different projects. Cloning is treated as an operation, that creates brand new cases, using the cloned ones as a base. In order to perform cloning, you must have at least a role of Engineer in both source and target projects.
Test case layout mismatch
Test case fields in the source project without a match (based on both name and type) in the target project will not be transferred.
Cloned cases
Cloned test cases will become brand new test cases in the target project and will not keep any connection with the original test cases.
In order to clone test cases, follow these steps:
- Navigate to the Test Cases page.
- Click the three-dot menu in the top right corner and choose Bulk actions.
- In the appeared window, select the Clone option.
- Choose the test cases you wish to clone.
- Choose an option for cloning test cases:
- Cases only: This option will clone only the selected test cases to the target project.
- Cases with their suite tree path: This option will clone both the selected test cases and their parent suite tree path to the target project. If the target project is empty, the suite tree path will be cloned there. If the target project already has suites, the suite path will be merged by name, ensuring that the test cases are placed correctly within the existing suite structure.
- Select target project and suite to which the test cases will be cloned.
- Confirm the action in the presented modal.
Test Case author and creation date
For the Clone operation, test cases will be transferred as-is. However, the author and creation date will be set to the user who initiated cloning and the current date, respectively.
Alternatively, you can enable selection mode on Test Cases page, choose the cases you wish to clone, click corresponding button on top of the screen and follow the prompts.
Deleting test cases#
The bulk deletion feature allows you to efficiently remove multiple test cases from a project at once. To perform a deletion, users must have a role of Engineer or higher.
In order to delete test cases, enter Test Repository's selection mode, choose the cases you wish to delete, click corresponding button on top of the screen and follow the prompts.
Alternatively, to delete test cases, follow these steps:
- Navigate to the Test repository.
- Click the three-dot menu and choose Bulk actions.
- In the appeared modal window, select the Delete option.
- Choose the test cases you wish to delete.
- Confirm the action in the presented modal.
Once you confirm, you will be redirected to a new modal where you can monitor the progress of the deletion operation. Once the operation is completed, you can safely close the modal window.
Are cases deleted forever?
Subscribers on the Professional plan or above will have their deleted test cases sent to the trash bin, providing the possibility for restoration or permanent removal. For those on lower-tier plans, deleted test cases cannot be recovered and will be permanently removed.
Exporting test cases#
The bulk export feature allows you to download selected test cases in CSV format. To perform export, users must have a role of Engineer or higher.
In order to export test cases, enter Test Repository's selection mode, choose the cases you wish to export, click corresponding button on top of the screen and follow the prompts.
Alternatively, to export test cases, follow these steps:
- Navigate to the Test repository.
- Click the three-dot menu and choose Bulk actions.
- In the appeared modal window, select the Export option.
- Select the test cases you want to export.
- Choose the test case fields you want to include in the CSV file.(You can include any active test case fields except Attachments. The Title and Key fields of the test cases will automatically be added to the CSV file.)
- Confirm the action in the presented modal.
Warning
By their nature, CSV files are regular text files. They were created as a human-readable data format with columnar structure, rather than as a mechanism for transferring data between computing systems.
The exported CSV file is not intended for later import into any Zebrunner project. If you need to transfer cases between project, please use Move or Clone batch actions. If you encounter any difficulties, please contact Zebrunner Support.
Importing test cases#
Zebrunner allows you to import test cases from various 3rd party systems. Depending on the system, either direct import is supported (via that system's API) or import of exported .CSV file. Additionally, there's an option to import a generic .CSV file (coming not from one of the supported systems).
Warning
It is strongly recommended to review the subsection corresponding to the source of test case data before starting the import. These subsections describe the structure the specific requirements that must be met during the import process in order for it to complete successfully.
Also, it is a good idea to create a separate project to test how the import works. Only after making sure that everything is imported correctly, you should import the cases into desired project.
Depending on the amount of data (test cases and attachments) import may take significant (up to a couple of hours) amount of time. Zebrunner does not support partial imports: either all test cases or none will be imported.
TestRail#
There are two options supported at the moment:
- Direct import from account with active TestRail subscription
- Import of .CSV, exported from TestRail
Direct import is preferred over .CSV file import, however it will only work if you have an active TestRail subscription. Importing your data that way will allow you to capture majority of TestRail's field data types and smoothly transfer those to Zebrunner.
Direct#
For a direct import, the Zebrunner user must possess an active TestRail subscription and valid TestRail account credentials. Importing test case data in this manner ensures not only the capture of test case field values but also the essential metadata required to accurately configure the test case layout within Zebrunner. Therefore, this approach is highly recommended for migrating data from TestRail.
In order to access the import dialogue you must have a role of Engineer (or higher) in the target Zebrunner project. Perform the following steps:
- Go to the Test repository → Test cases
- Open 3-dot menu (top right corner) and select Import. Import dialogue should pop up
- Select TestRail as a source of import
- Select the target suite in the current Zebrunner project and click Next. Note: if there are no suite in the current project, imported suites from TestRail will become top-level suites in Zebrunner project
- Provide your TestRail hostname, username, API key,
tr_sessioncookie (optional) and select the type of subscription you have. Please see Obtaining import configuration section on that part of the process. Once you'll supplied all the information, click Next to proceed - Select the source TestRail project to import data from. Note, that you can only import one project at a time. Once you've selected the project, hit Next
- Select the suites you want to import and click Next
- Map fields from TestRail test case layout to the one in Zebrunner. Please see Mapping test case fields section on the one - please study it carefully!
- Click Start. You'll be asked for confirmation - if everything is correct, confirm by clicking Start in the configuraion dialogue once more
The import will commence, and you'll be able to monitor its progress. Please be aware that the duration required to complete the import depends significantly on the number of attachments being transferred and the rate limits of TestRail's API. It's advisable to wait until the import is entirely finished before interacting with the test repository. Once the import is complete, you'll see the count of cases and attachments that were transferred. The Close button will then be activated. Click on it, and you'll be presented with the test repository containing all the imported data.
Obtaining import configuration#
In order to import test cases from TestRail account, users will need to provide the following configuration on Zebrunner's end:
- Hostname - your TestRail workspace base URL (
https://{orgname}.testrail.io) - Email - email, associated with a TestRail account, that will be used to access test cases data
- API key - TestRail API access key, required to obtain test cases data
- tr_session cookie (optional) - special cookie, that is needed to be able to access the attachments, uploaded to TestRail before April 2021. If you have such attachments, provisioning of this value is essential in order to succesfully import all test case data
- Enterprise subscription checkbox - check it, in case you have a TestRail Enterprise subscription (may be seen in TestRail's administrative section of the app). TestRail Enterprise subscription allowed higher API rate limits, enabling faster import. Make sure to check the type beforehand, leave checkbox unchecked if not sure
Please see details on obtaining some of the configuration parameters below.
Hostname#
Hostname can be copied from your browser's address bar. Make sure to provide only the base URL (https://{orgname}.testrail.io), delete everything that follows after the .io/.com part of the URL.
Email#
Email, associated with the TestRail user account, that will be used to access data.
Recommended account type
It is recommended to use an account with utmost permissions on TestRail's end. That way you'll minimize the risks of having insufficient permissions to access data during import (e.g. test case layout, user list, etc).
API key#
You'll need to provide an API key, so Zebrunner will be able to access data on TestRail's end via its API. But first, you'll need to create one (if you haven't already). In order to do so, please do the following:
- Go to your TestRail workspace
- Go to account settins (click on your username in the top right corner and select My Settings in the menu)
- Go to API KEYS tab of setting
- Click Add Key button, give key a name and click + Generate Key
- You'll see an output containing generated API key. Copy it right away, you won't be able to access it later
- Click on + Add Key. Note: if you'll close the window without clicking that button, your key will not be saved and, as a result, will not be effective!
- Click Save settings in order for changes to take effect
Once all steps are performed, you'll have an API key needed during import flow on Zebrunner's end.
tr_session cookie#
If you have attachments in TestRail uploaded before April 2021, you will require this value. Changes to TestRail's file management mechanism introduced in April 2021 require presence of that configuration value, otherwise it would be impossible to import attachments uploaded before that date. To retrieve this value, you must access your browser's cookies. Instructions can vary by browser, but the following guidelines focus on Chrome:
- Open your Chrome browser and go to your TestRail workspace
- Login to your TestRail account
- Once logged in, open Chrome's Developer Tools
- Go to Application tab in the Developer Tools
- On the left, in the Storage section, you should be able to see Cookies
- Expand it, and you'll see an entry, named after your current TestRail base URL. Click on it to see its content
- Find a cookie named
tr_session. Double-click on its value in the "Value" column to select it and copy it
Once all steps are perfromed, you'll have a tr_session cookie value needed during import flow on Zebrunner's end.
Mapping test case fields#
Before initiating the actual import, Zebrunner will retrieve the test case layout from TestRail and prompt users to review the automatically proposed field mappings. At this stage, you can either accept the automatic suggestions or modify them. We recommend closely examining these automatic mappings to ensure that all necessary data is set to be imported. By default, all fields originating from TestRail will be imported into Zebrunner.
Notes on some TestCase fields
Please be aware that certain system fields from TestRail will be imported as strings. This is applicable to datetime fields such as "Created At" and "Updated At", as they are stored as strings within TestRail. Furthermore, fields of the "User" type will also be treated similarly. As of this writing, the import process in Zebrunner does not support automatic user creation and mapping. Consequently, all these fields will retain their text value from TestRail and will be represented as String types in Zebrunner.
Note on Automation type/state/etc dropdown
Many teams commonly use a Dropdown type field in TestRail to track the automation state of a specific test case. By default, Zebrunner will suggest mapping this field to a similar Dropdown type on its end. However, Zebrunner provides a unique system field named Automation State. Essentially, this is an enhanced version of the standard Dropdown. We recommend reviewing this mapping and considering a switch to the "Automation State" type, as it offers specialized handling within Zebrunner.
Exported .CSV import#
Before starting the import, it is recommended to examine what columns are in your .CSV file. For this, open the .CSV file using any plain text editor, such as Notepad or TextEdit. This is particularly necessary if your TestRail project has custom fields or fields with custom names.
Warning
We don't recommended opening the .CSV file in handier or more advanced tools such as Excel. These tools can corrupt the structure of the .CSV file and make it unsuitable for import.
TestRail .CSV columns#
The .CSV file must contain at least 2 columns for the import to work:
Title- the title of an imported test case. The value of this column is used to distinguish test cases when the .CSV file includes separated steps on separate rowsSection Hierarchy- test suite in which the test case should reside. The value of this column may contain the '>' symbols. With it, TestRail reflects nesting of the test suites. If the test suite does not exist in Zebrunner, it will be created
There are a few other columns recognizable by Zebrunner:
Priority- priority of the test case. If a priority from the .CSV file does not exist in Zebrunner, it will be created. If the file does not contain this column, test cases will be assigned a default priorityPreconditions- preconditions of the test caseSection Description- description of the test suite. This value is used along withSection Hierarchycolumn when creating the test suiteSteps- column with the test case steps definition. Usually, the steps are numerated. Note: according to the default TestRail behaviour, there can be two columns with this nameExpected Result- column with step expected results. This column is processed only together withStepscolumnSteps (Step)- contains step actions onlySteps (Expected Result)- contains step expected results. This column is processed only together withSteps (Step)column
If your .CSV file does not contain the columns listed above, but contains data matching the meaning of a listed above column, feel free to manually rename the column. This is especially valid for steps-related columns.
Your .CSV file may contain all the mentioned steps-related columns. It is a usual situation, so Zebrunner will do its best to extract data from those.
Troubleshooting#
Most of the time, the import works correctly. But there are several anomalies (usually unpredictable) in how TestRail exports data. This section describes some of them and gives you tips on what to do if this happens to you.
Why have my test cases been imported without steps?
Please check if your .CSV file contains valid column names. To learn more about recognizable column names, refer to TestRail .CSV columns.
Why do my imported steps have corrupted images?
By nature, .CSV files are regular text files. They were created as a human-readable column-structured data format, but not as a mechanism to transfer data between computing systems. Images in turn are binary data. While technically possible, it is not natural to encode images inside a .CSV file. That is why TestRail does not export images inside a .CSV, but only provides a relative path to the image within the TestRail workspace. Because of this, Zebrunner is not able to resolve TestRail images for imported cases.
Steps of my test cases are not properly imported. What to do?
When it comes to exporting test cases, TestRail is not usually reliable. We observed cases when the structure of the file with the same exporting data had been changed over time.
There is no a single solution to this, but it usually helps to experiment with the set of exporting steps-related columns. E.g. export only Steps column or Steps and Expected Result. In some cases, export only the Steps (Step) and Steps (Expected Result) is the best option. Also, you can try to enable or disable the "Include separated steps on separate rows" option during the export from TestRail.
Why have only the first steps of my test cases been imported?
There are some anomalies in how TestRail exports test cases and this is one of them. In this case, you can try to play around the set of exporting steps-related columns. Usually, this issue is fixed by not exporting the Steps (Step) column.
Import failed with the "Import failed" message
This can be due to many reasons, e.g. incorrect file structure. Please contact support@zebrunner.com for further assistance.
I did everything I could, but it still doesn't work. What should I do?
In this case, feel free to contact support@zebrunner.com for further assistance.
Generic CSV#
By nature, .CSV files are regular text files. They were created as a human-readable column-structured data format, but not as an mechanism to transfer data between computing systems. The very first line in such a file is a header line: it contains a list of column names. All subsequent lines starting from the second one are rows with data.
Since the list of columns can be arbitrary, Zebrunner exposes strict requirements for the column names of Generic .CSV files. Before you starting the import, it is recommended to examine what columns are in your .CSV file. For this, open the .CSV file using any plain text editor, such as Notepad or TextEdit.
Warning
We don't recommended opening the .CSV file in a handier or advanced tools such as Excel. These tools can corrupt the structure of the .CSV file and make it unsuitable for import.
As of now, Zebrunner recognizes the following columns (columns with other names will be ignored):
Title- mandatory. The title of the test caseDescription- description of the test caseSuite- mandatory. The name of the test suite this test case belongs to. It is possible to reflect the nested structure of the target test suite. For this, parent and child suites must be divided by the '>' symbol. If there is no target suite in Zebrunner, then it will be createdSuite Description- description of the test suite. This value is used along with theSuitecolumn when creating the test suitePriority- priority of the test case. If a priority from the .CSV file does not exist in Zebrunner, it will be created. If the file does not contain this column, test cases will be assigned a default priorityAutomation State- automation state of the test case. If a value from the .CSV file does not exist in Zebrunner, it will be created. If the file does not contain this column, test cases will be assigned a default automation stateDeprecated- specifies if the test case should be marked as deprecated. Positive values are+,1,t,true,yesDraft- specifies if the test case should be marked as a draft. Positive values are+,1,t,true,yesPreconditions- pre-conditions of the test casePostconditions- post-conditions of the test caseStep- column with a test case step's actions. The column may either contain a numerated list (using1.numbering) or one step per CSV file row (in case when CSV file includes separated steps on separate rows)Expected Result- column with a test case step's expected results. The column may either contain a numerated list (using1.numbering) or one step per a .CSV file row (in case a .CSV file includes separated steps on separate rows)Steps- column containing the list of test case steps and expected results. The list should be numerated (using1.numbering). Step's action and expected result will be divided by theExpected Result:string
If your .CSV file contains Step along with Expected Result columns and the Steps column at the same time, the Step along with Expected Result takes precedence when the file is processed.
If your .CSV file does not contain the columns listed above, but contains data matching the meaning of a listed above column, you can manually rename the column.
If you have difficulty importing the .CSV file, please contact support@zebrunner.com for further assistance.
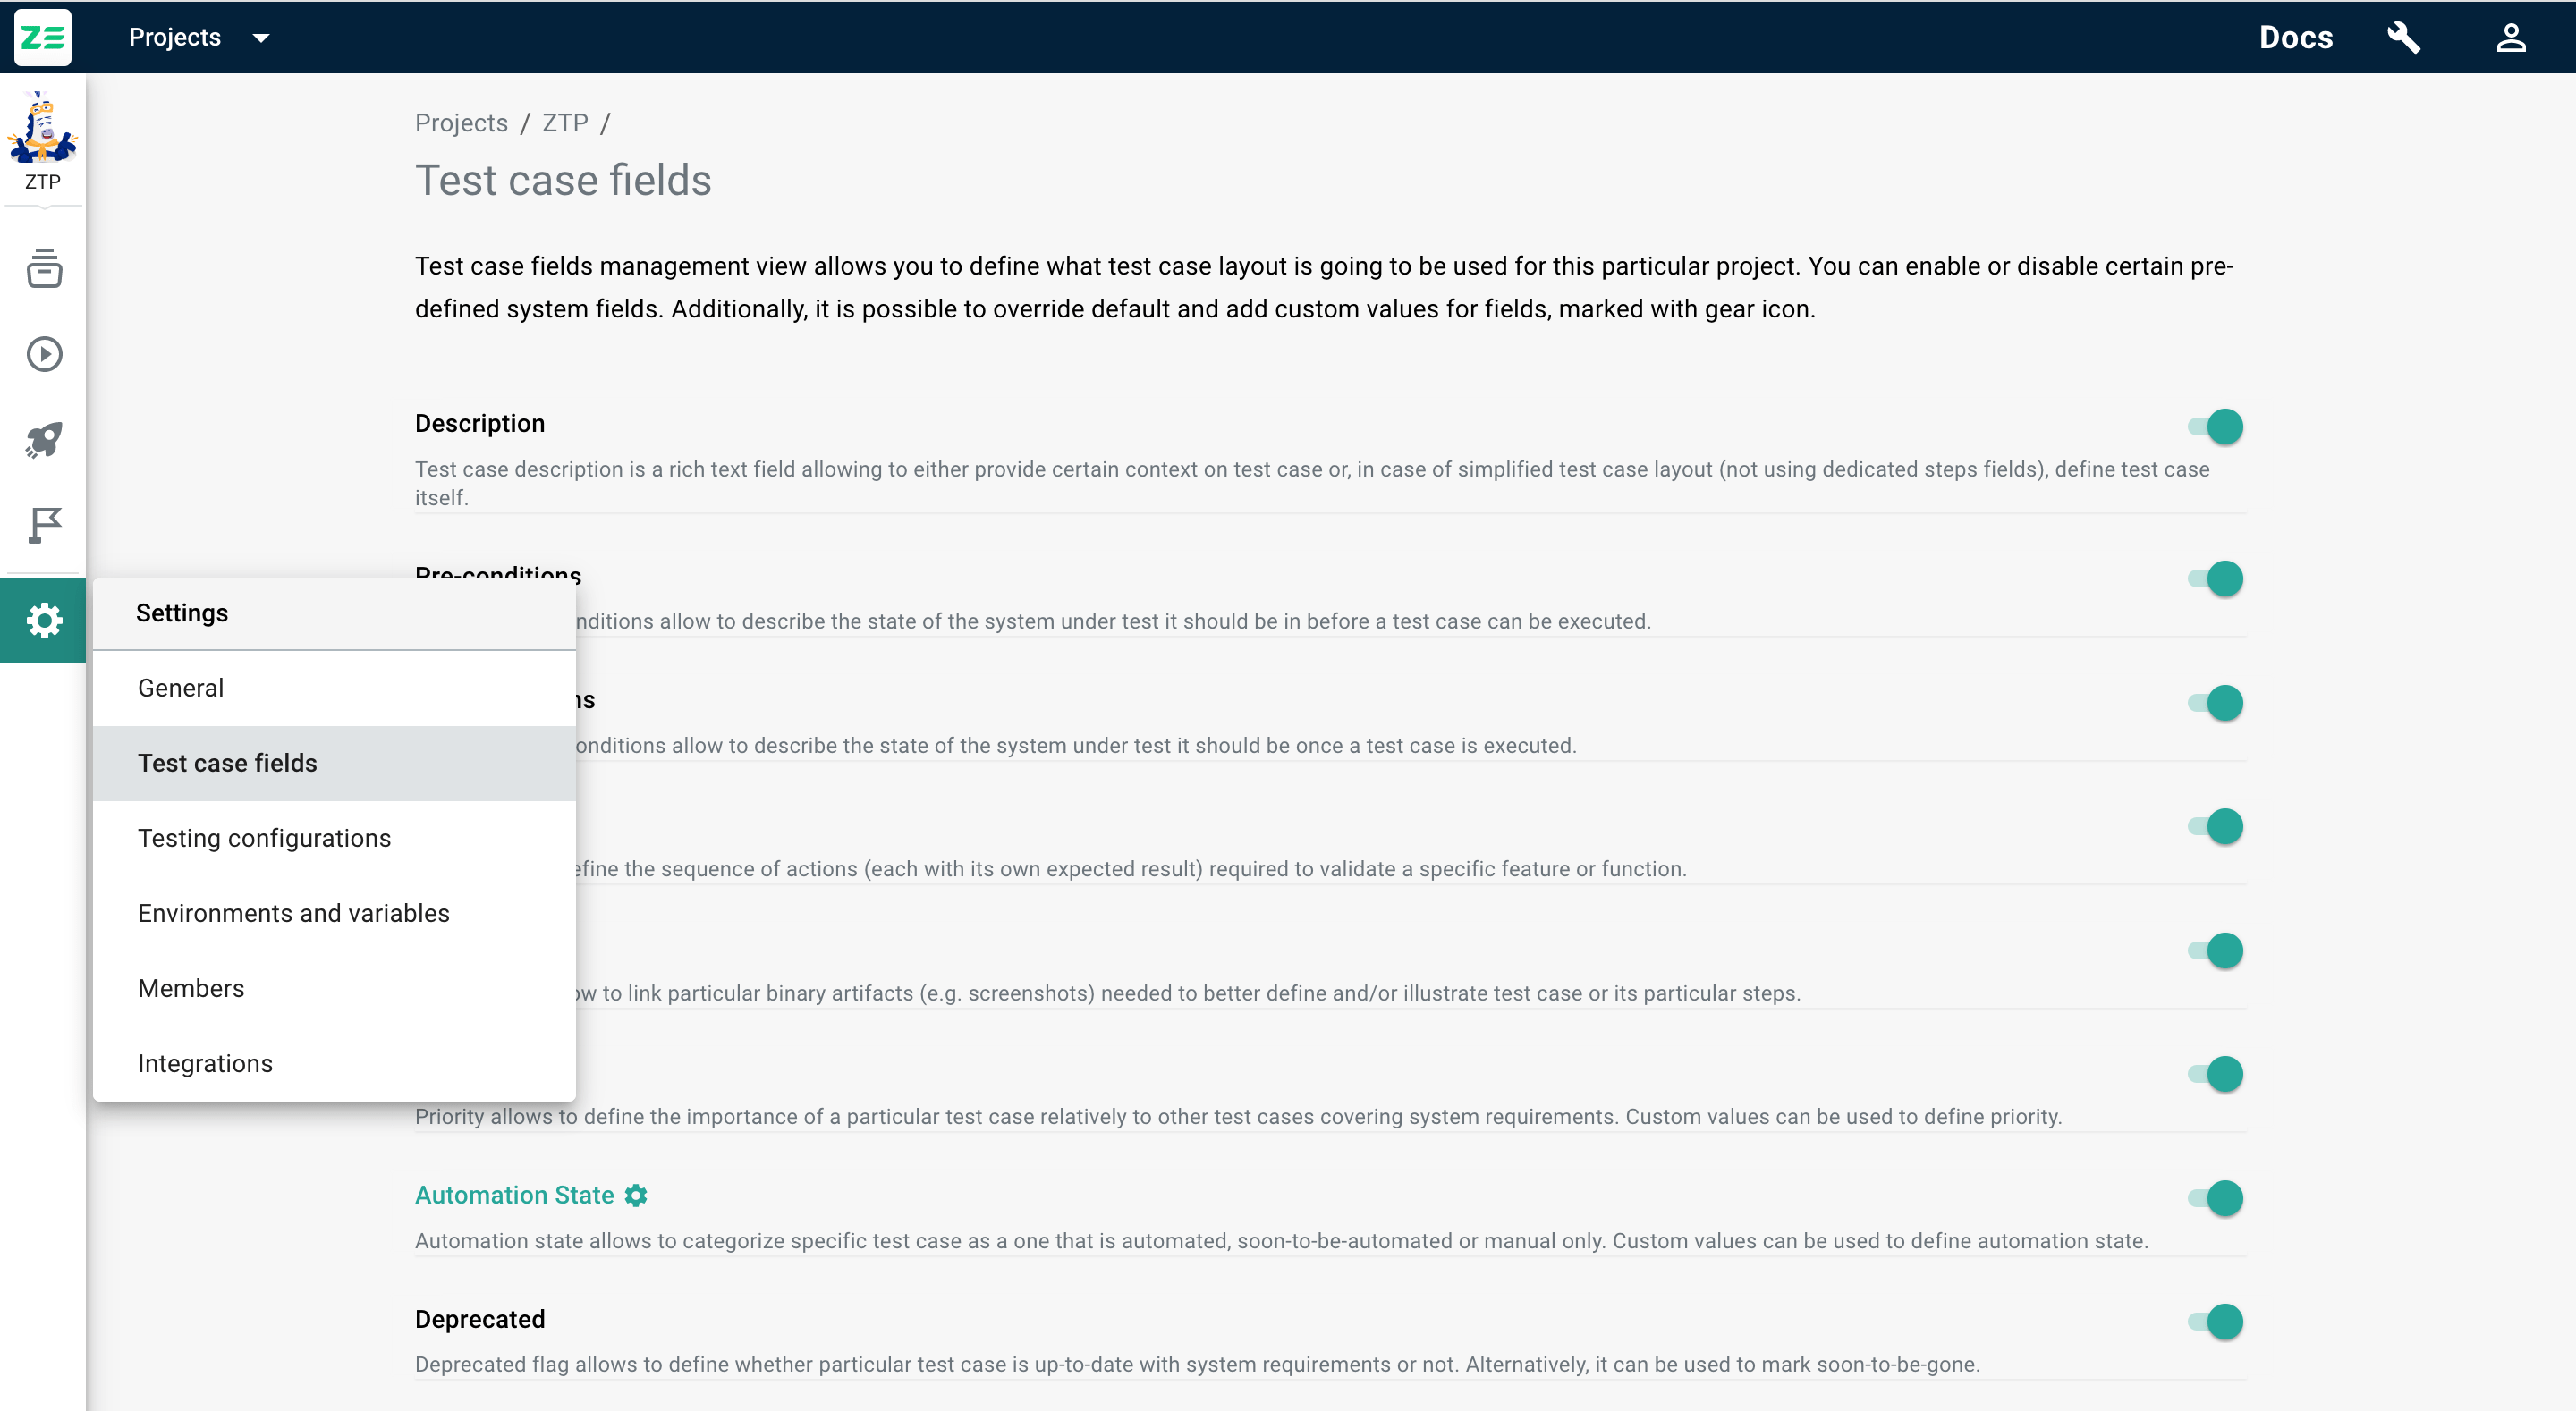
Customizing the test case layout [Professional+]#
It is possible to alter the test case layout used for a particular project. You can:
- Enable or disable predefined test case fields and provide additional (or change default) values for them (if applicable)
- Add custom fields having one of the available data types
Changes to the layout will be applied for a current project only, meaning that every project can have its own layout.
Info
You need to be a project Administrator/Manager to manage test case fields.
In order to alter the test case layout, go to the project Settings ( in the sidebar) → Test case fields. From there, you can enable or disable certain default fields (excluding the Title that cannot be disabled).
Info
Disabled fields will disappear from the test case views, corresponding filters will disappear too. Nevertheless, disabling a field doesn’t delete its values, so it’ll still be available if the field is turned on later.
Additionally, it is possible to modify (edit predefined and add new) values (and icons for those) for Priority and Automation State. To do that, click on the next to the field name. The view will appear, allowing you to add, alter or re-arrange existing possible values, as well as select the Default value (it’ll be automatically selected while creating a test case until changed to another value manually).
Info
Please note that the order of values is taken into account when those fields are part of sorting conditions for test cases (for instance, for the Priority field).
Test case field data types#
There are multiple data types that you can use when you create custom fields. Please see field data types breakdown in a table below:
| Type | Description |
|---|---|
| Date | Allows you to define a test case field that can have date as a value. Default value can be assigned. For default values, there are two possible options: default value can be set to a specific date; default value can be computed automatically relatively to the date of the test case creation. You can either configure it to use current date or define a shift relative to current date. |
| Dropdown | Allows you to define a test case field that can have one value from the pre-defined list. In addition to that, values can have icons, associated to them. Default value can be assigned. |
| Multi-Select | Allows you to define a test case field that can have multiple values from the pre-defined list. Default value or set of values can be assigned. |
| String | Allows you to define a test case field that can have single-line string of plain text (without formatting) as a value. Default value can be assigned. |
| Text | Allows you to define a test case field that can have a long multi-line rich text (with formatting) as its value. Default value can be assigned. |
| URI | Allows you to define a test case field that can have a URI its value. Markdown syntax for URIs is supported, allowing you to use human-friendly aliases/names for URIs. Default value can be assigned. |
| User | Allows you to define a test case field that can have another system user reference set as a value. Default value can be assigned. |
Info
Adding a custom filed to the test case will also render a corresponding test repository filter component that can be used to narrow down test cases based on that field value.
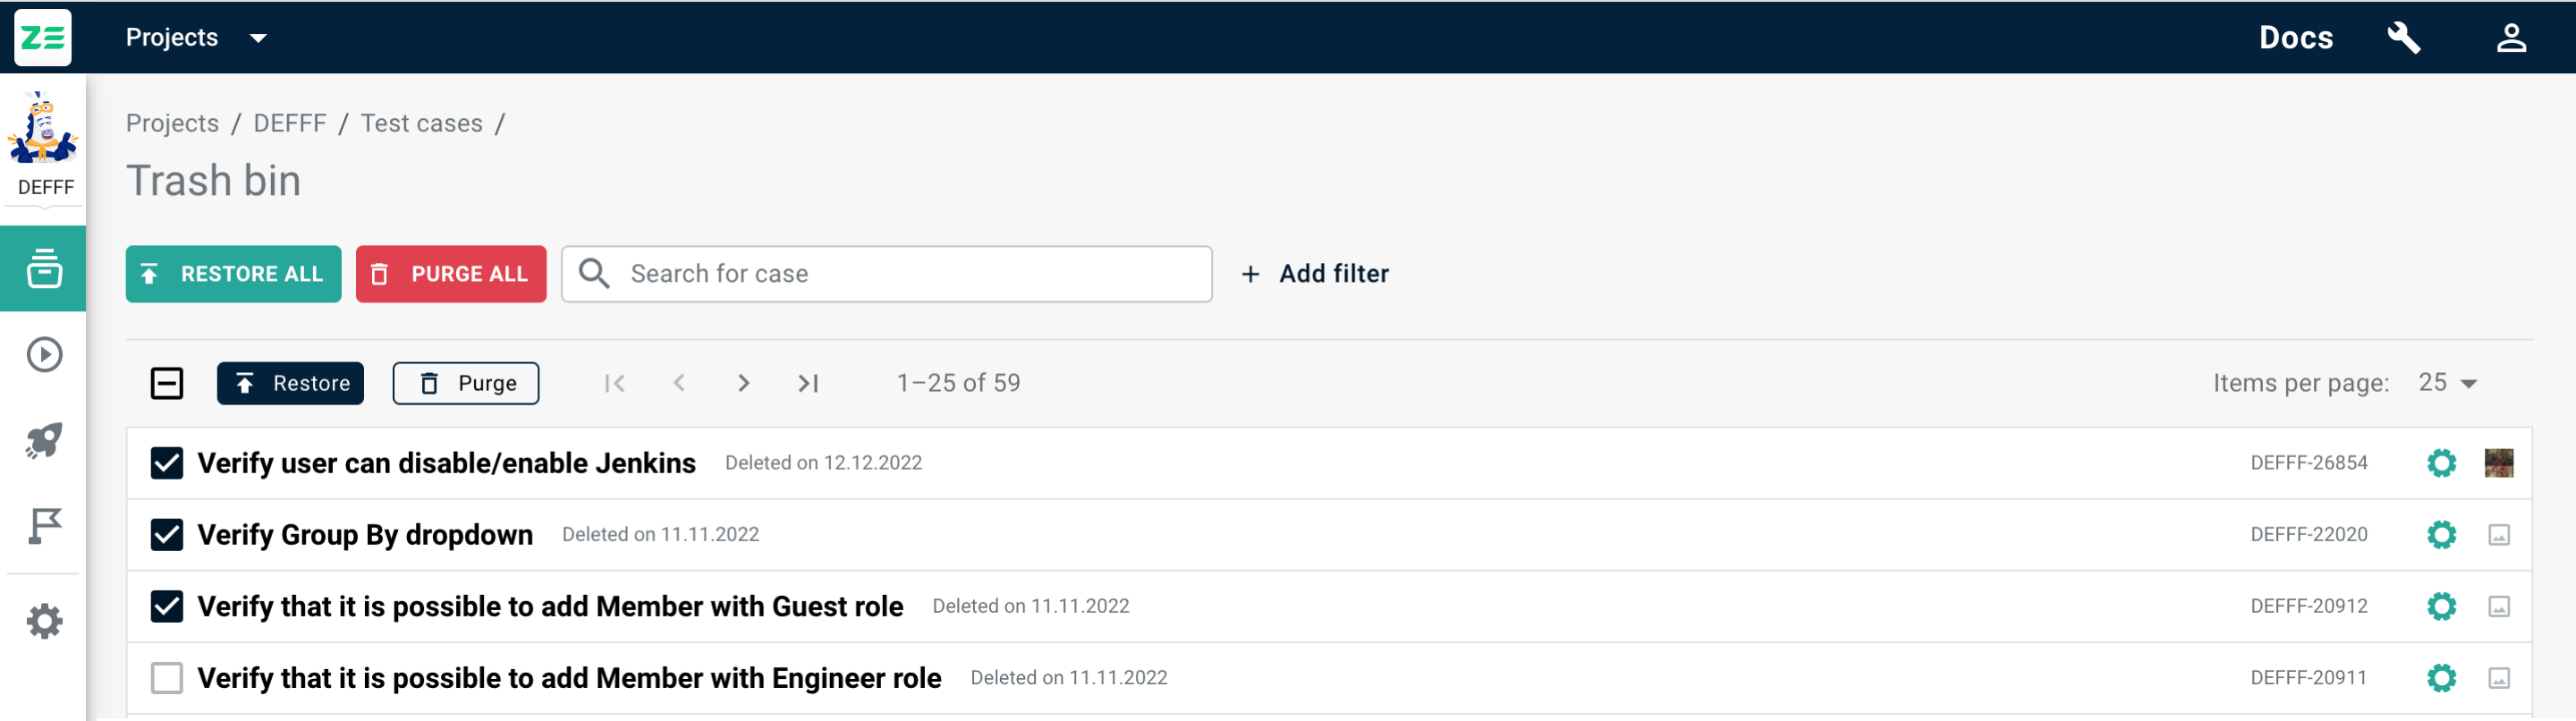
Using the trash bin [Professional+]#
Deleting test cases from the test repository does not remove them completely from the system. Test cases are first placed into a trash bin from where you can restore them or purge completely.
You can access the Trash bin from test cases grid by clicking the button at the top-right corner of the page.
Restoring cases#
To restore one or several test cases, go to the Trash bin page and perform the following actions:
- Select the cases that you want to restore and click Restore button
- Select the parent suite to place the restored test cases
- Click Restore again
Alternatively, you can restore all the test cases at once by clicking Restore all at the top of the page.
Purging cases#
To purge one or several test cases, go to the Trash bin page and perform the following actions:
- Select the cases that you want to purge and click Purge button
- Confirm your action by clicking Purge again
Alternatively, you can purge all the test cases at once by clicking Restore all at the top of the page.
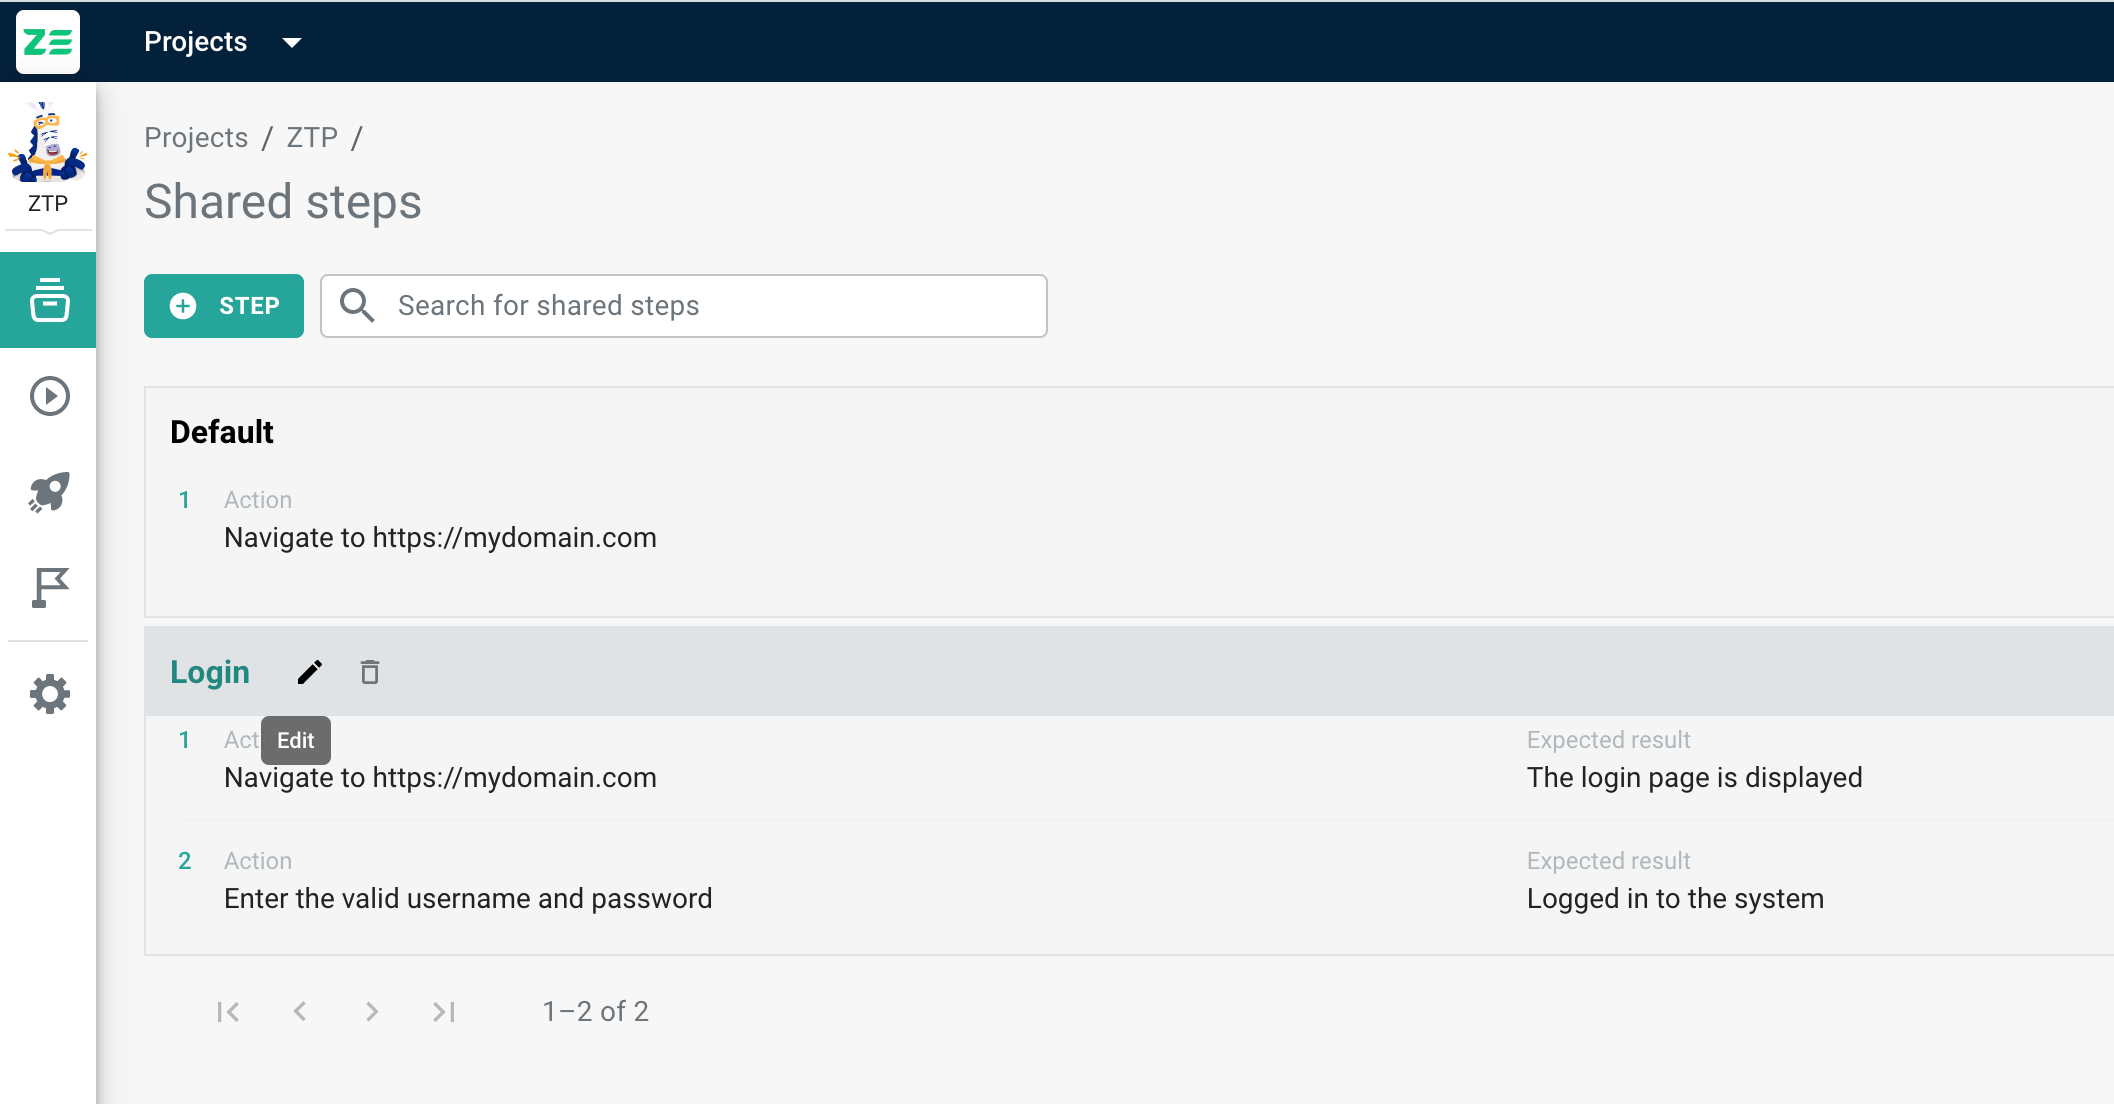
Using shared test steps#
Shared steps represent a sequence of steps (or just one step) that can be reused (shared) between multiple test cases. Usage of shared steps aims to reduce content duplication and simplify future maintenance of test cases.
Steps are always included into other cases as a group - if you modify a sequence later by adding more steps (or removing some of them) - the changes will be reflected in test cases that use these sequences.
Creating shared steps#
To create a new shared step, go to the Test repository → Shared steps grid and perform the following actions:
- Click +Step
- Fill out all necessary fields, add additional steps if needed
- Click Create
The new sequence will be added to the grid. You can now include your shared steps to test cases.

Using shared steps in test cases#
To insert a shared step to a test case, go to the Test repository → Test cases grid and perform the following actions:
- Navigate to an existing test case or start creating a new one
- Under the steps, click +Shared step
- Select the needed shared step from the list and click Add
Selected steps will appear in a test case creation/edit form. Proceed with more changes if needed and save the test case.
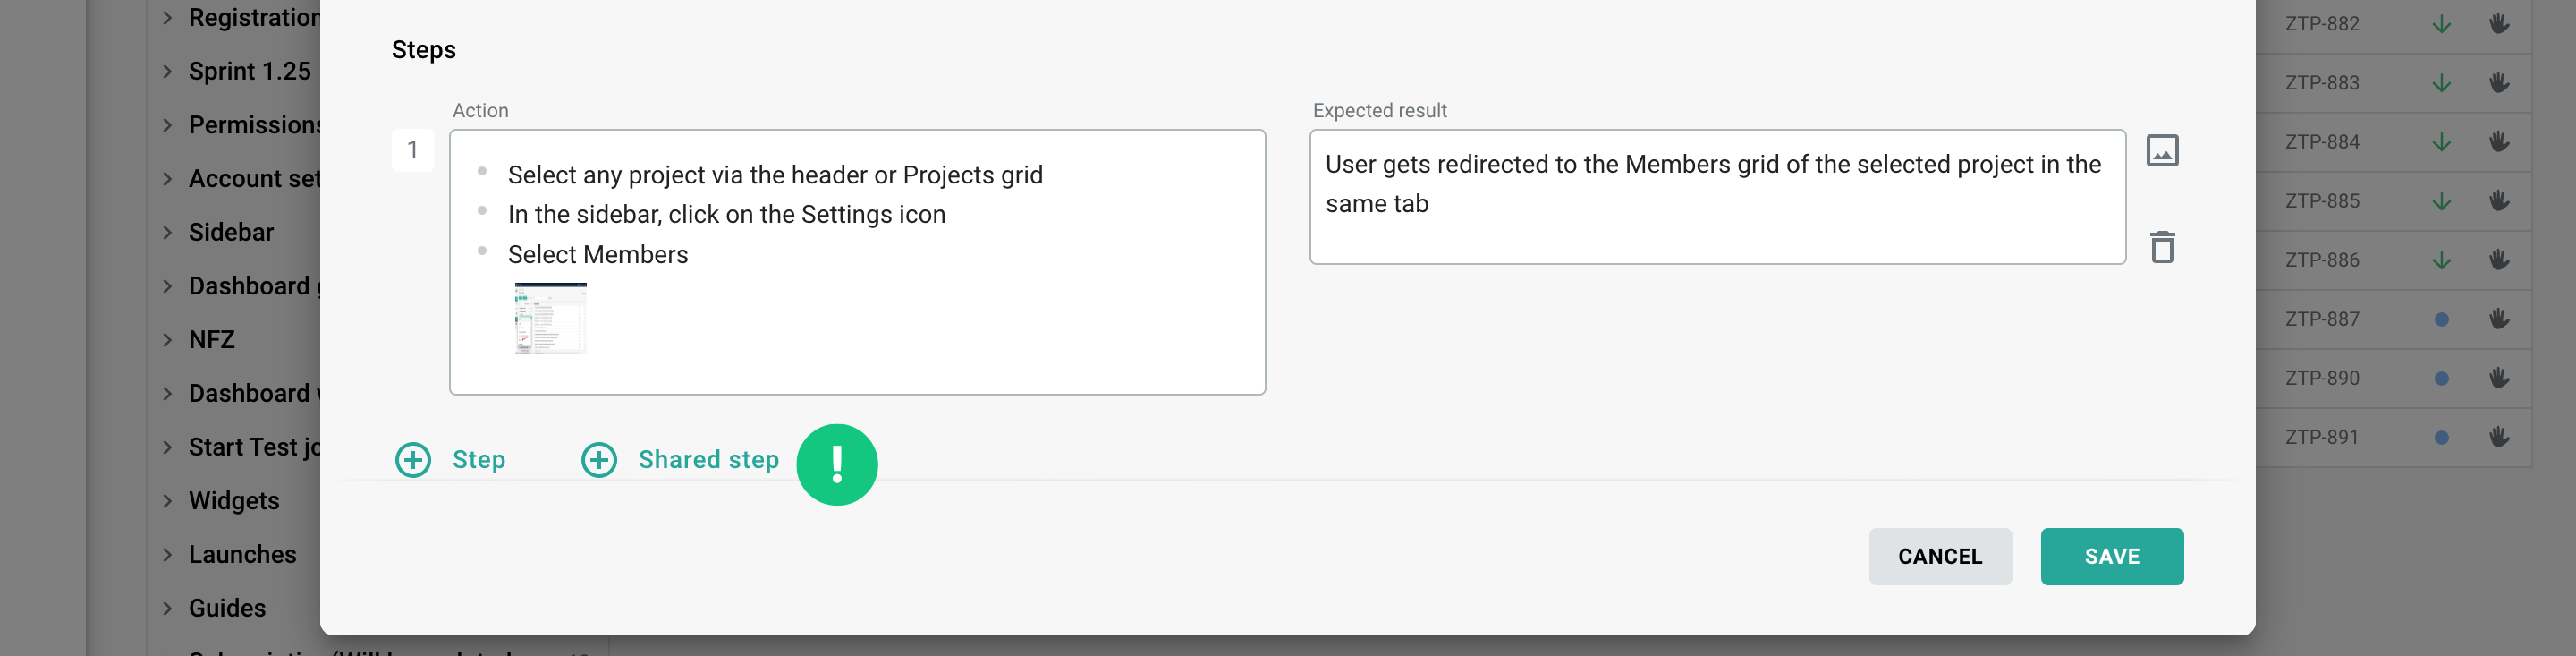
Info
After adding a shared step to your test case, you can delete it by clicking the Delete beside it.
Info
Shared steps can be converted to a set of “regular” steps on test case creation. To do this, after adding a shared step to your test case, click the Edit to the right. This action will convert them to “regular” steps that you now can alter or re-arrange.
Editing shared steps#
To edit a shared step, go to the Test repository → Shared steps grid and perform the following actions:
- Hover over the shared step to edit and click the Edit to the right of the step title
- Make the necessary changes to the shared steps and click Save
The update will be applied to the shared steps (and reflected in all cases that use them).
Deleting shared steps#
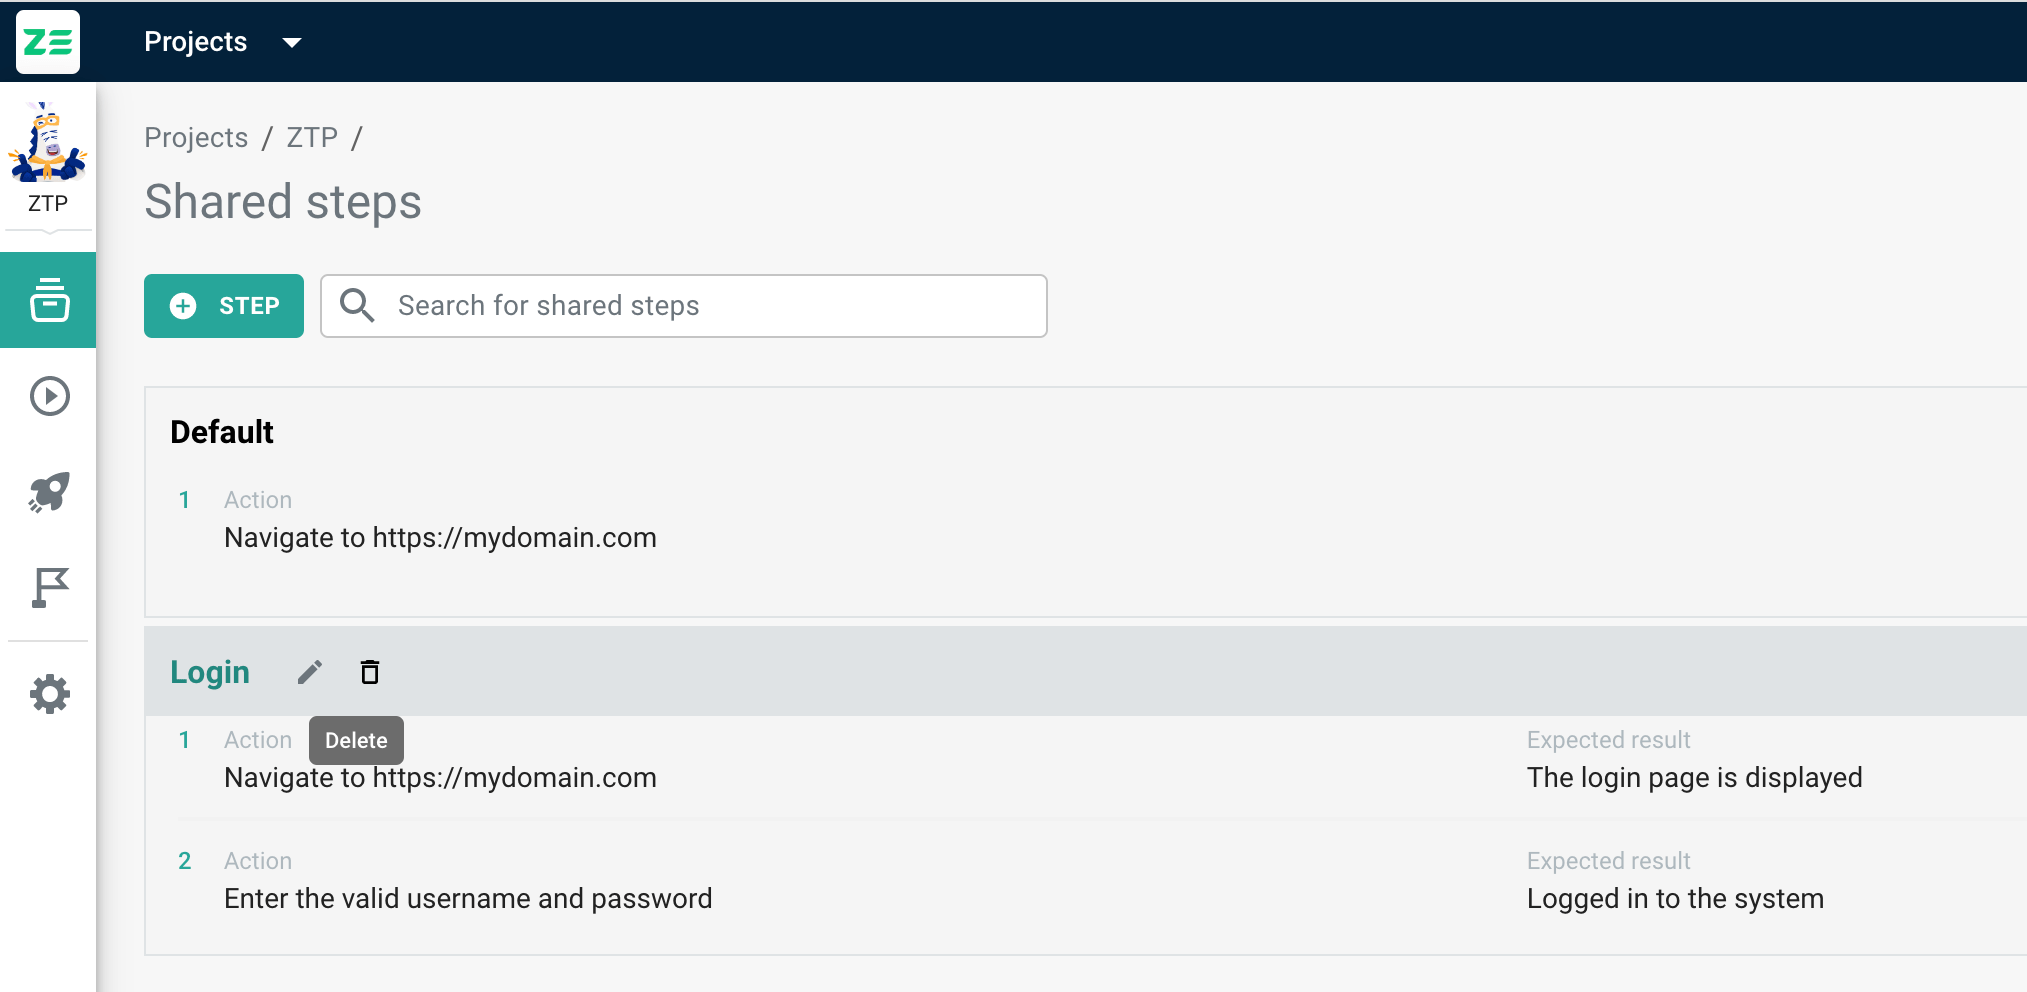
To delete a shared step, go to the Test repository → Shared steps grid and perform the following actions:
- Hover over the shared step to and click the Delete to the right of the step title.
- Confirm action by clicking Delete
The shared step will be deleted from the system, as well as from all the test cases where they have been added.